Introduction to Test Development
Test Development in FireFlink enables the creation and management of automated tests for Web, Android, iOS, and API applications. The platform provides a comprehensive set of tools that help test engineers design, organize, and execute test scripts efficiently.
The Role of Test Development In FireFlink
- Test development centralizes all automation scripts in a structured and organized manner.
- The process begins with creating a Module, which serves as a container for scripts and sub-modules.
- A single module can contain multiple scripts and nested sub-modules for better organization.
- Sub-modules can further include additional scripts and modules, allowing scalable test structuring.
- Test scripts are created by adding NLP steps through the Steps page.
- Once all steps are configured, scripts can be executed using the Run option.
Pre-Requisites
To get started, the user must first create a new project in FireFlink before proceeding with test development.
Navigation
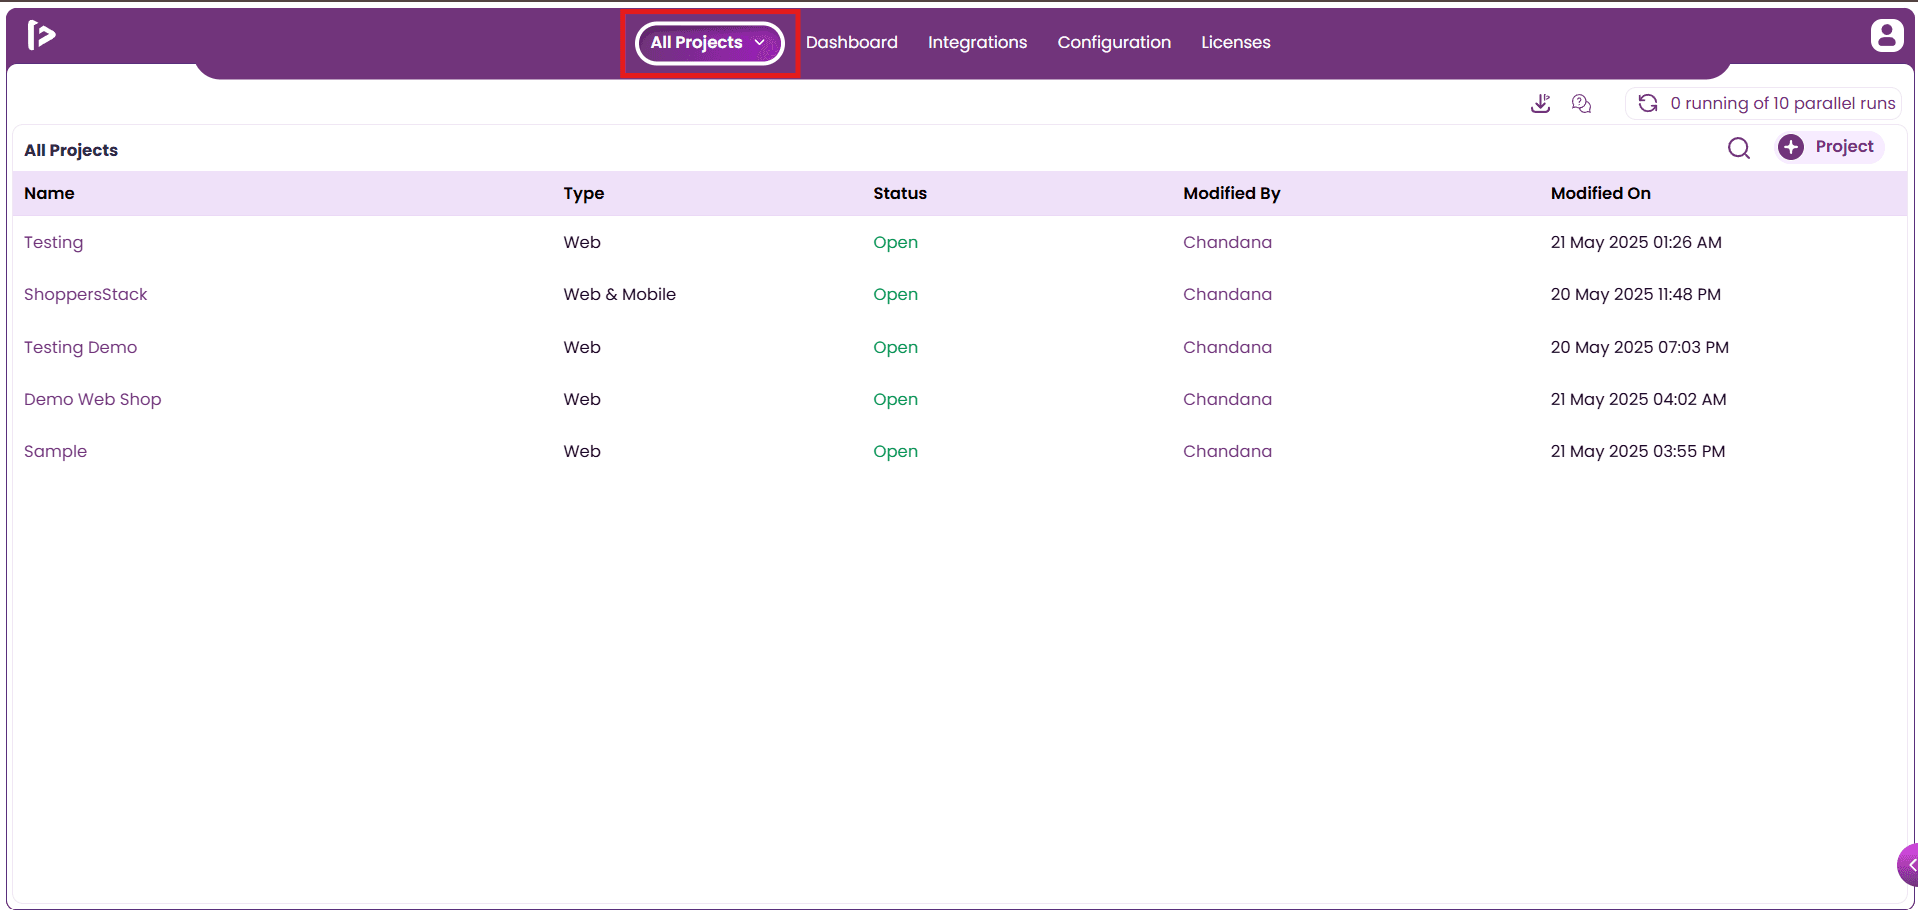
- User can navigate to Individual Project by clicking on the All Project button as shown below
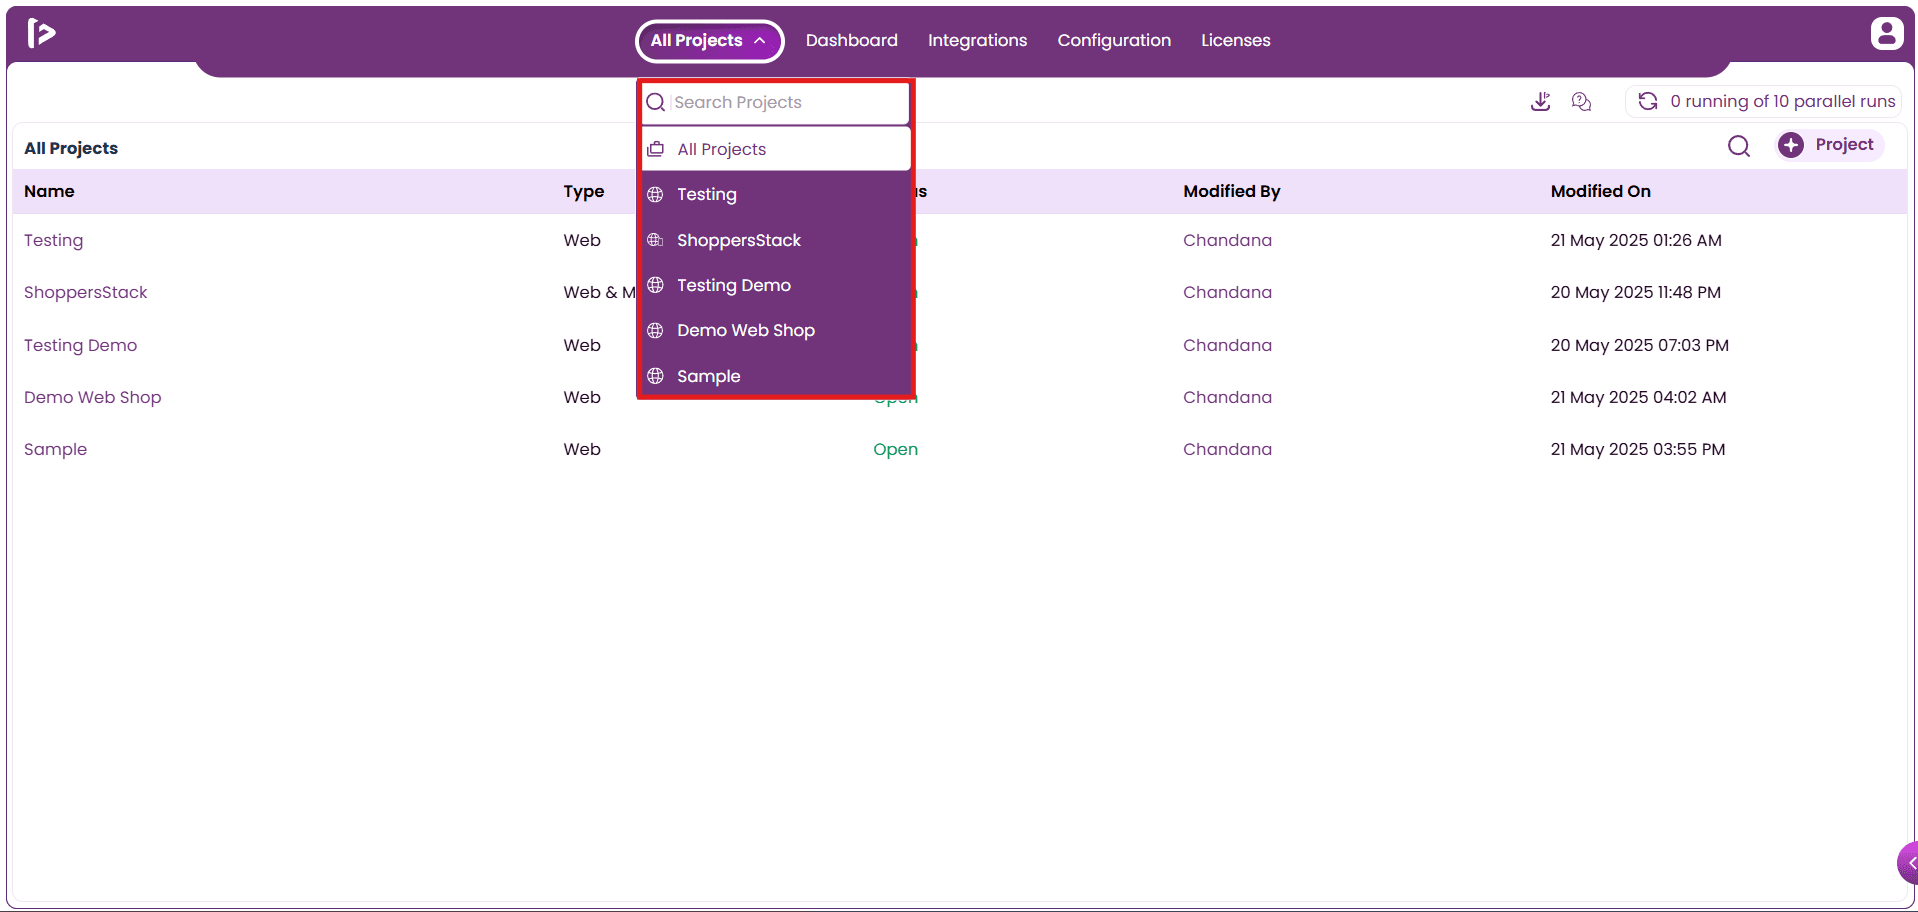
- Upon hovering on it, user will able to get options to select the project as shown below
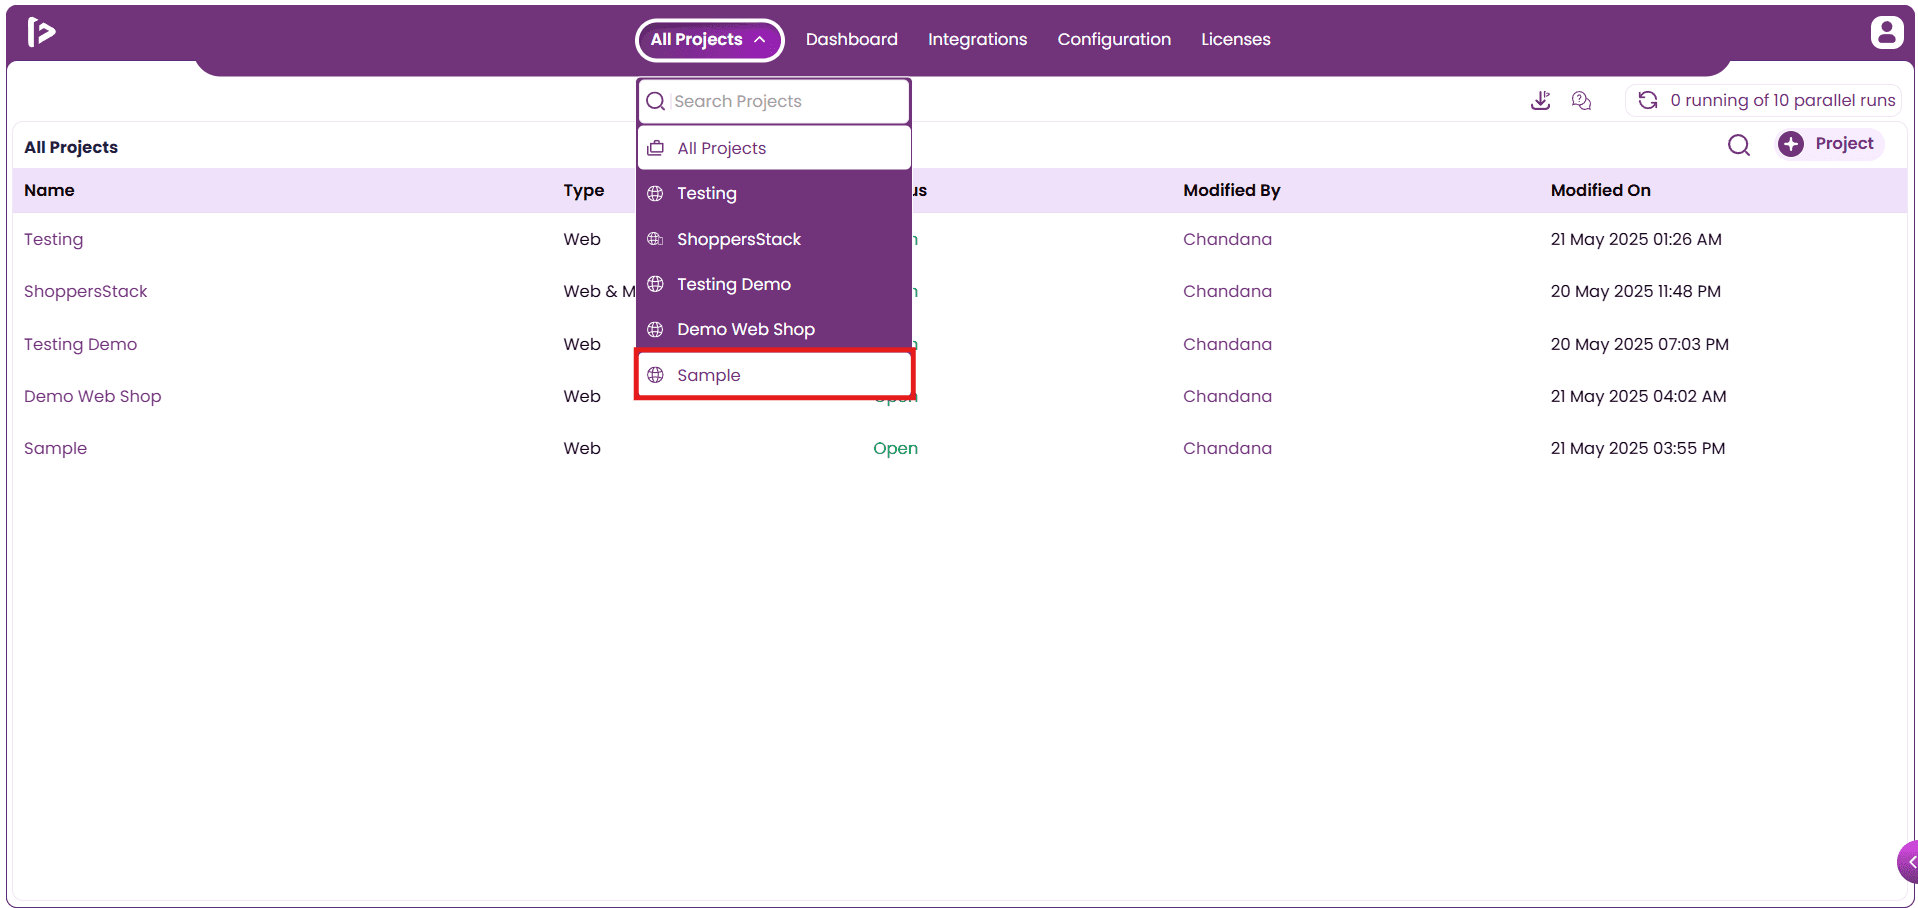
- Click on the project user want to navigate as shown below
- Upon clicking on the project, User will be navigated to individual project Level and user can view the top navigation bar. By default the user will be navigated to the Test development section
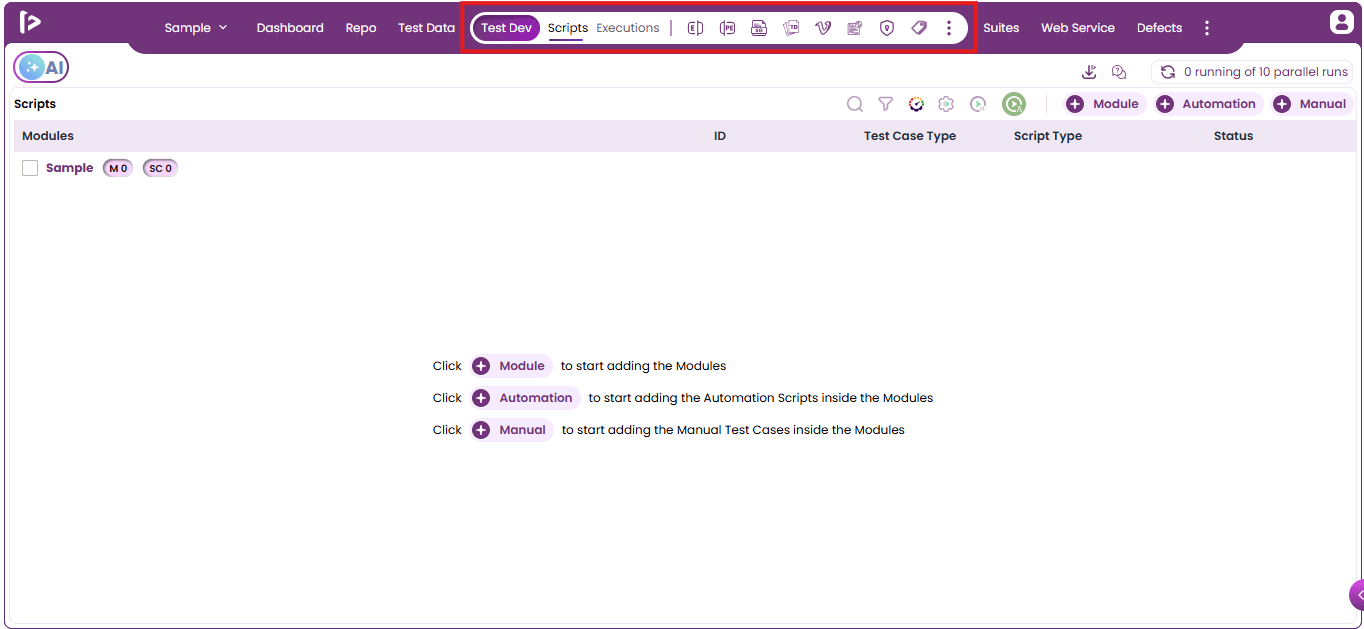
Importance of Modules In FireFlink
Modules in FireFlink act as containers that help organize automation assets within a project. A module can hold both automation scripts and manual test cases, making test management structured and easy to maintain.
Modules are typically created based on the application flow or features, allowing teams to better understand and manage test coverage.
Steps To Create A Module
There are different ways to Add a Module in Test Development
- Using + Module Button
- Using + icon beside ProjectName Module
Method 1 : Using + Module Button
- Click on +Module button.
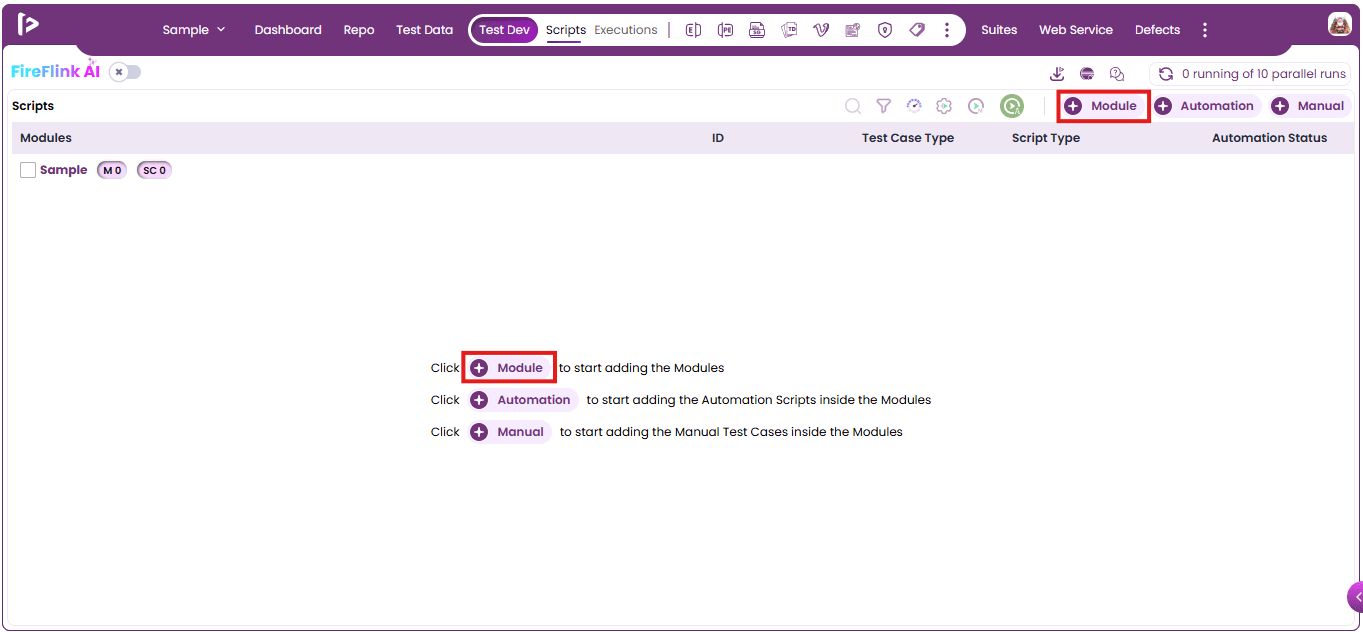
- The Create Module slider will appear.
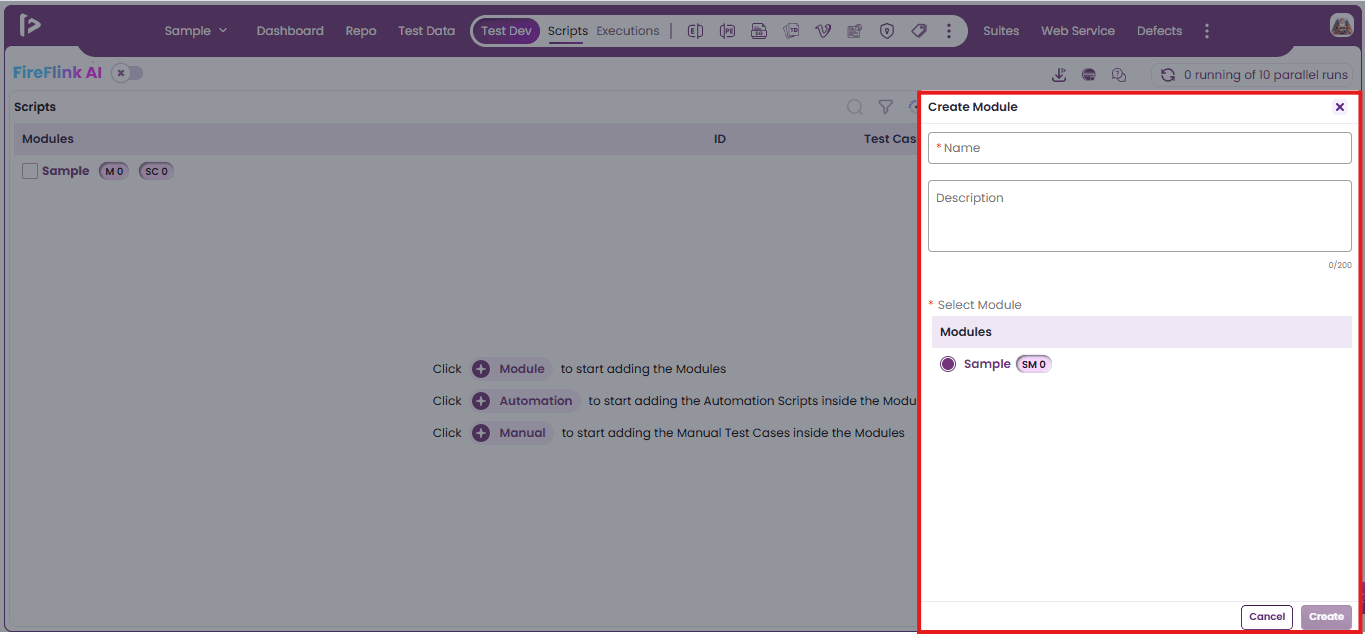
- Fill in the mandatory Name field and, if needed, include a Description for the module
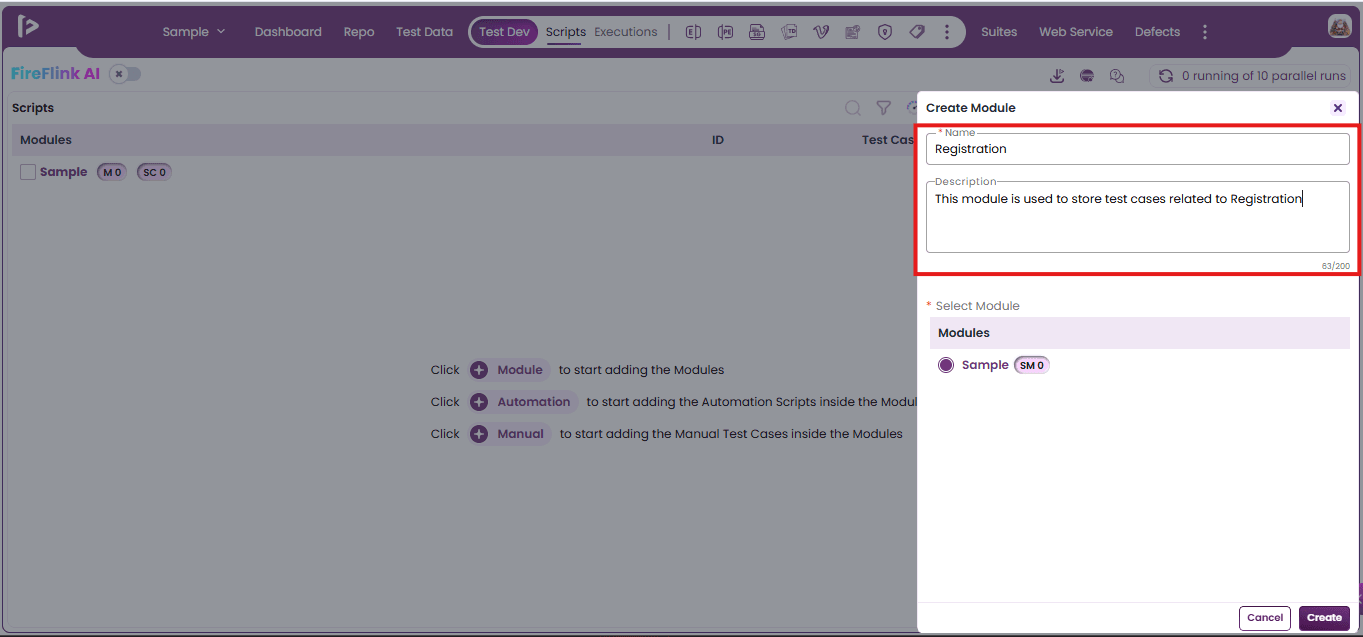
- Select the parent module under which the new module should be added. Note: If a user is adding a module for the first time, the Project Name will be selected as the parent by default.
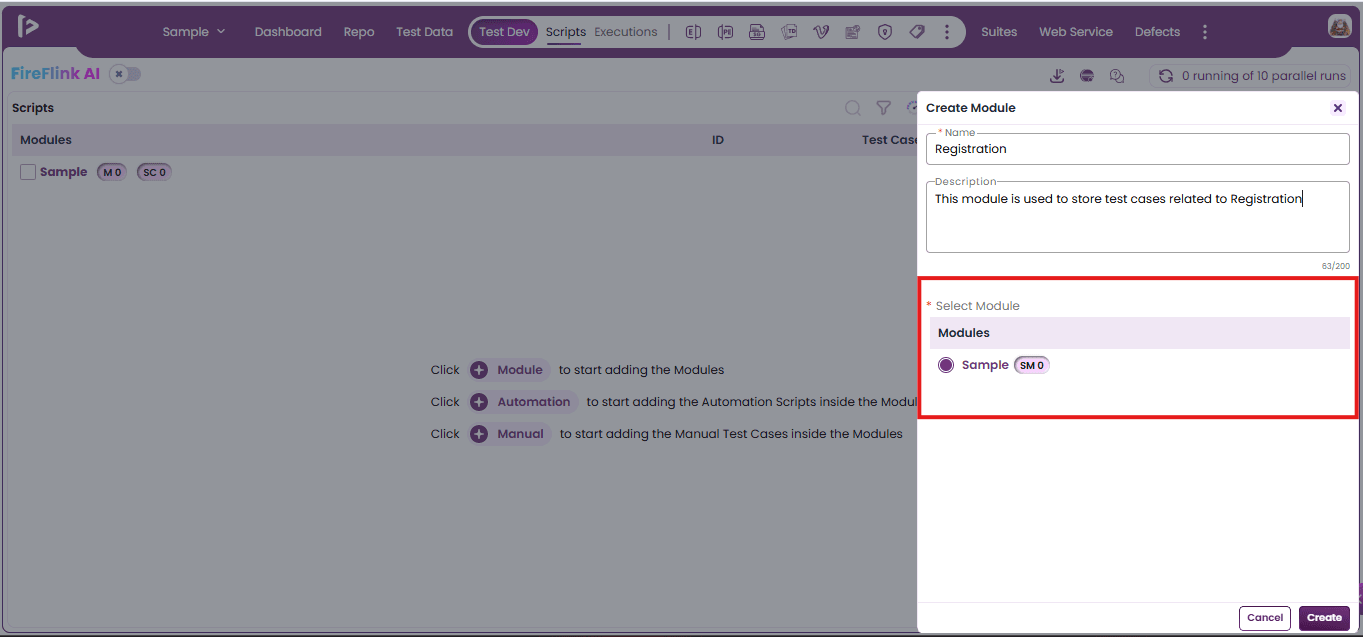
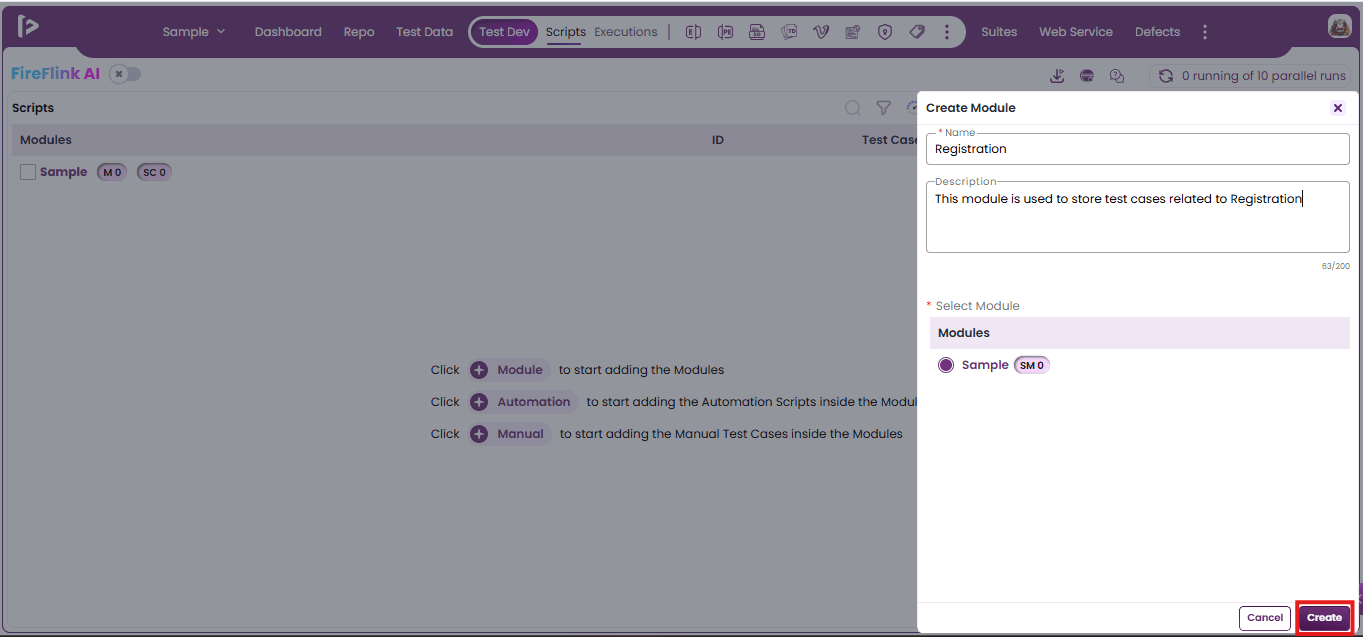
- Click on Create button
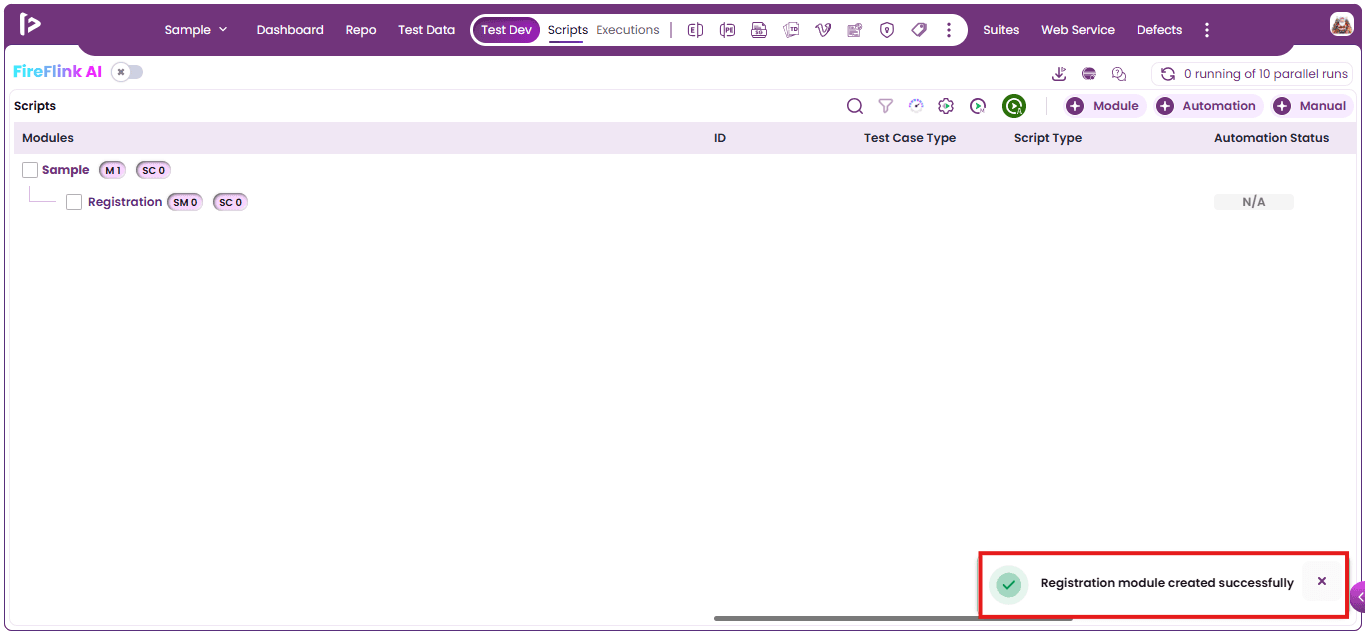
- Module created successfully message will be displayed as shown below
Method 2 : Using + icon beside ProjectName Module
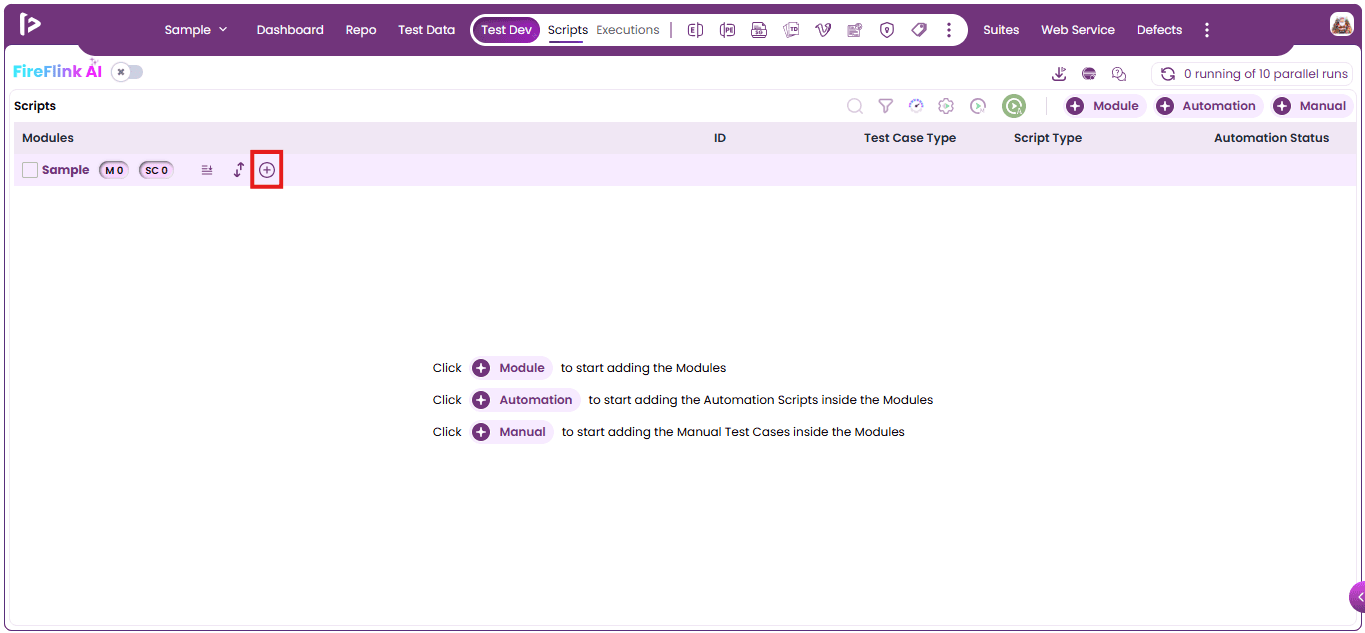
- Mouse hover on the Project Name Module and click on the + icon as displayed below
- Click on the Right Arrow pointer as displayed below
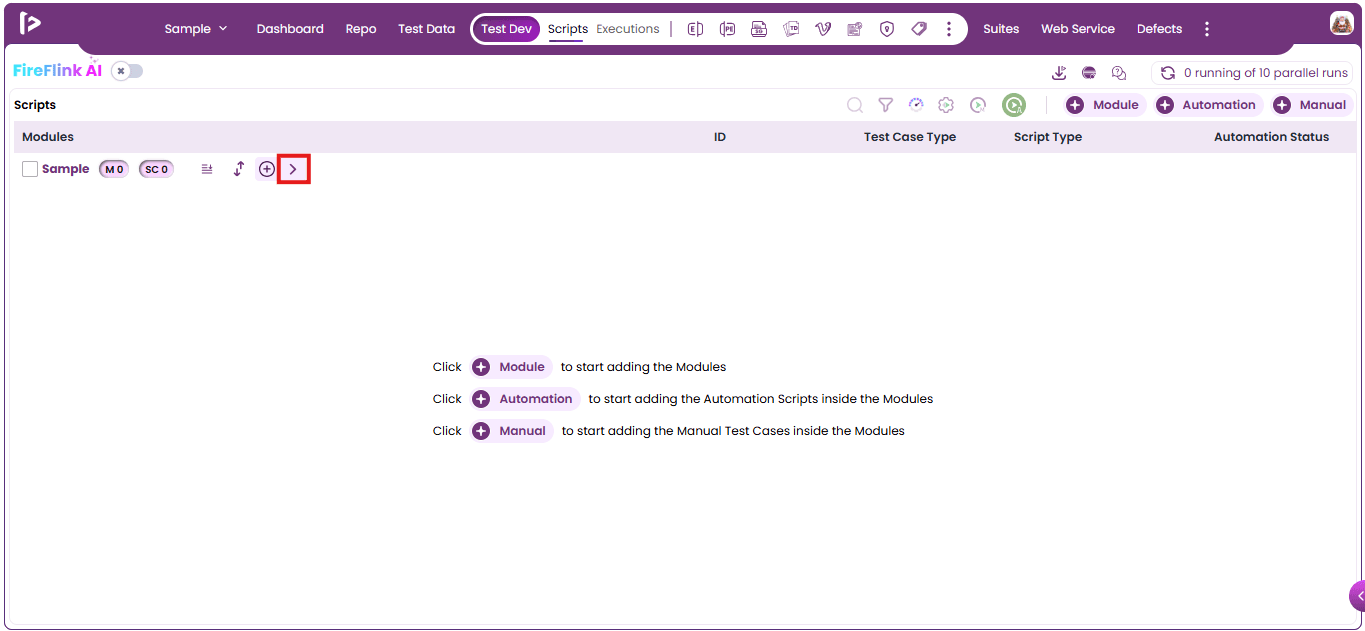
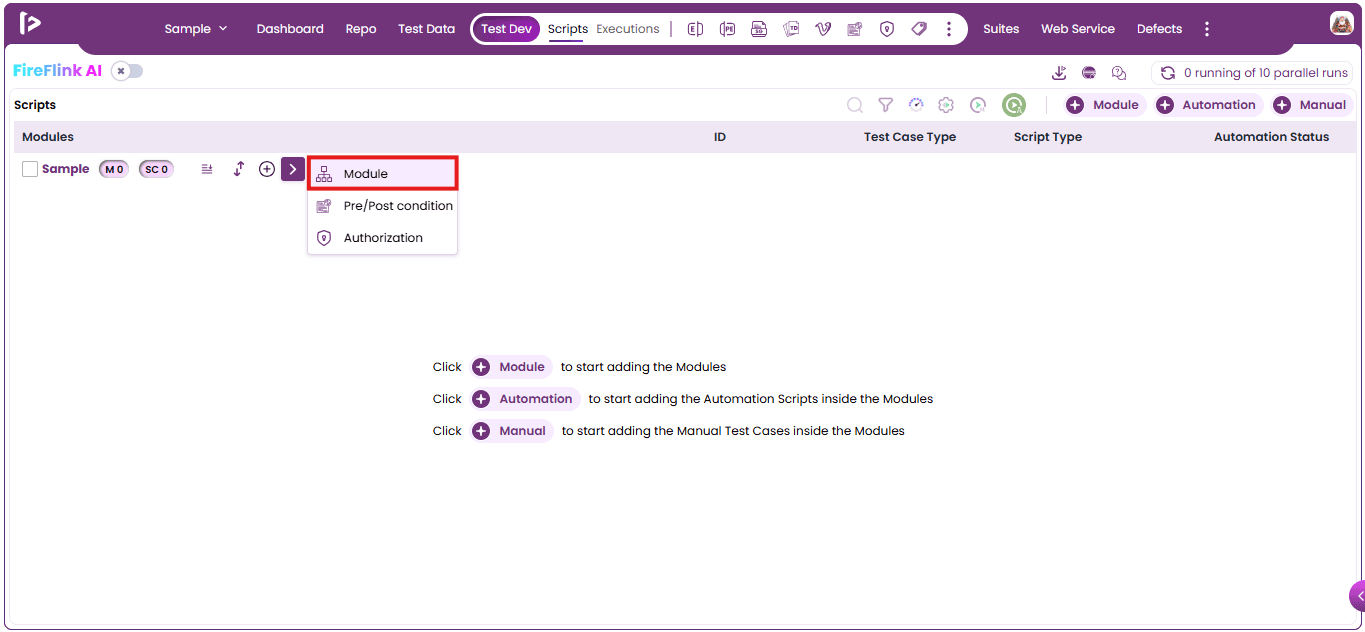
- Upon clicking on the right arrow pointer, user can able to view multiple options wherein user can select the Module Option as displayed below
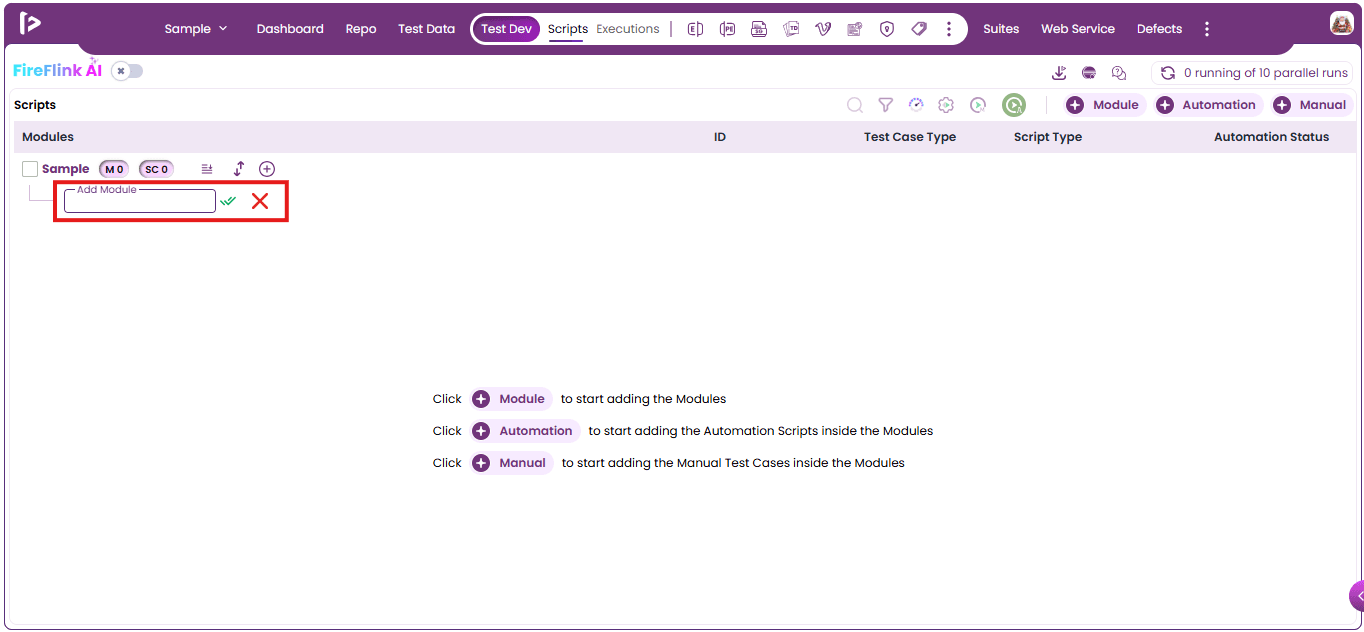
- User can view a textfield wherein user can able to add the module name as shown below
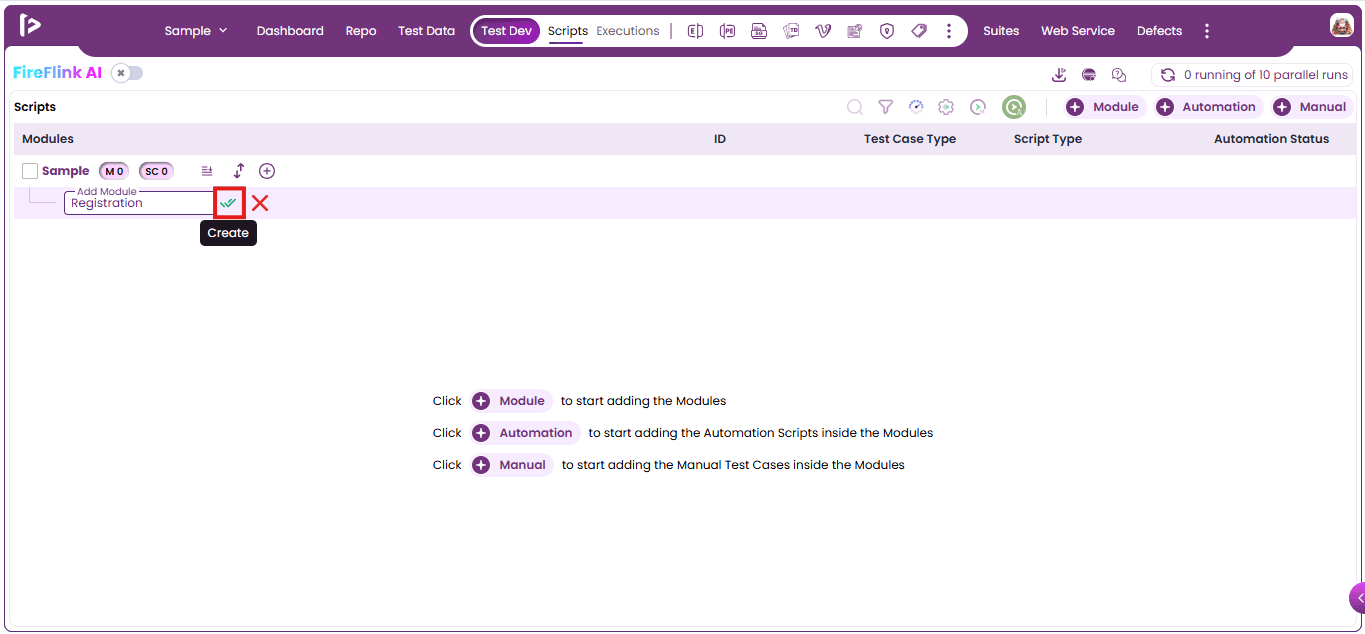
- User can able to click on create icon as shown below
- User will able to view the successful message upon creating a module as shown below
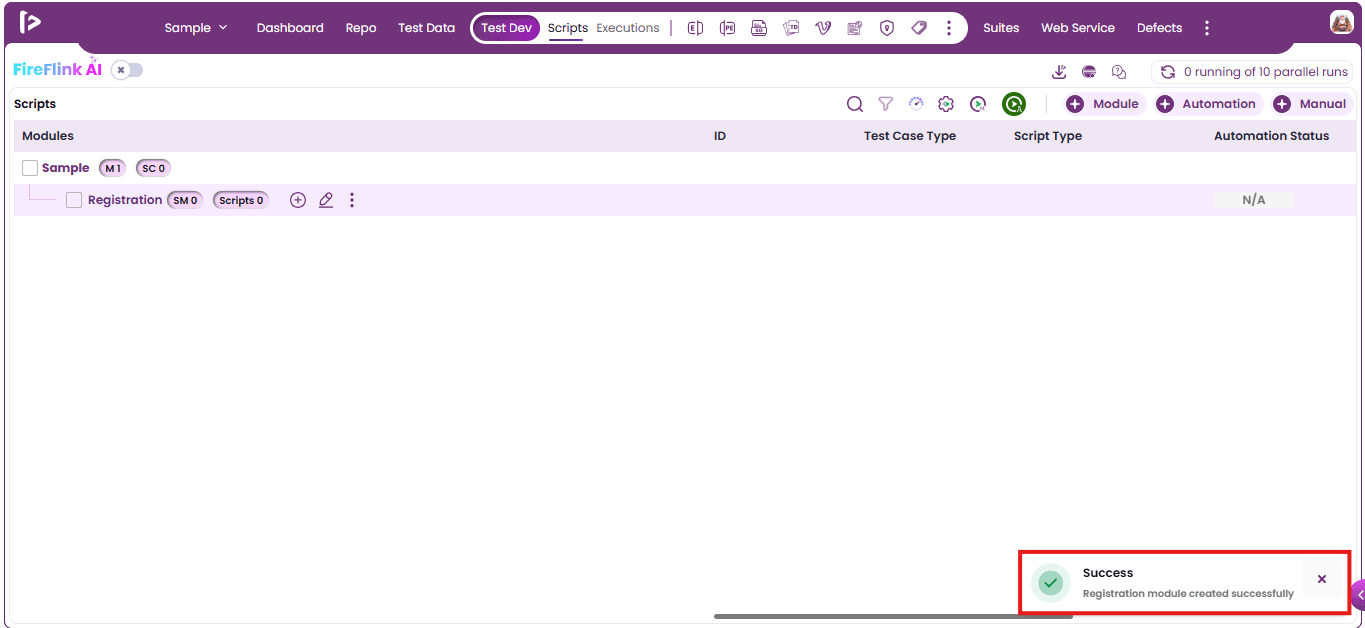
Column Descriptions In Module View
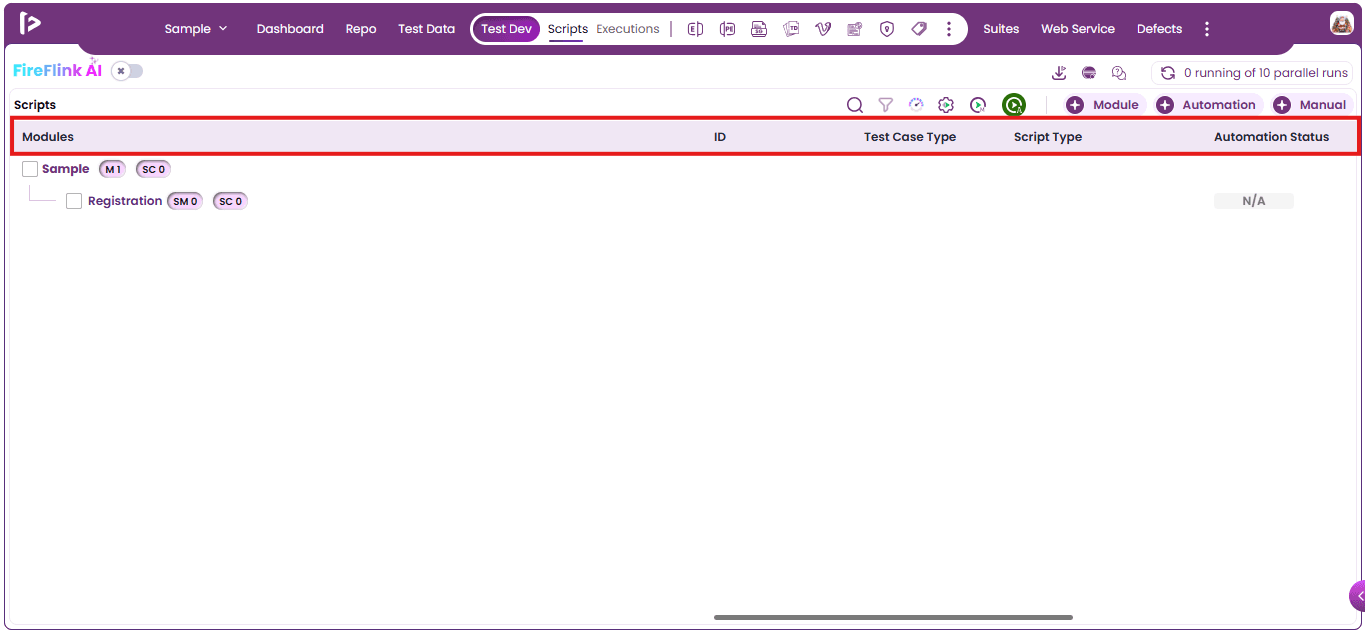
- Modules
- This column displays the structure of the Module Tree.
- The Module Tree contains all Sub-Modules, Scripts, and Pre/Post Conditions.
2. ID
- This column displays the unique Test Case ID associated with each script.
- The Test Case ID is automatically generated by the platform.
3. Test Case Type
- This column displays the “Test Case Type” of the script, indicating whether it is an automation or manual test case.
4. Script Type
- This column displays the “Type” of the script, as selected by the user during the script creation process.
- The script type varies depending on the selected project type.
- This column will be empty for Module and Sub-Module rows. Supported Script Types by Project Type:
i. Web Project:
- Supported types: Web, Web Service, Database
ii. Mobile Project:
- Supported types: Android, iOS, Android & iOS, Android or iOS, Web Service, Database
iii. Web & Mobile Project:
- Supported types: Web, Android, iOS, Android & iOS, Android or iOS, Web and Mobile (Android & iOS), Web and Mobile (Android or iOS), Web Service, Database.
iv. Web Service Project:
- Supported types: Web Service, Database
5.Automation Status
- This column displays the execution status of scripts contained within Modules and Sub-Modules.
- The status of a Module or Submodule is evaluated based on the execution results of the test scripts contained within it..
- The column may display different types of statuses, which include:
- Partially Executed: When one or more test scripts within a Module or Submodule have not been executed at least once, the corresponding Module or Submodule is marked with the status Partially Executed. This indicates that execution is incomplete and some scripts are yet to be executed.
- Passed: When all scripts within a Module or Submodule have passed during the most recent execution, the status appears as Passed.
- Failed: When any script within a Module or Submodule fails in the latest execution, the status is shown as Failed.
- N/A: When a Module, Sub-Module, or script is newly created and has not yet been executed, its status will be displayed as N/A.
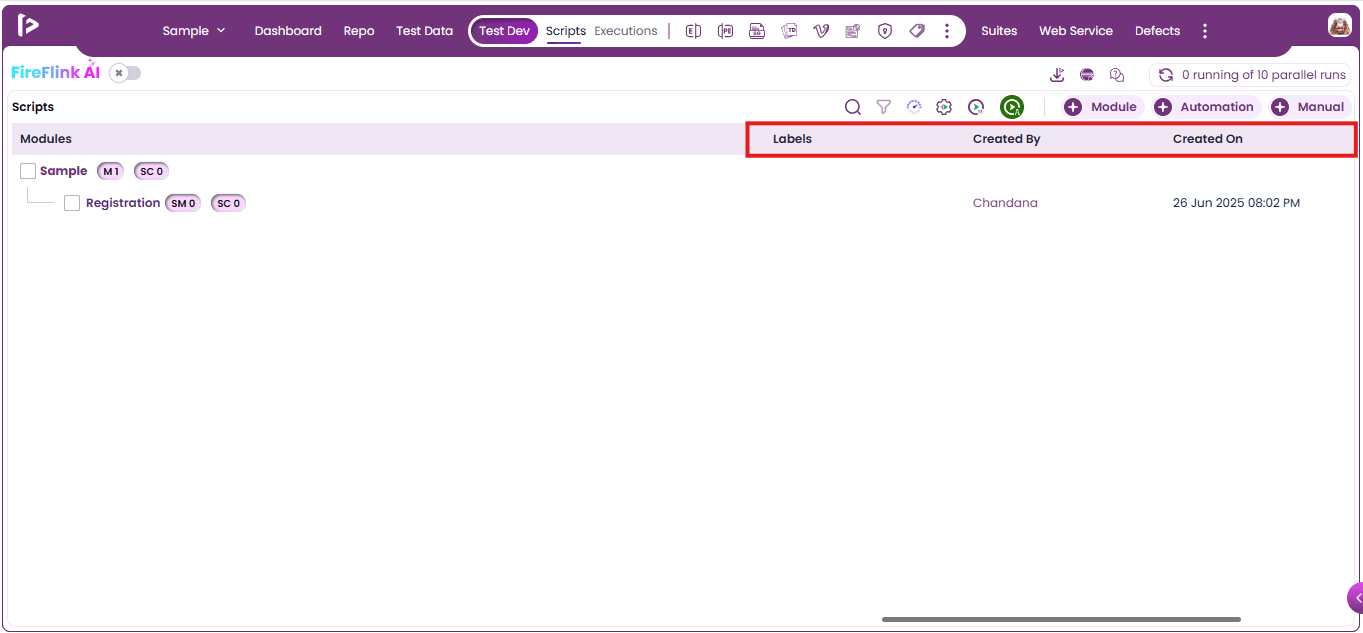
6. Labels
- This column indicates the type of testing performed for the corresponding script.
- This column is not applicable for Modules and Sub-Modules and will remain empty in those cases.
7. Created By
- This column shows who created the Module, Sub Modules, and scripts.
8. Created On
- This column shows the creation date and time of the Modules, Sub Modules, and scripts.
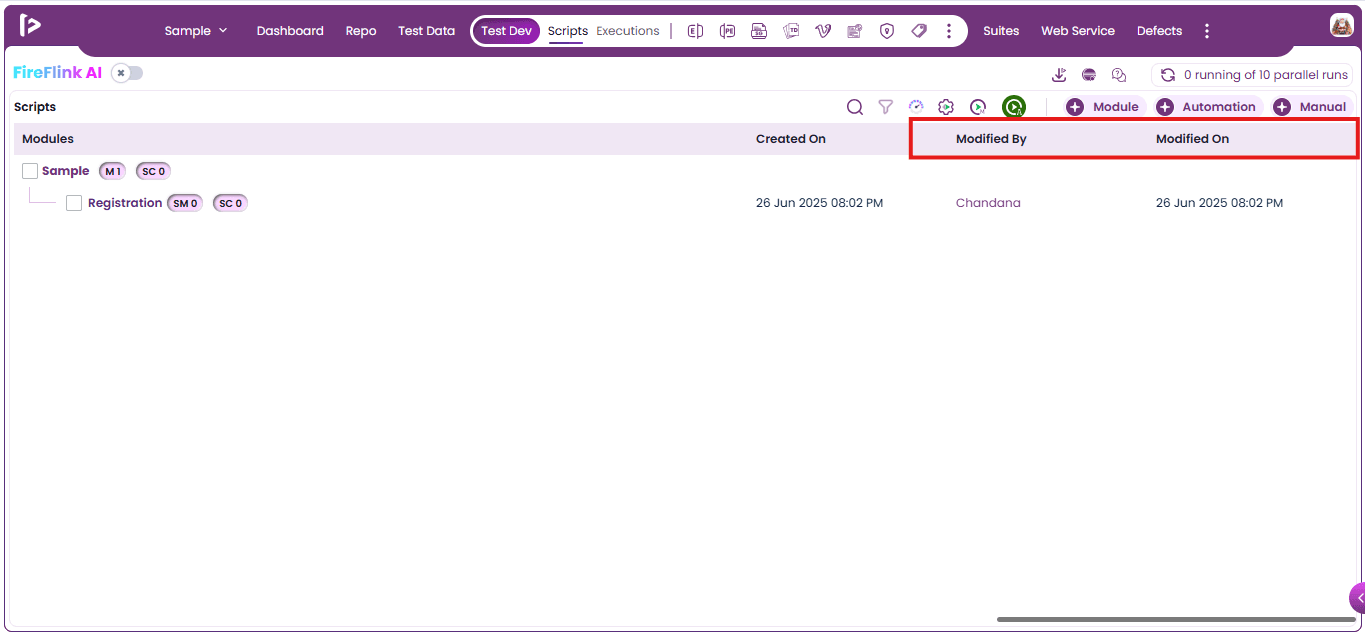
9. Modified By
- This column indicates who made the most recent modification to the Module, Sub Modules, and scripts.
10. Modified On
- This column displays the date and time of the most recent modification to the Modules, Sub Modules, and scripts.
Introduction to Sub-Modules
A Sub-Module is defined as a Module that is nested within another Module. Users have the flexibility to create multiple Sub-Modules under a single parent Module to support better organization and modularity. Each Sub-Module can, in turn, contain multiple Sub-Modules and scripts, enabling a structured and scalable test design.
Prerequisites for Creating a Sub-Module
Before creating a Sub-Module, it is mandatory to first create a parent Module.
Steps to Create a Sub-Module within FireFlink
There are primarily two methods to add a Sub-Module within FireFlink.
- Using + Module Button
- Using ‘+’ icon beside Module
Method 1: Using +Module button
- Click on + Module button as displayed below
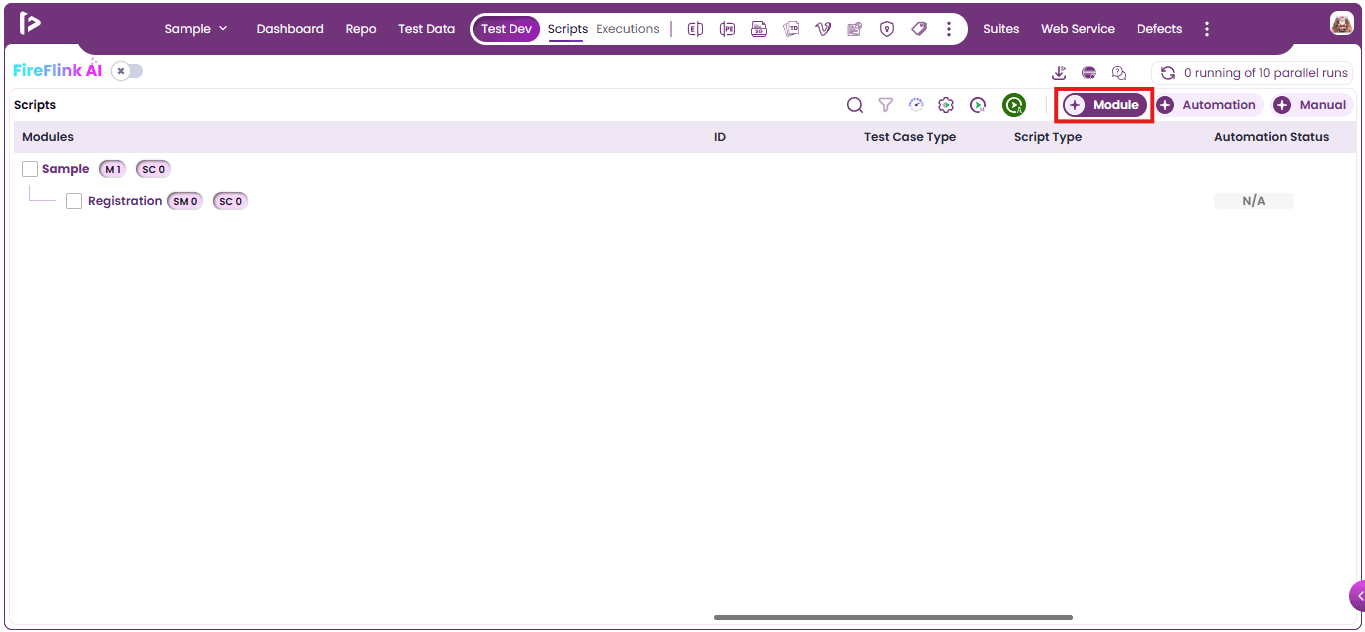
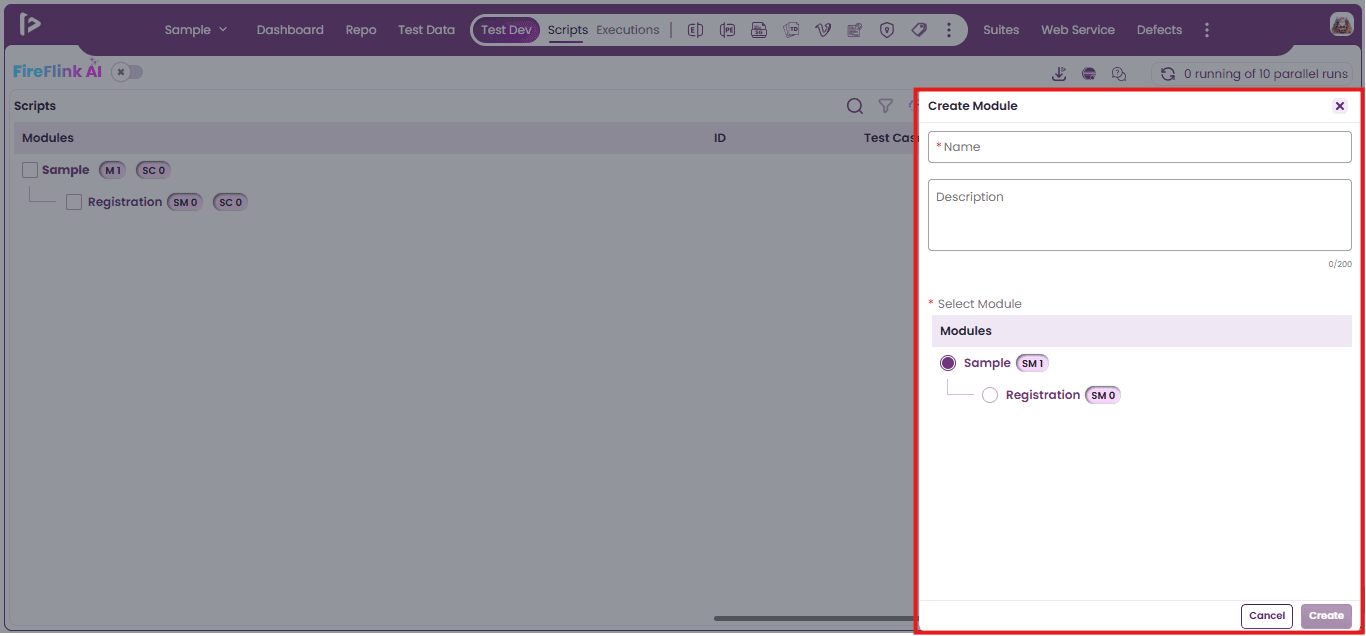
- The Create Module slider will appear.
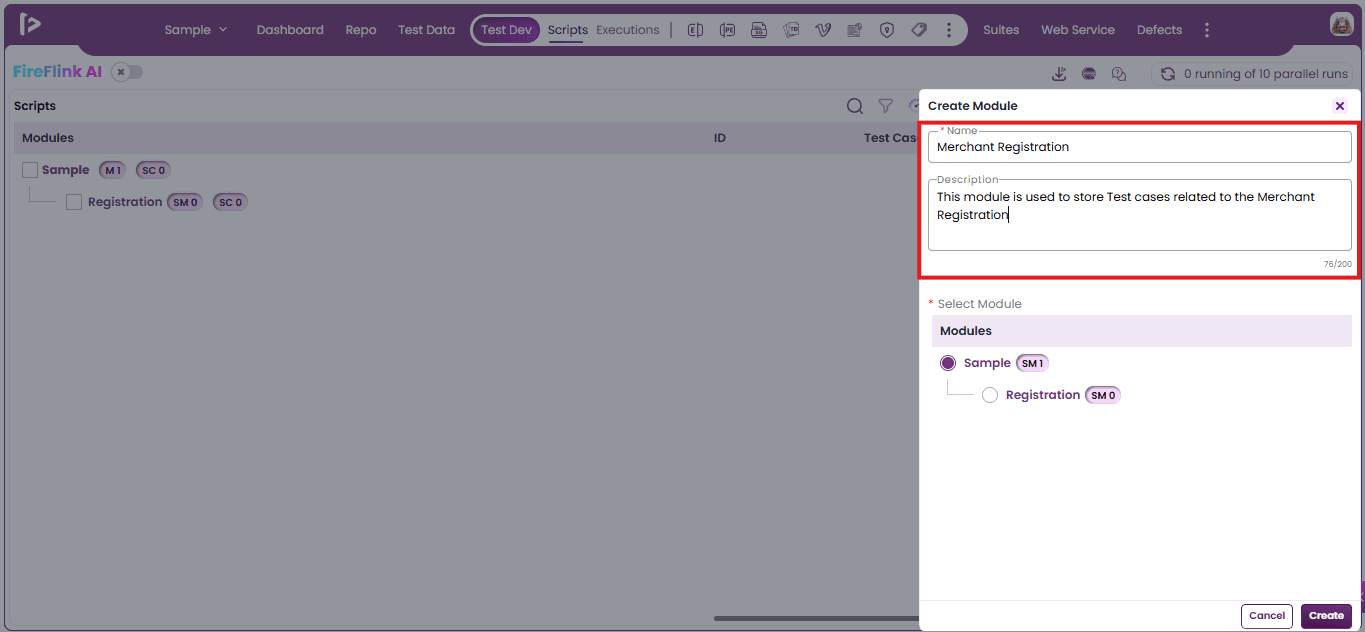
- Fill in the mandatory Name field and, if needed, include a Description for the sub module
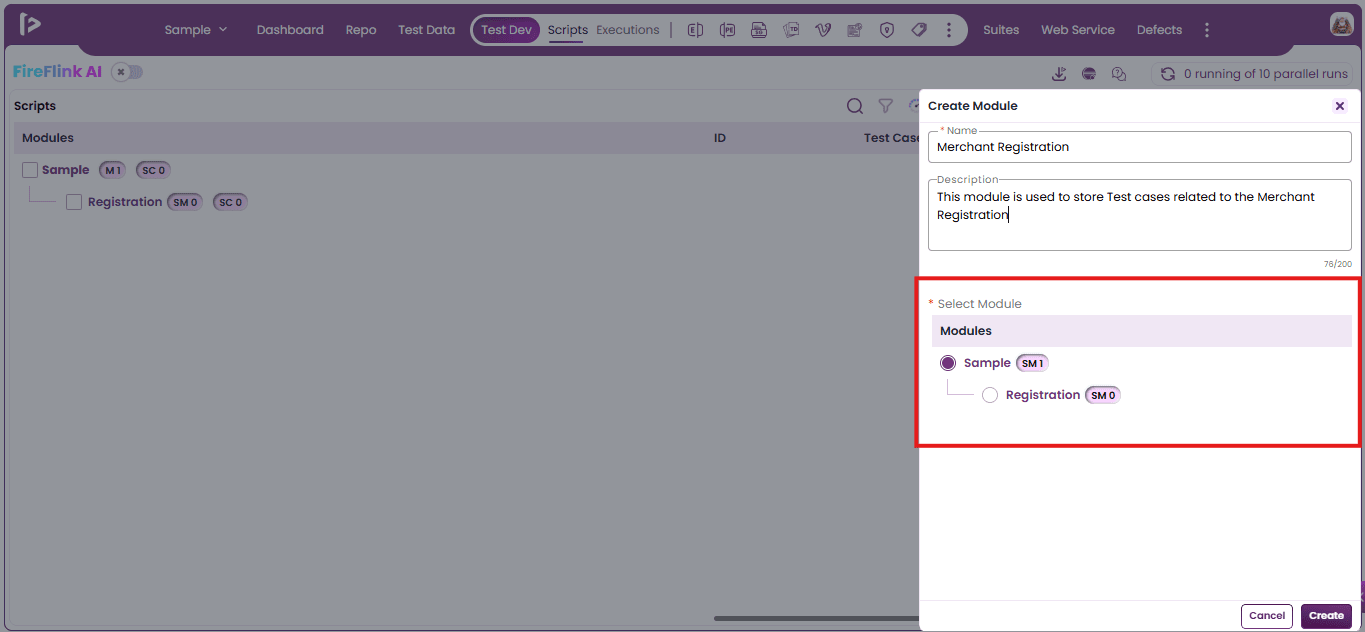
- Select the parent Module under which the Sub-Module will be added.
- User will have an option to create module by clicking on ‘+’ icon and selecting the module option as shown below
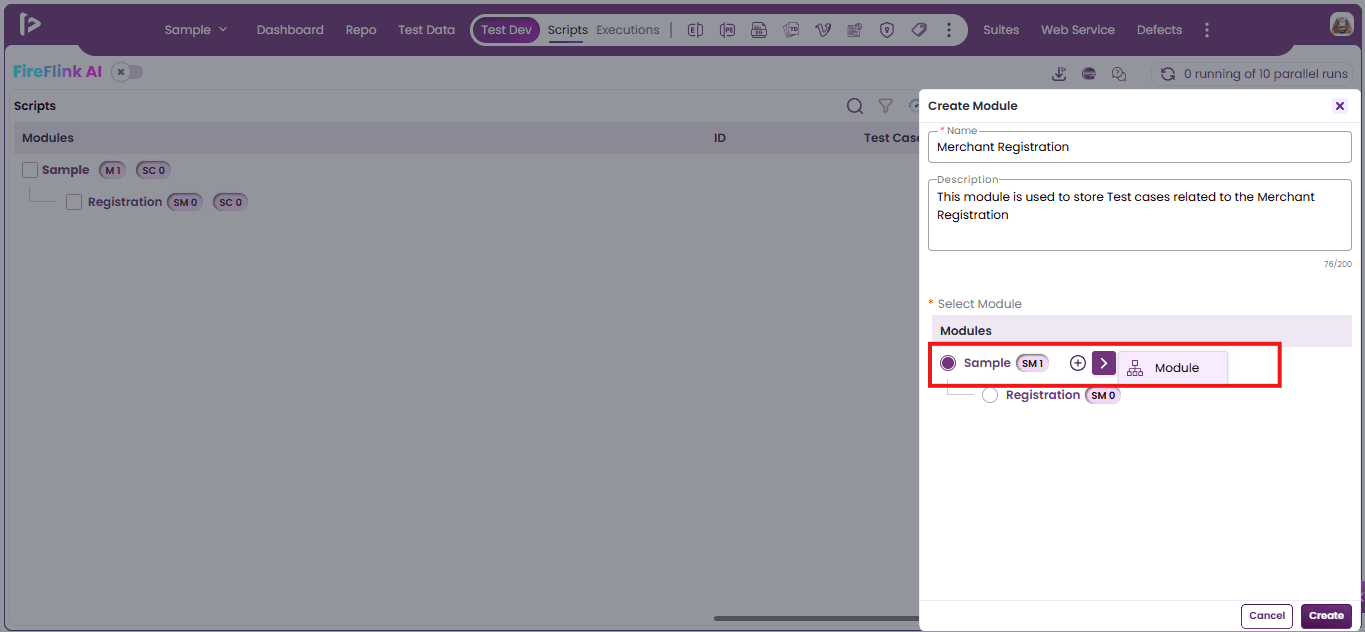
- User can even create a module above or below the existing module by clicking on the + icon beside the module as shown below
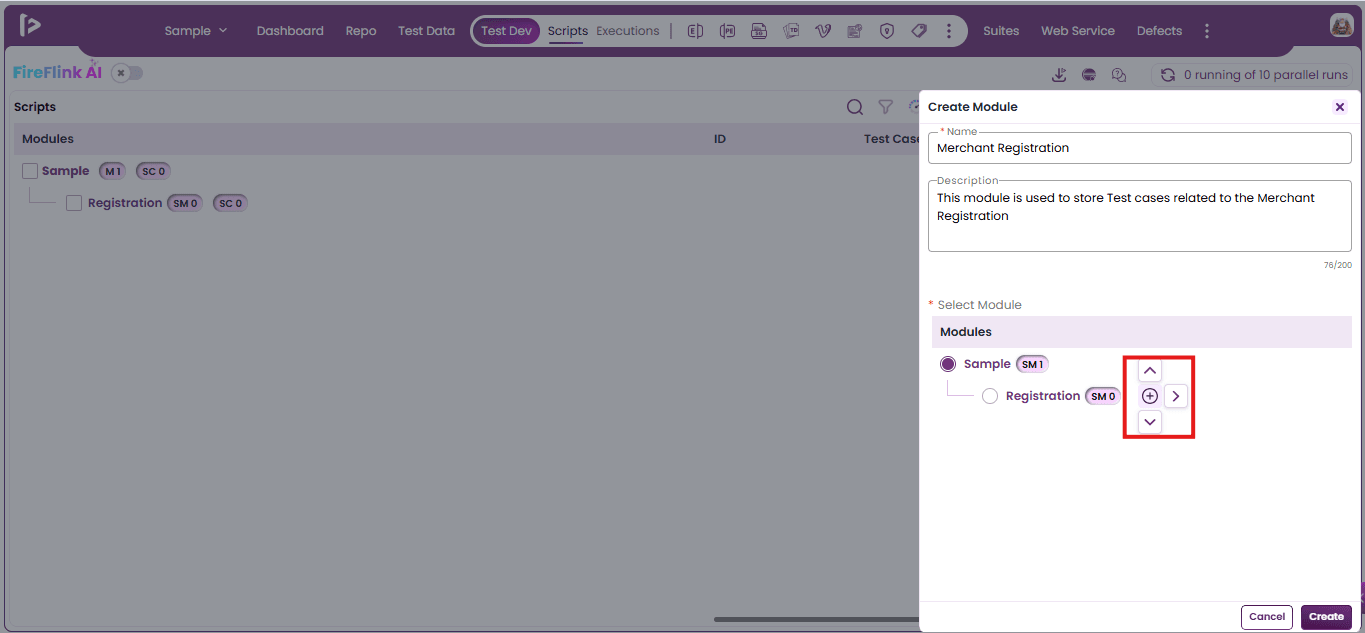
- After selecting the module, user can click on Create Button
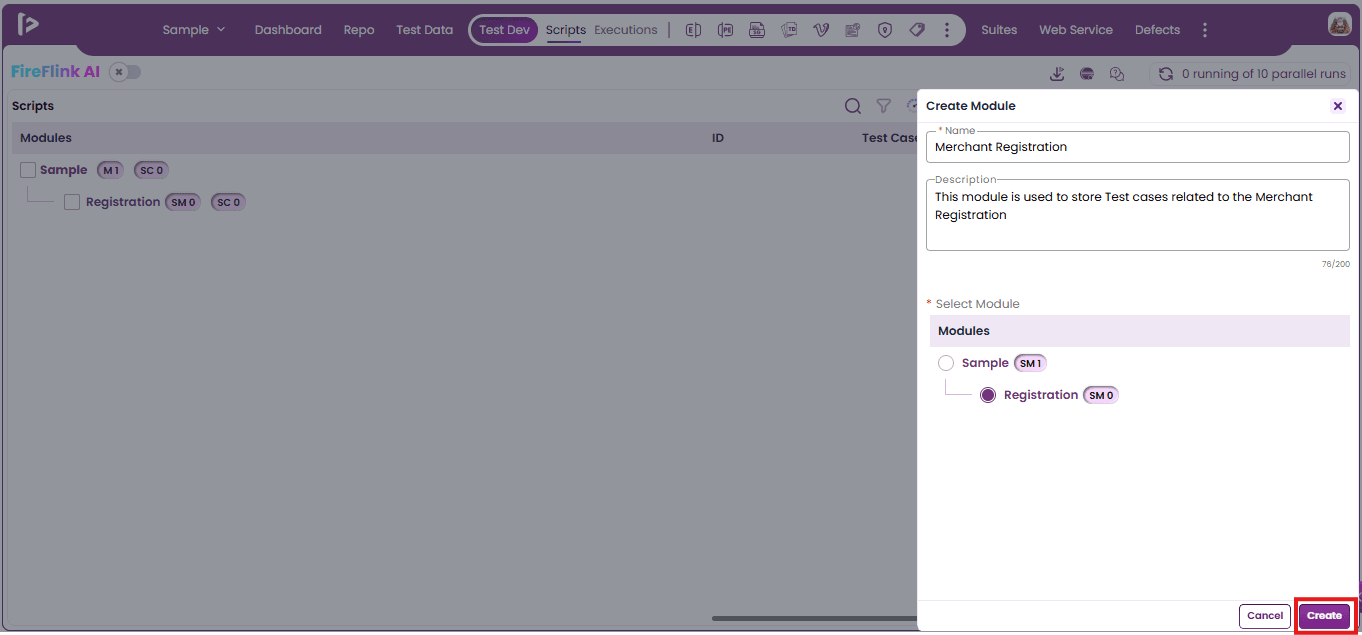
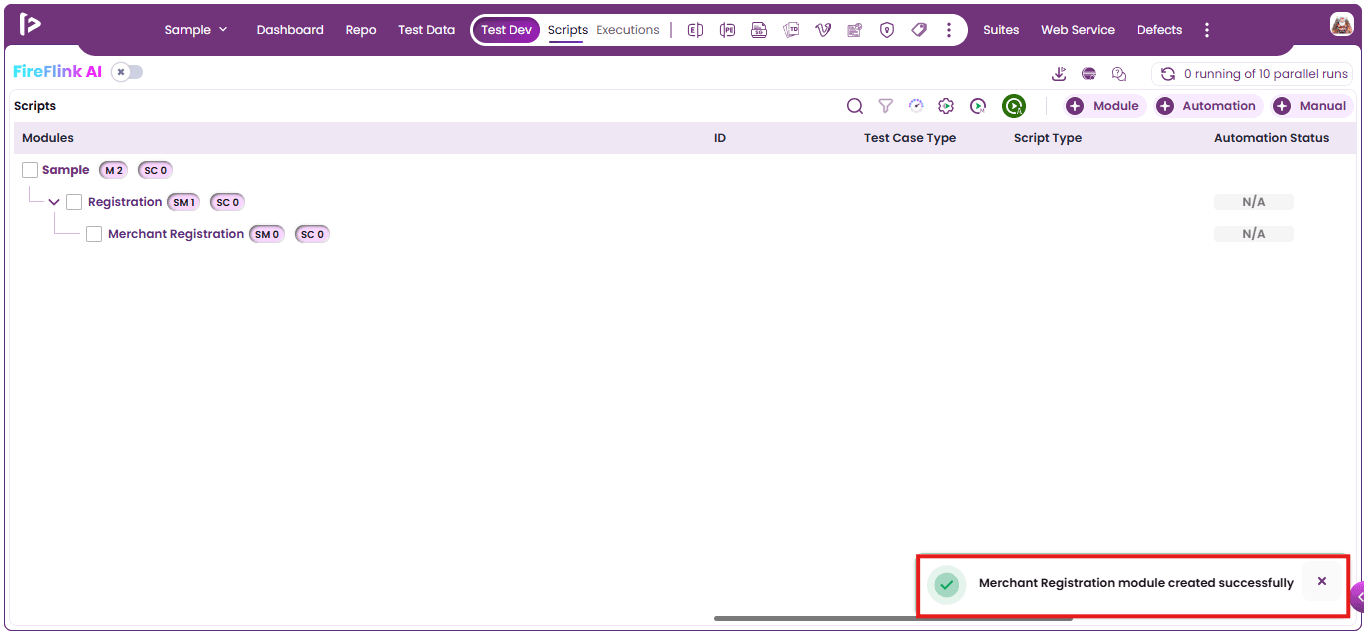
- Successful message will be displayed upon creating a Sub Module
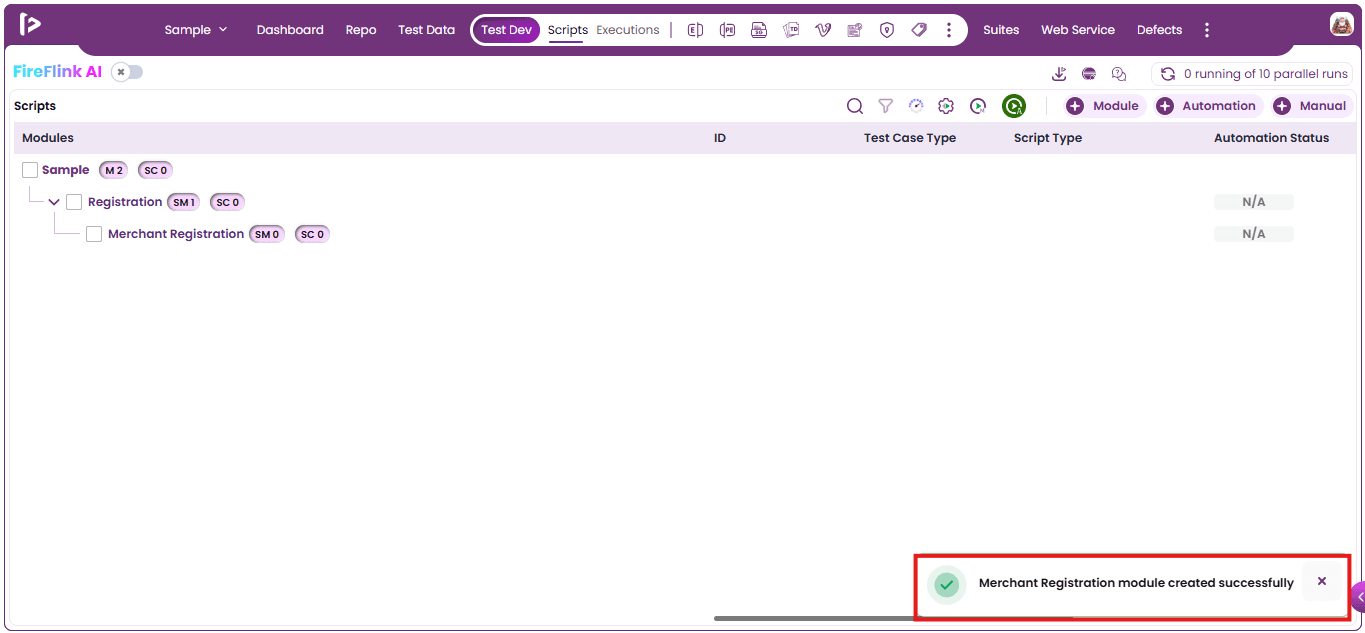
Method 2: Using + icon beside the Module
- Place the cursor over the desired module and click the '+' icon as displayed below
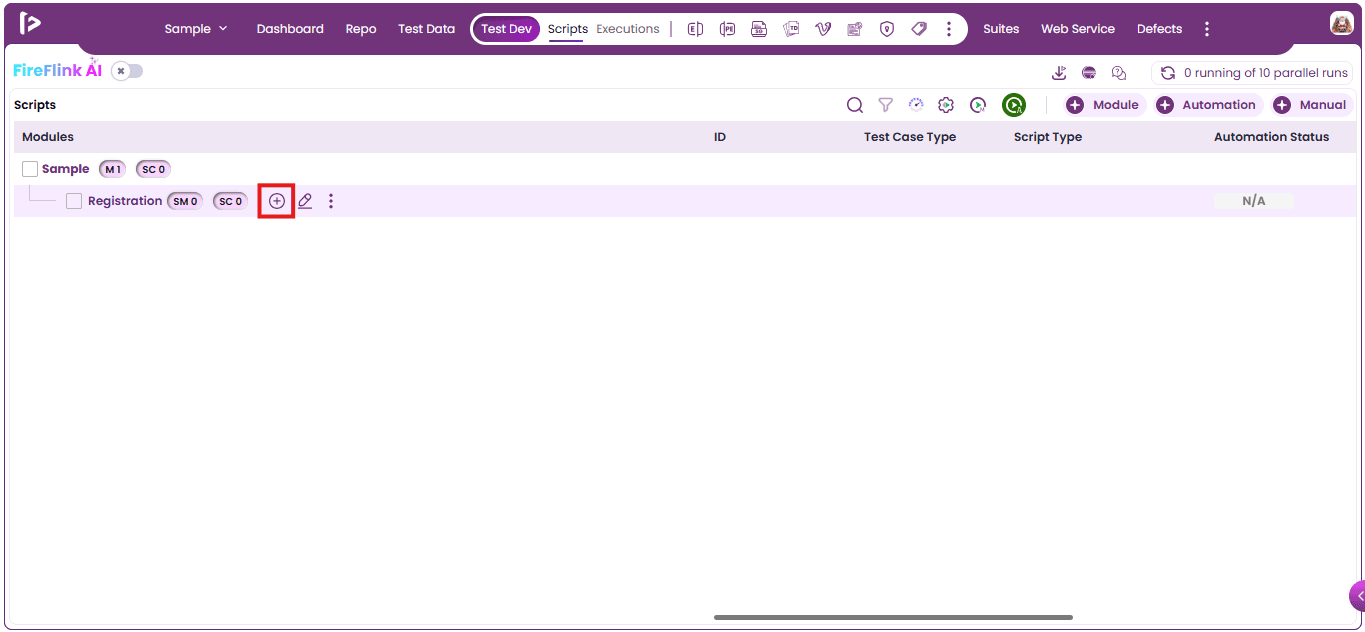
- Upon hovering the '+' icon, additional pointer options will appear, as shown below.
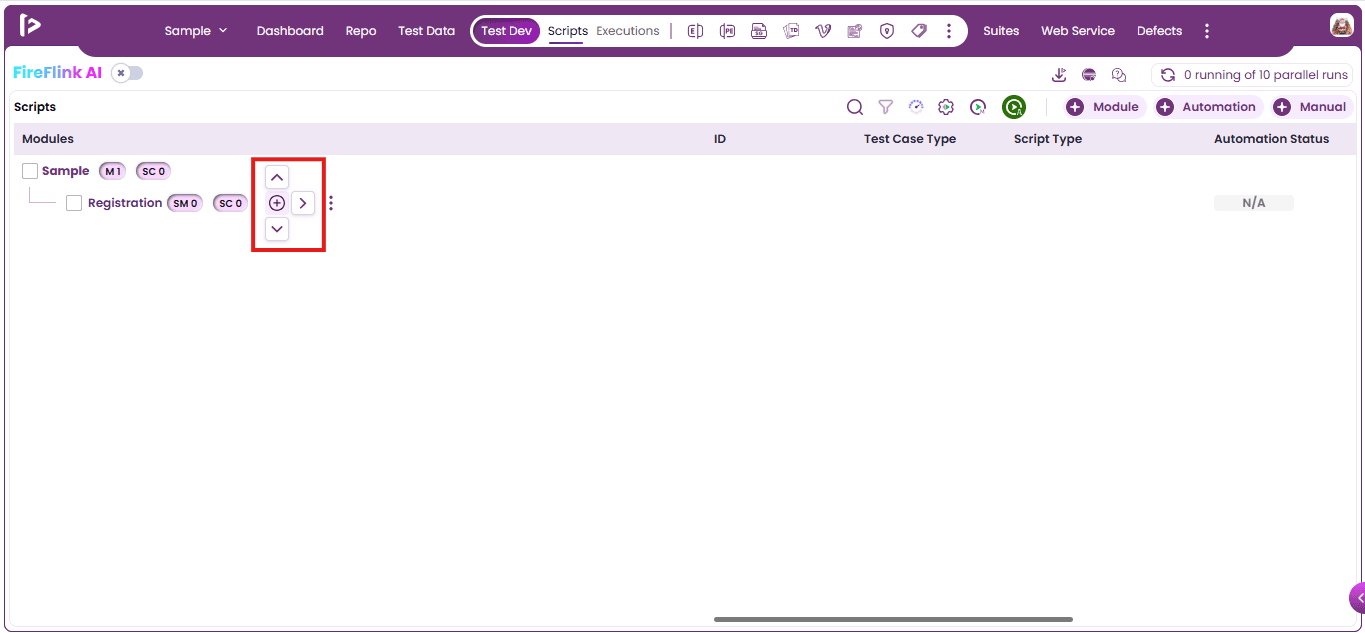
- Click on Right Pointer as displayed below.
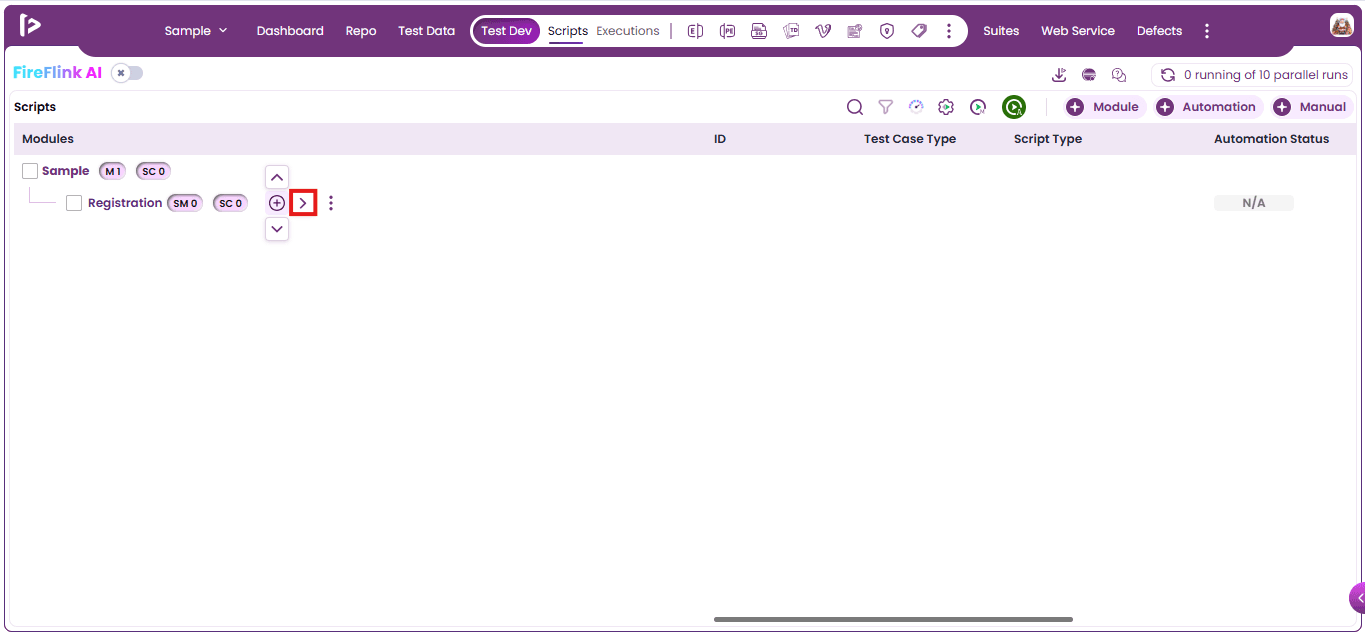
- Upon clicking on Right Pointer, Multiple options will appear as shown below
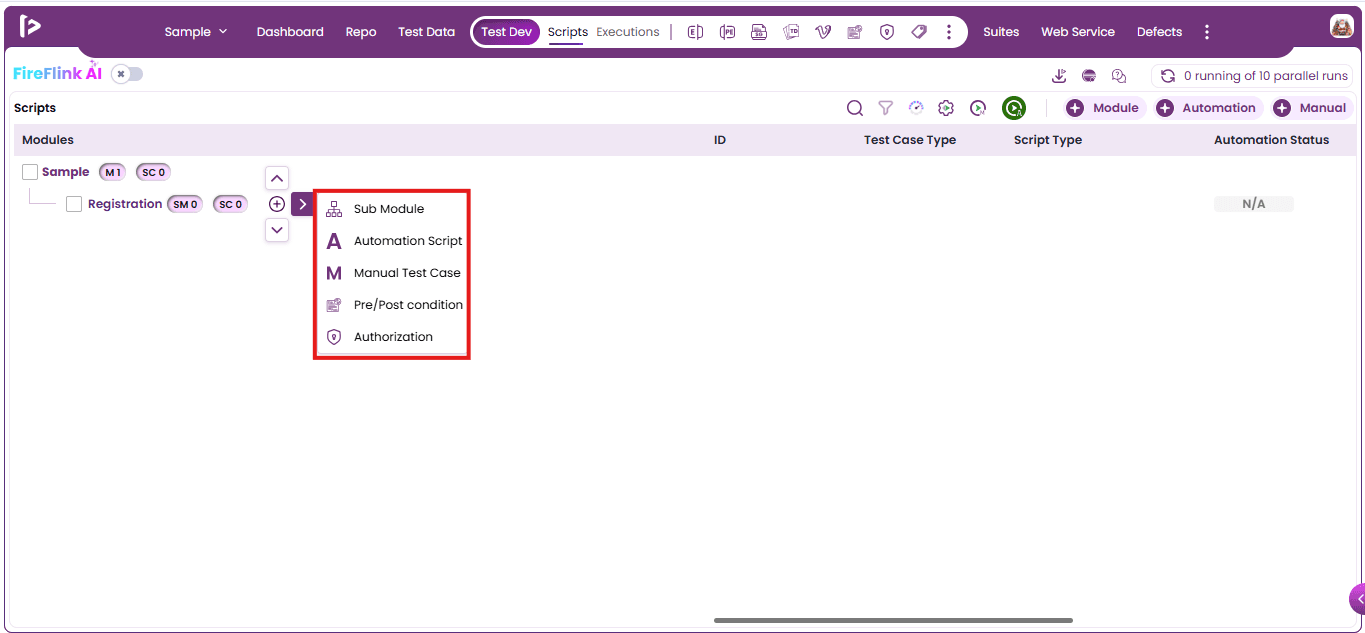
- Click on Sub Module option
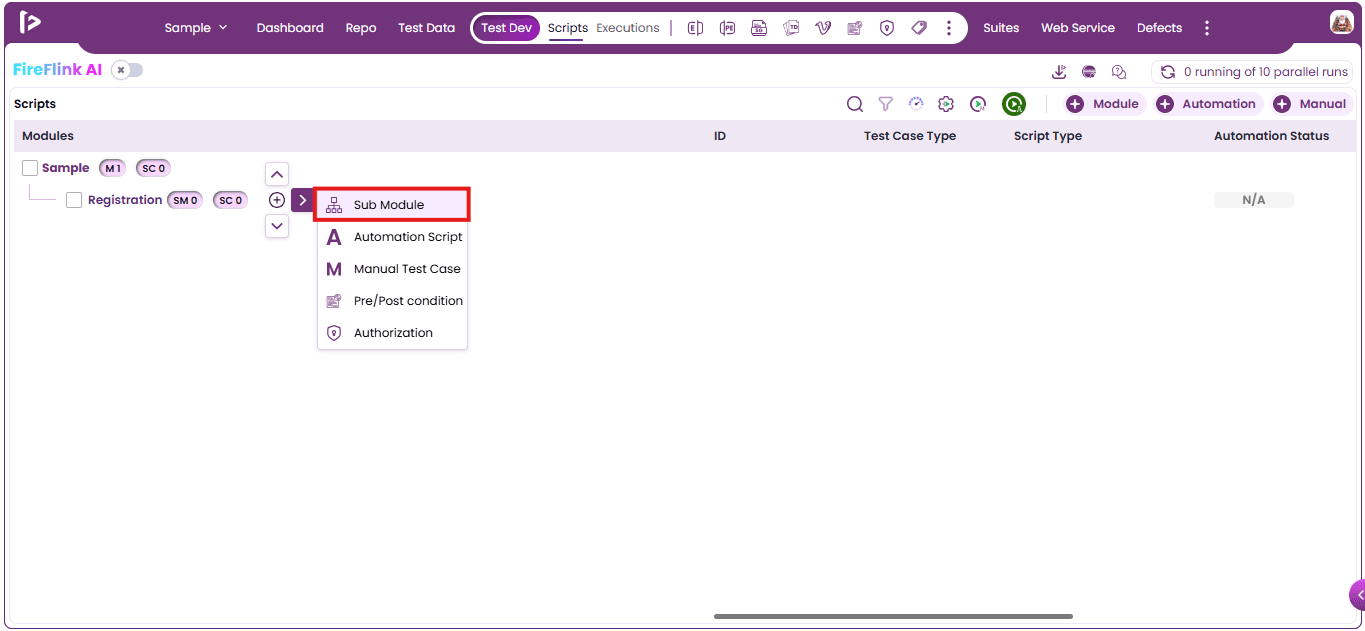
- A empty Textfield named Add a Sub Module will appear as shown below
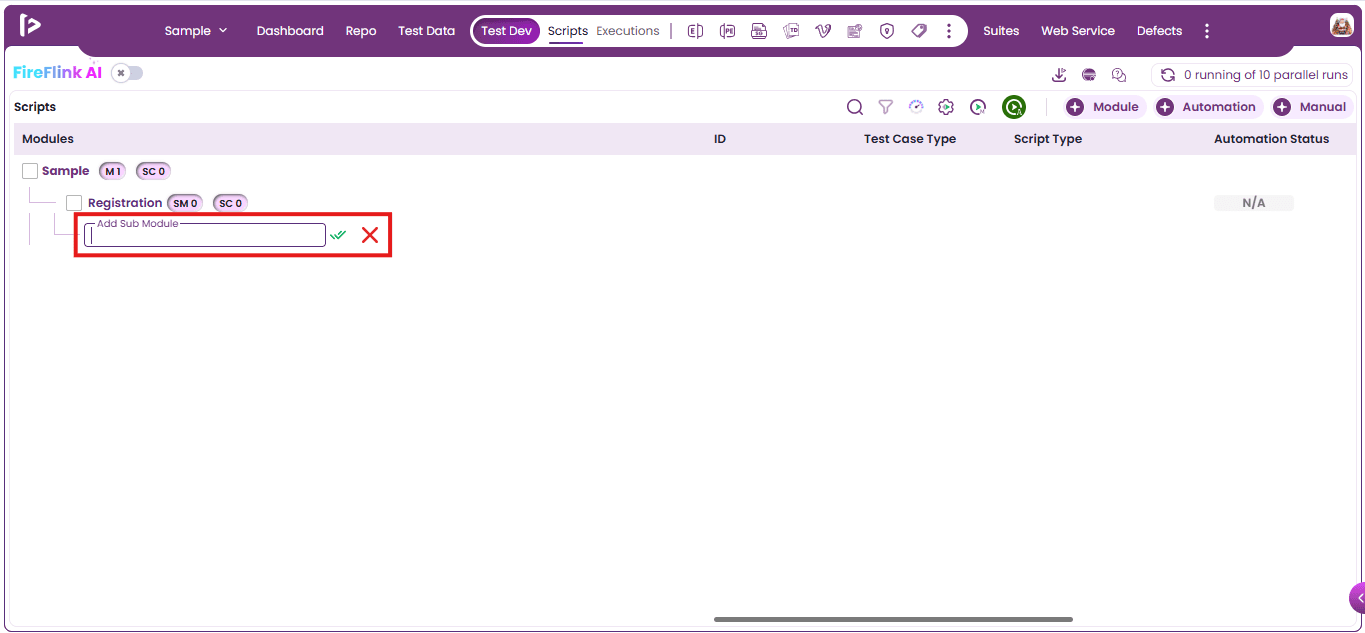
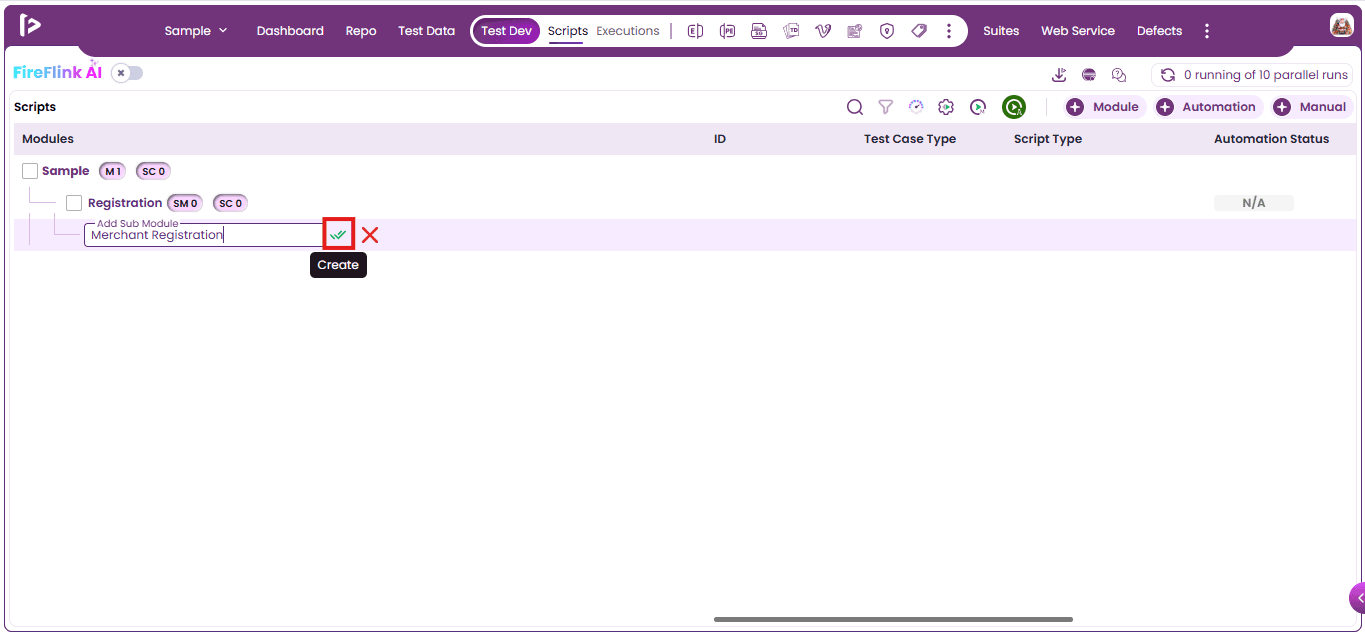
- Enter the name for the sub module and click on create button as shown below
- Successful Message will be displayed as shown below
Additional Features For Project Name Module
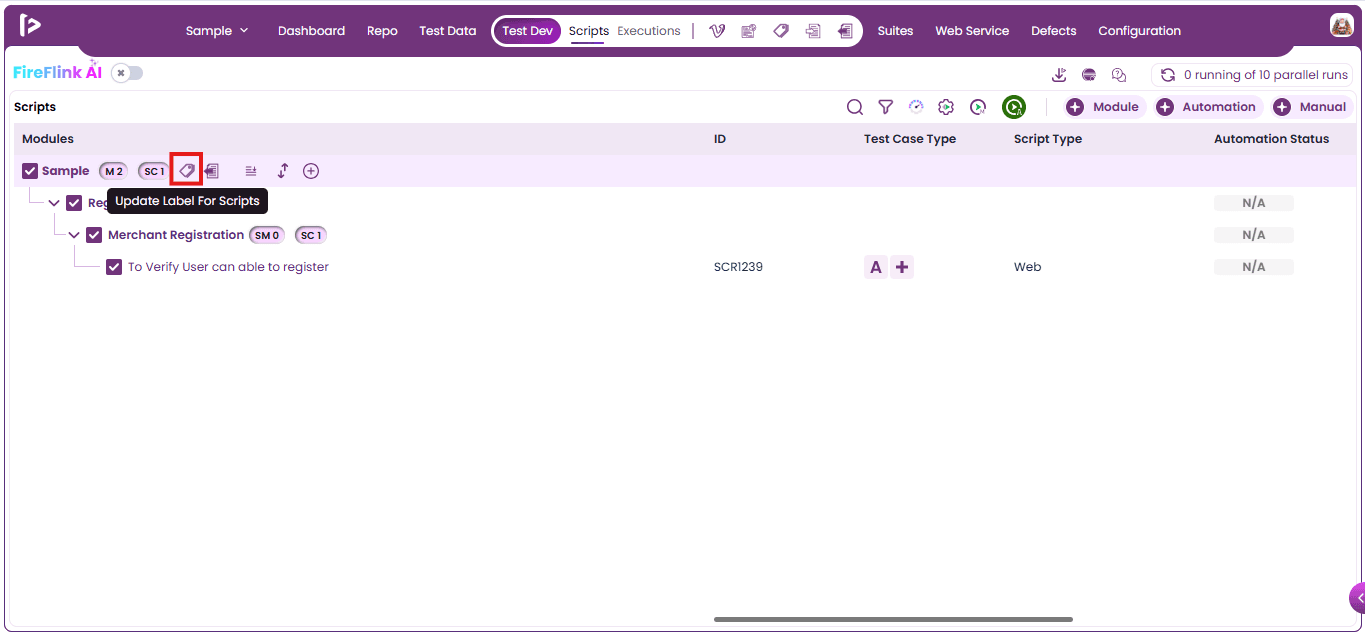
- Update Labels For Scripts:
- This feature will be enabled only when the user selects a script. It allows users to modify or assign custom labels to existing scripts within FireFlink. This feature supports bulk updates and ensures consistent labeling across related scripts. For updating Labels for scripts click on the Update Labels for Scripts icon as shown below
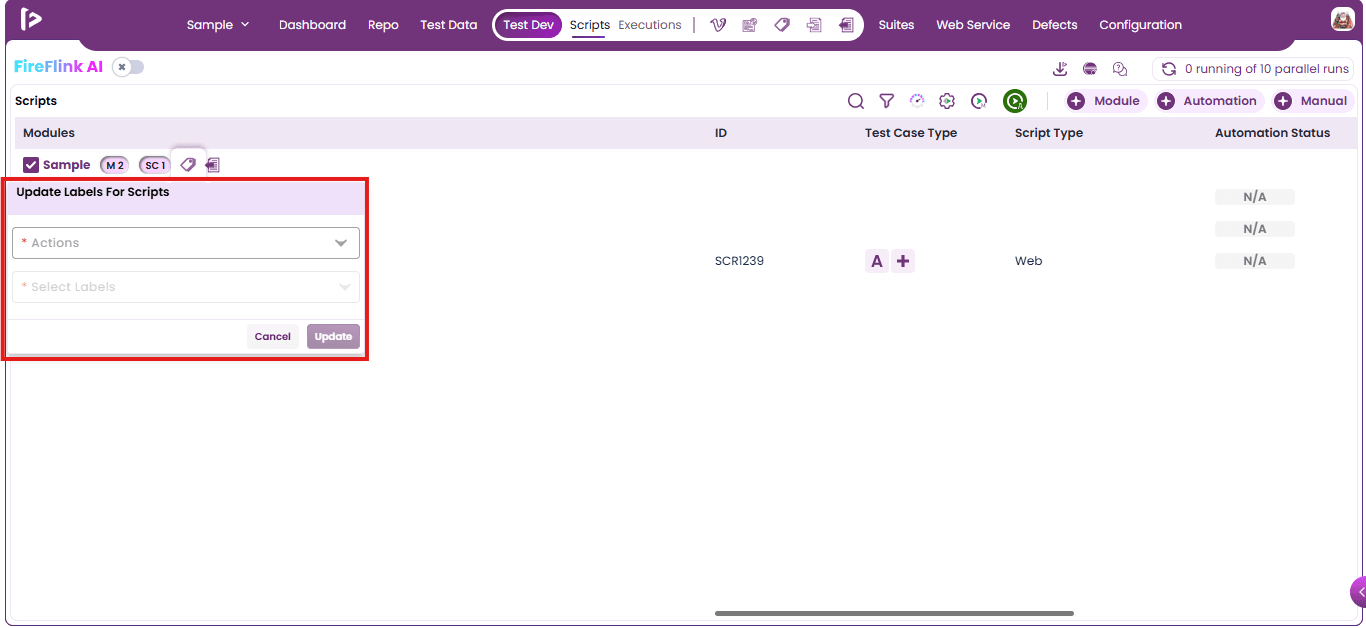
- Upon clicking this feature, the user can select an Action from the available options.
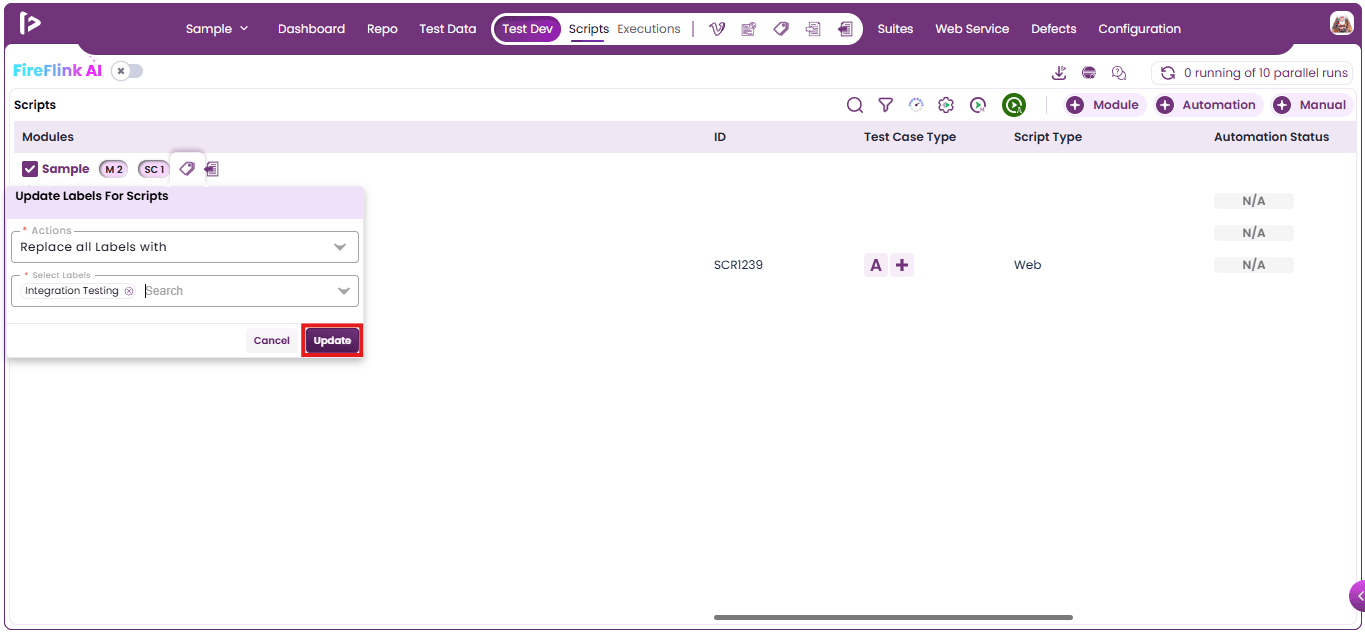
- Based on the selected action, a corresponding secondary option will be displayed. After making all necessary changes, the user can click the Update button to apply the modifications.
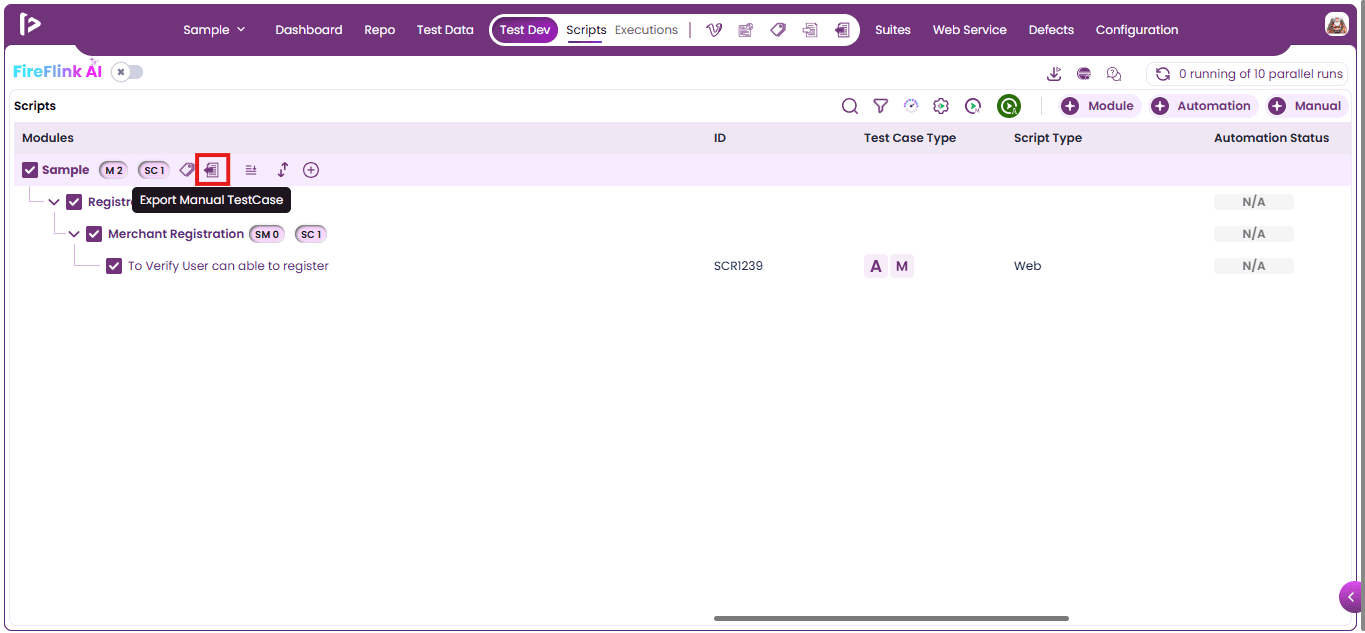
2. Export Manual Test Cases:
- This feature will be enabled only when the user selects a script. It allows users to export manual test cases from FireFlink as an Excel file for offline review, sharing, or reporting purposes.
3. Hide All Scripts / Show All Scripts:
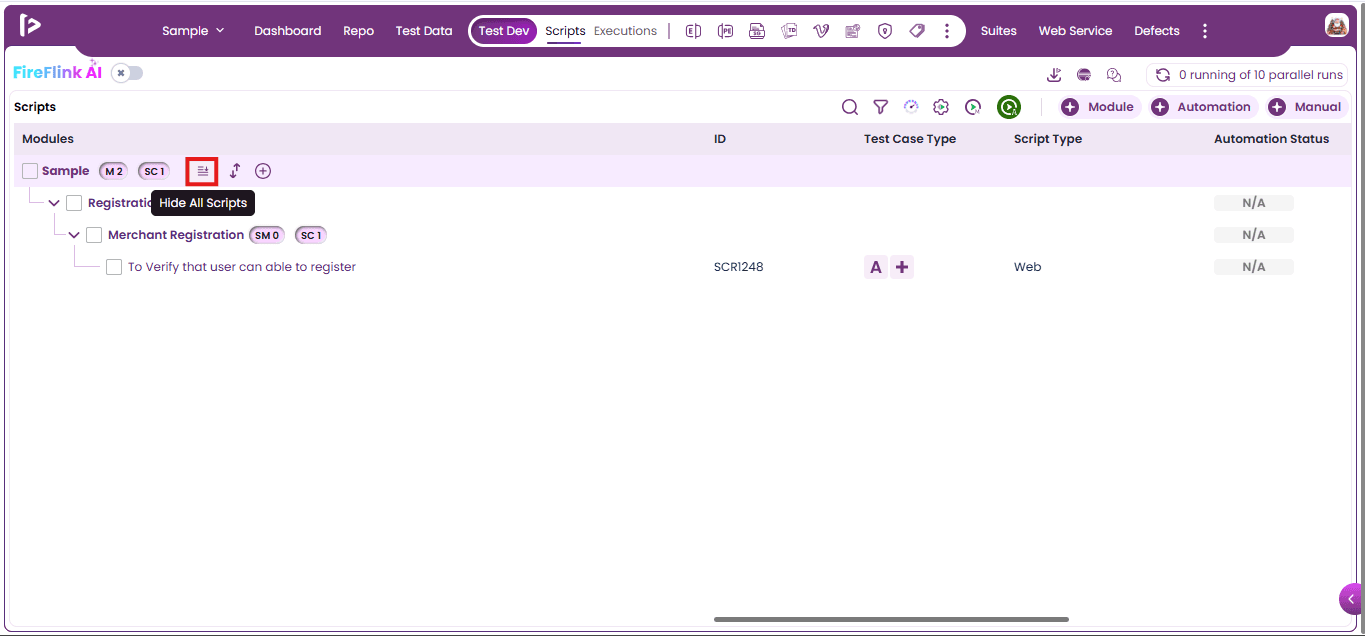
- Hide All Scripts: Upon clicking on this feature it collapses or hides the script list to reduce on-screen clutter and provide a cleaner workspace, especially useful when working with large sets of scripts.
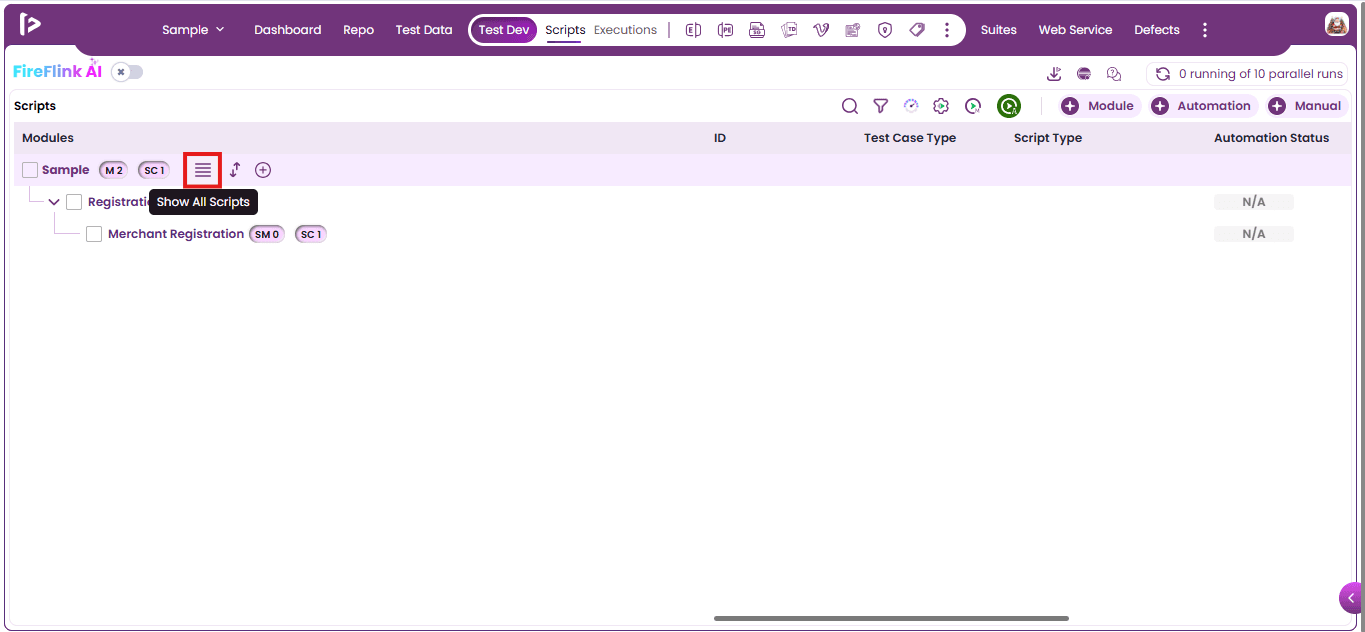
- Show All Scripts: Upon clicking on this feature it expands and displays all scripts, making it easier to review, navigate, or select specific scripts for further actions.
4. Show Pre/Post Conditions / Hide Pre/Post Conditions :
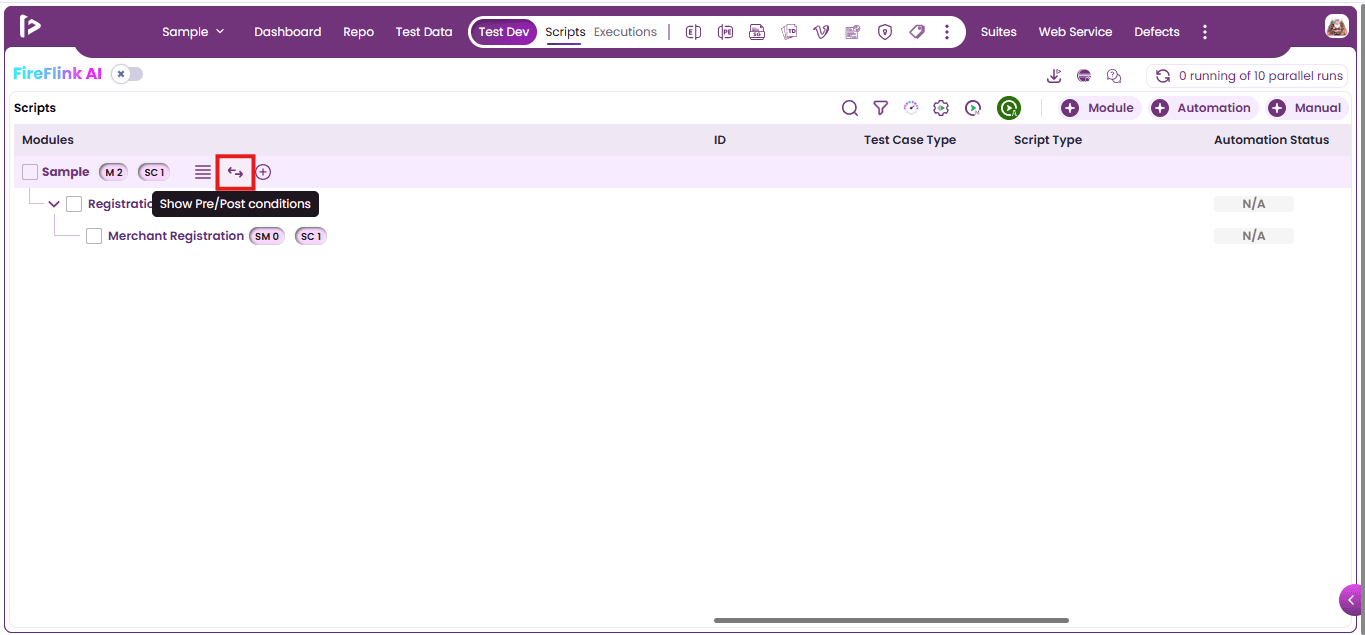
- Show Pre/Post Conditions: Upon clicking on this feature it displays the defined preconditions and postconditions, allowing users to review setup steps required before test execution and actions expected after completion.
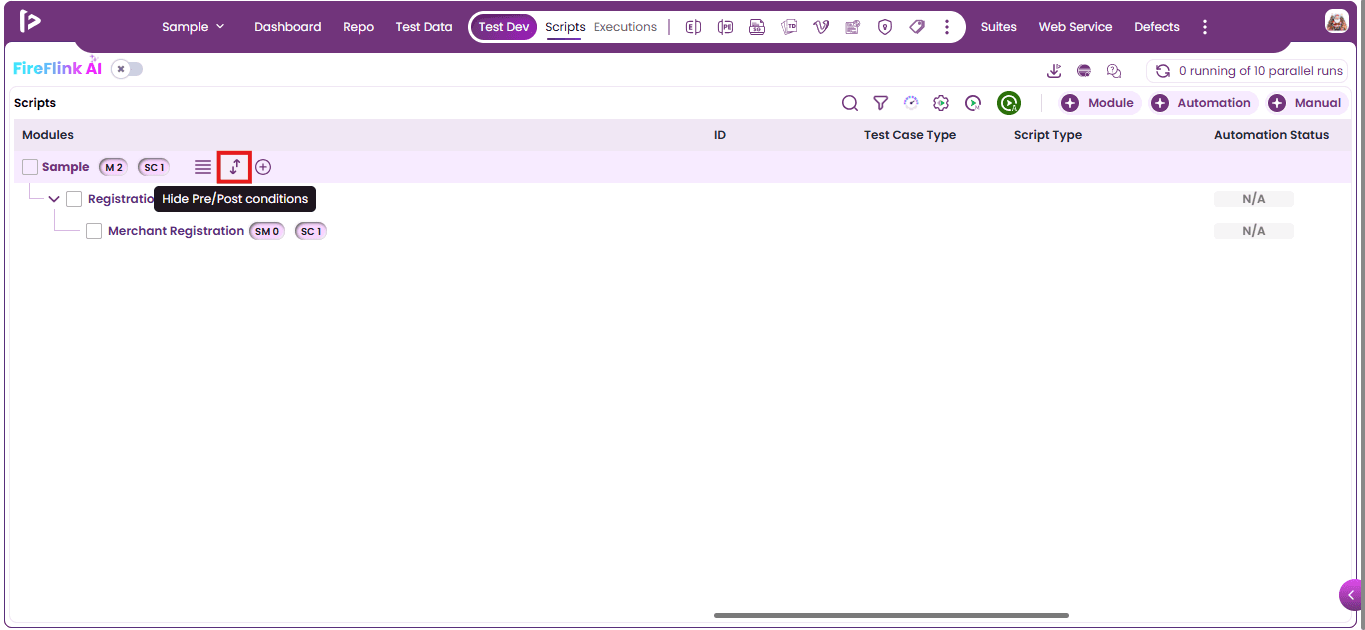
- Hide Pre/Post Conditions: Upon clicking on this feature it collapses or hides these details to minimize visual clutter and focus on core test steps.
5. Add Icon: It consists of other features which is present inside Right Flow Arrow
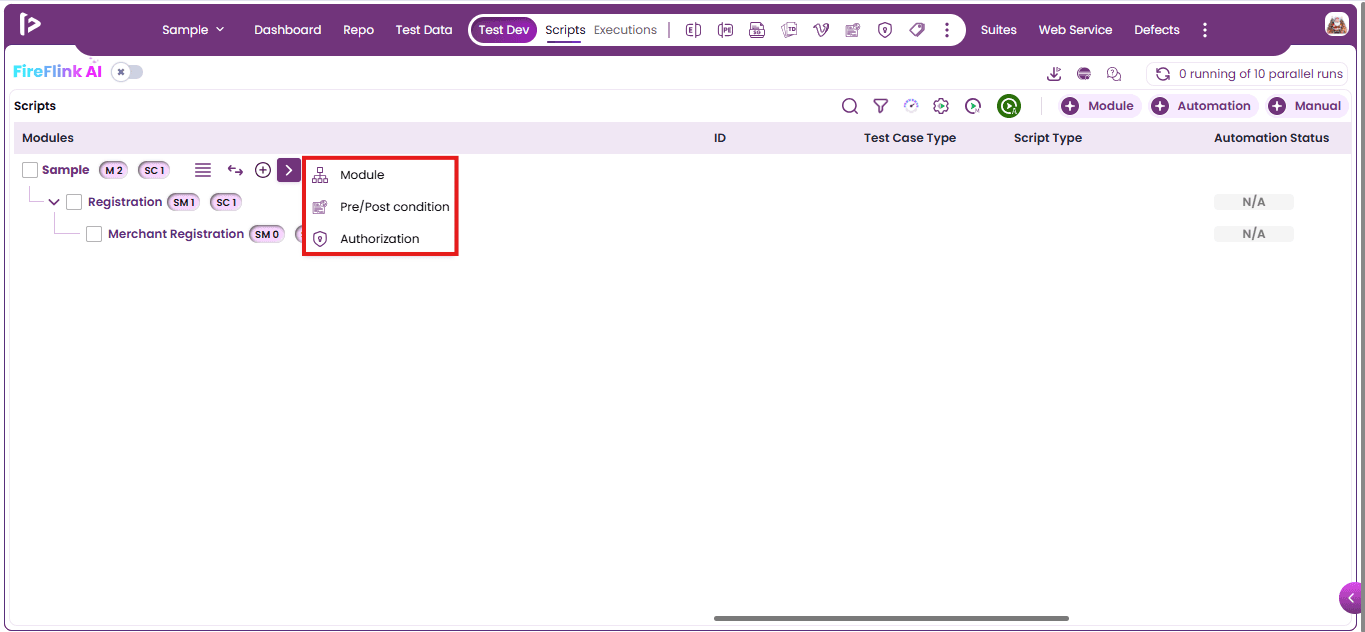
a. Modules: This feature enables the addition of modules to the project. b. Pre/Post conditions: This feature allows users to add preconditions and postconditions to all the modules. c. Authorization: This feature allows users to configure authorization for web service steps at the Project Name level.
6. Bulk deletion : Bulk deletion will be enabled when the user selects multiple scripts. This feature allows users to delete multiple scripts at once for better management and efficiency.
- Scripts that are impacted (linked or dependent on other components) will not be deleted
- Only non-impacted scripts will be successfully deleted
- Helps prevent accidental removal of dependent or critical scripts.
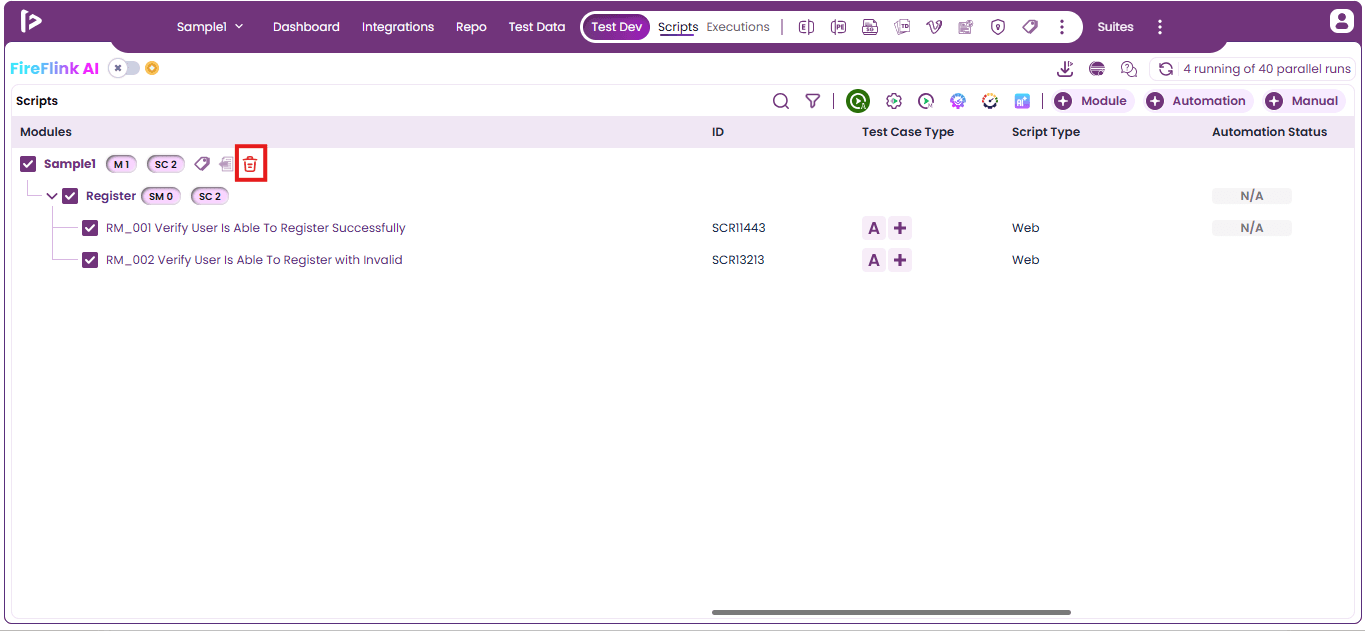
Additional Features For Module and Sub Module
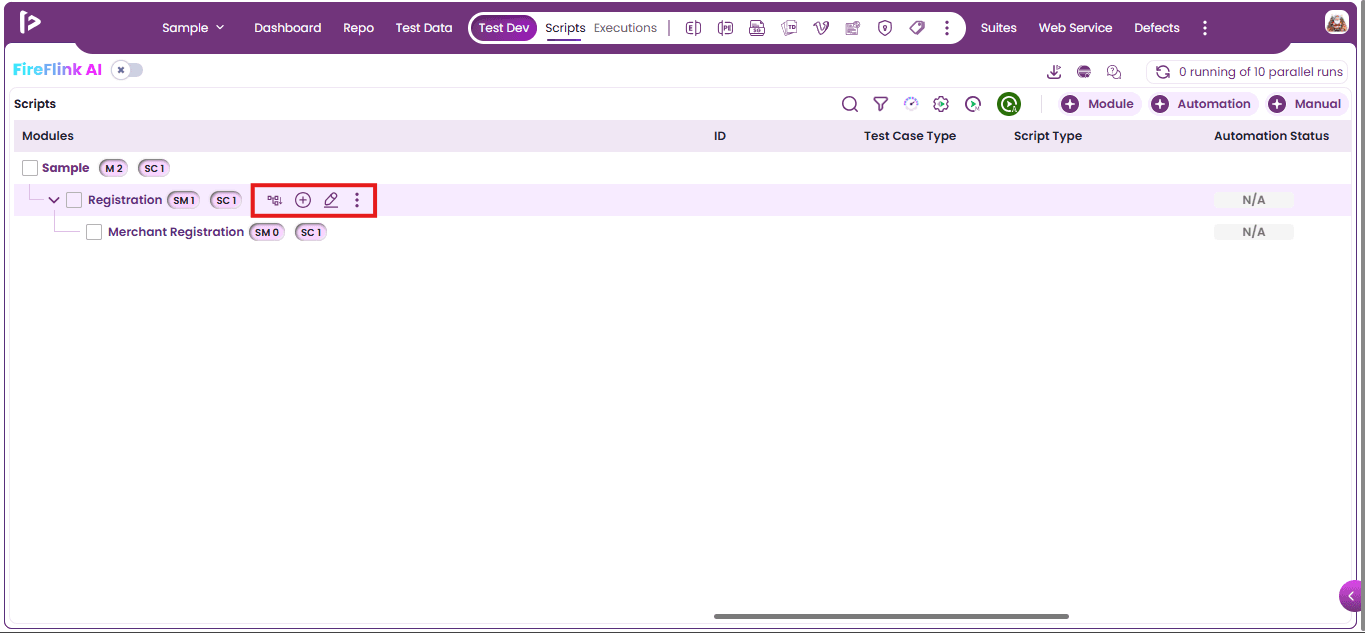
- Expand all / Collapse all : This feature will be enabled only when there are scripts present inside that module or sub module. a. Expand All: Upon clicking on it displays all modules along with their associated sub-modules, providing a complete view of the project structure along with the scripts. This is especially useful for reviewing or navigating complex module trees.
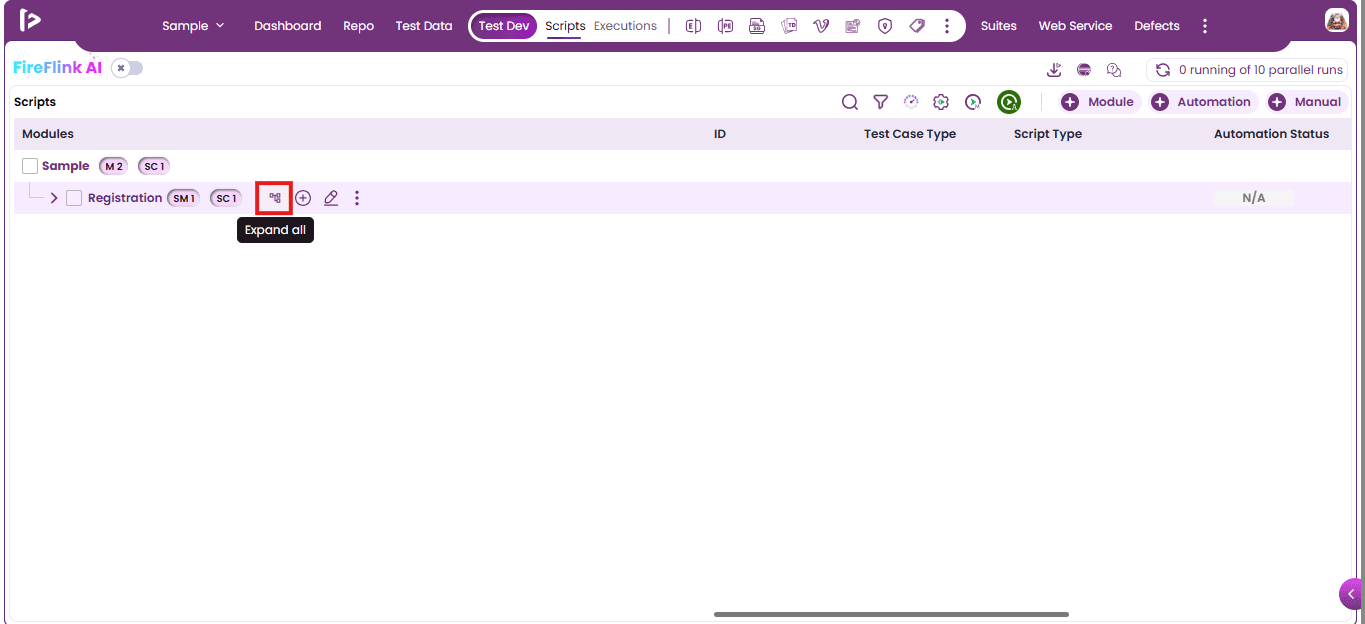
b. Collapse All: Upon clicking on it hides all sub-modules under their parent modules, giving a cleaner and more focused view. This helps reduce visual clutter and simplifies navigation when working with large projects.
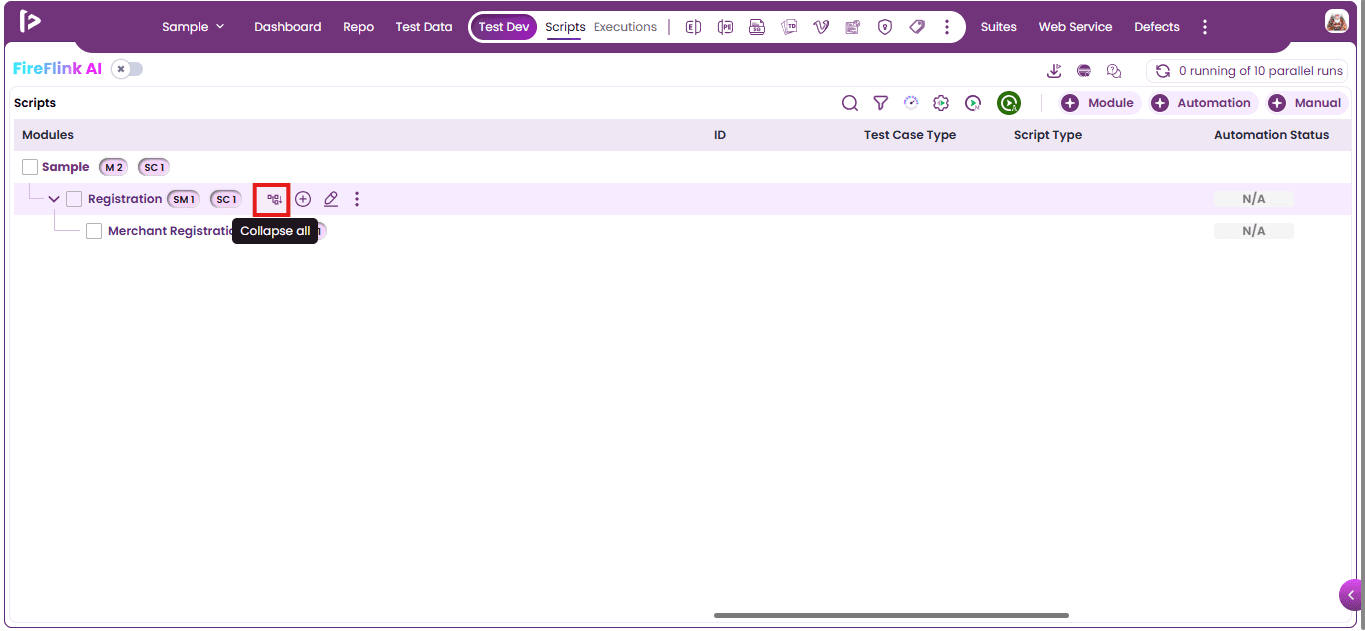
2. Add Icon: This comprises of three Arrow in different direction as displayed
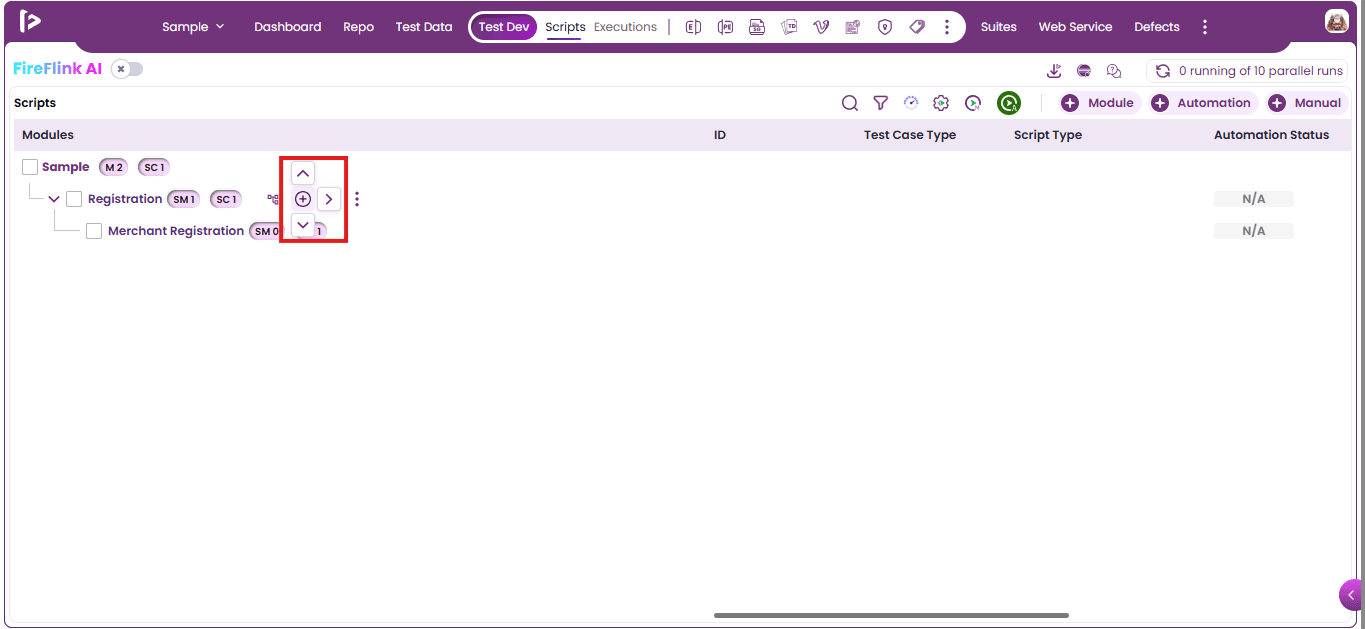
a. Up Arrow : Upon clicking on the Up Arrow , Module feature will be displayed as shown below.
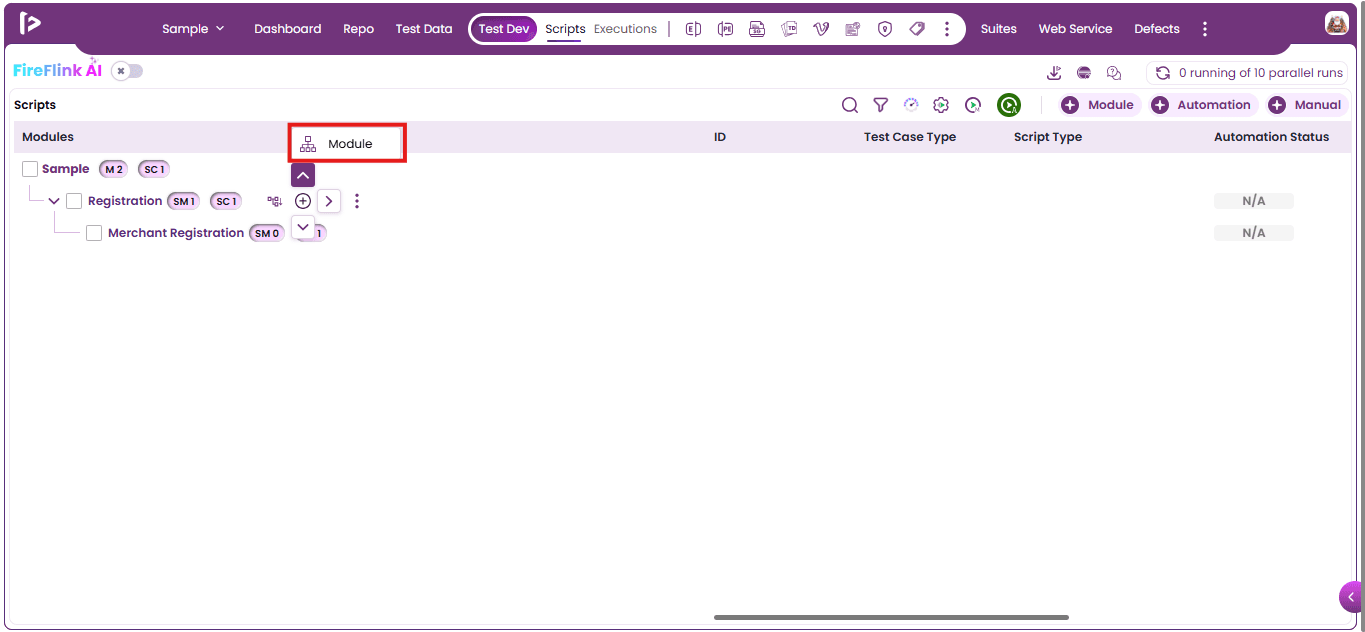
- Upon clicking the module icon, users can add a new module above the current module or sub-module.
b. Right Arrow: Upon clicking on the Right Arrow, multiple features will be displayed as shown below
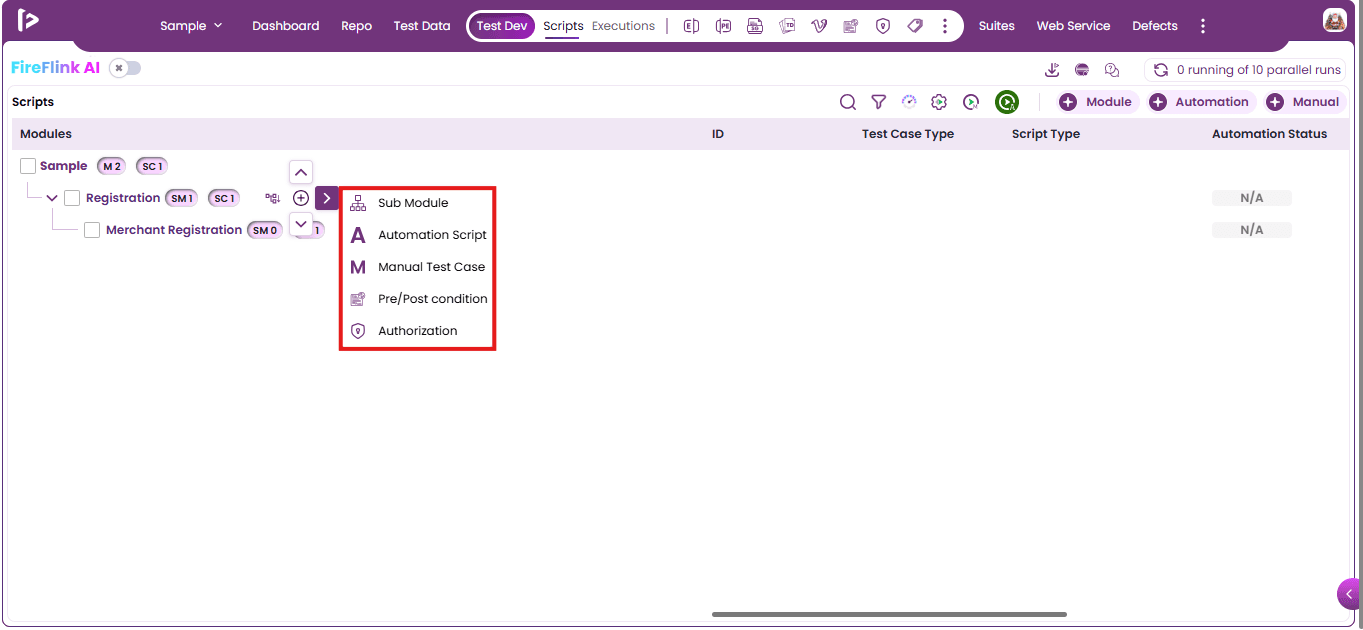
i. Sub Module: This feature allows users to add submodules to the selected module. ii. Automation Script: This feature allows users to add an automation script to the selected module. iii. Manual Test cases: This feature allows user to add a Manual Test Cases to the selected module iv. Pre/Post Conditions: This feature allows the user to add Pre/Post conditions at Module level for the automation scripts. v. Authorization: This feature allows the user to provide the authorization for the web services scripts at Module level
c. Down Arrow : Upon clicking on the Down Arrow , Module feature will be displayed as shown below.
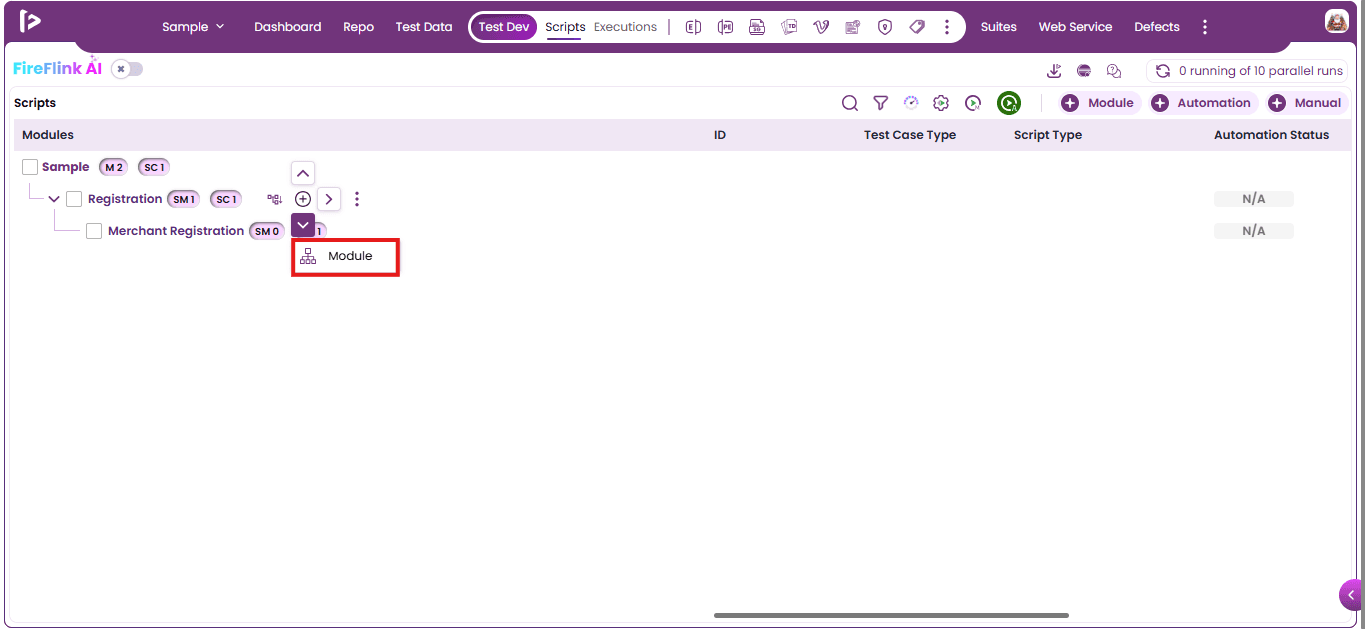
- Upon clicking the module icon, users can add a new module below the current module or sub-module.
3. Edit: User can edit the modules by following the steps given below a. Click on edit button as shown below
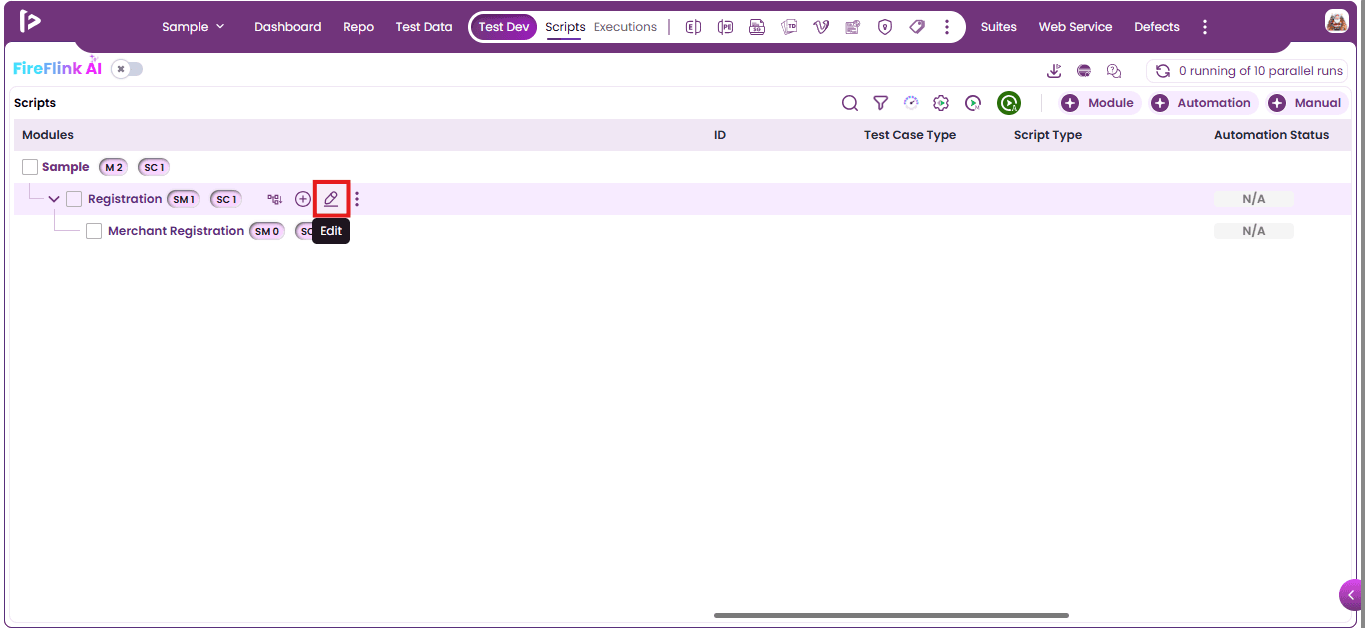
b. Upon clicking on the edit button, user can view edit module slider as shown below
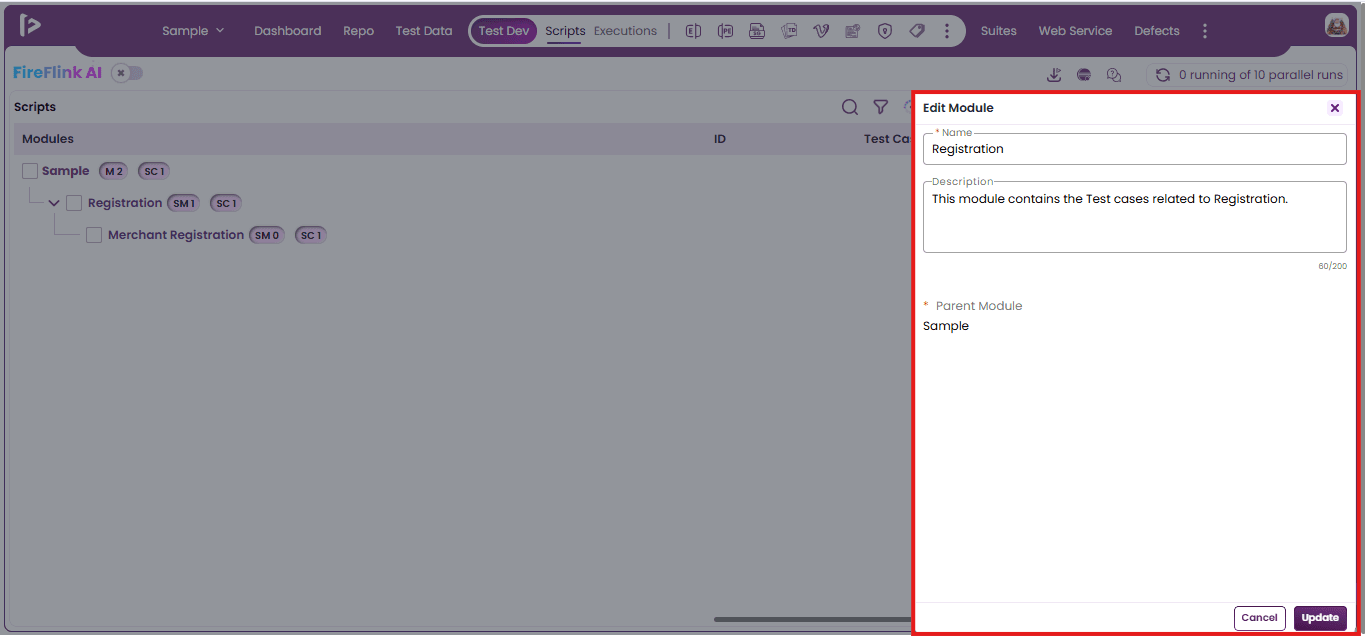
c. Users can update the name and description of the module. Once the changes are made, click the Update button as shown below.
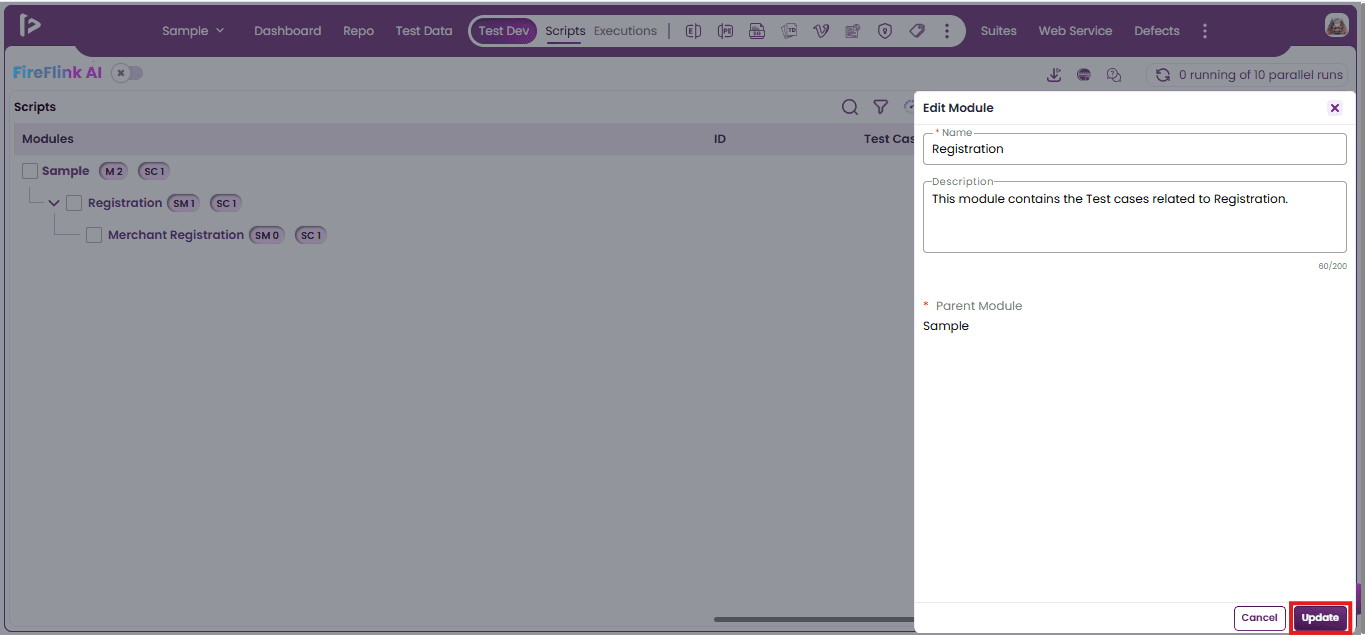
d. Upon clicking on the Update button, a successful message will be displayed as shown below.
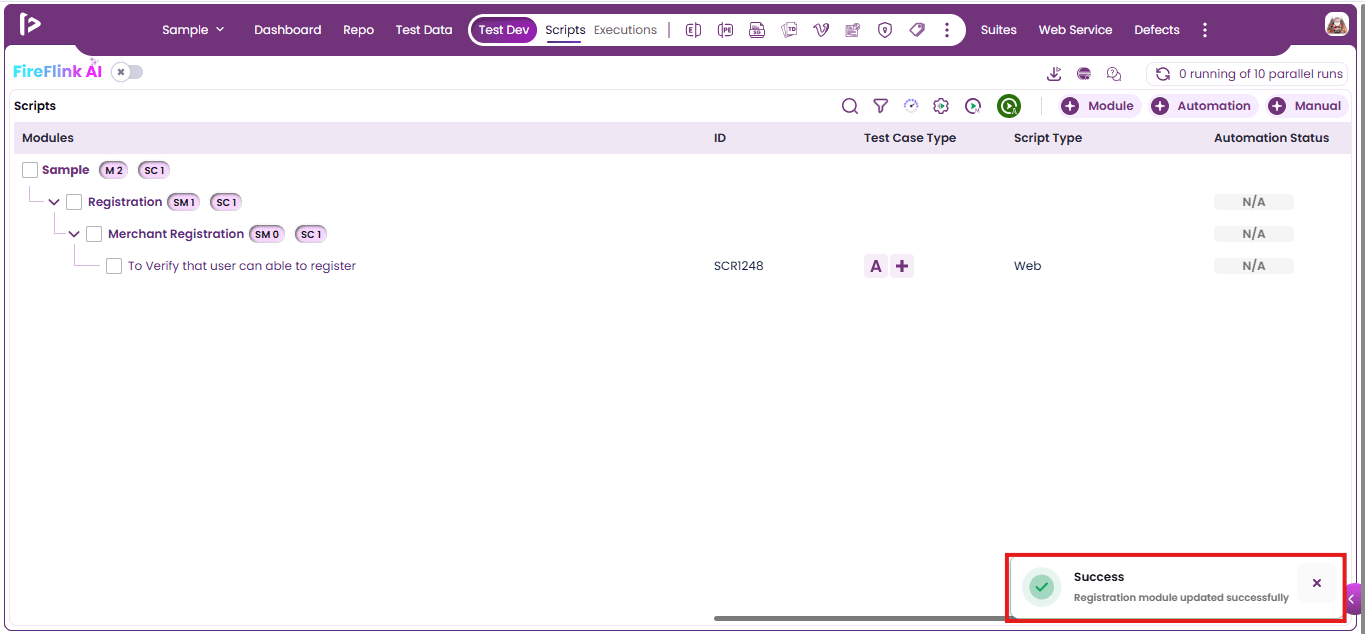
4. More Features : Upon clicking on the more option user can able to get some additional features for modules and sub modules , those are listed below
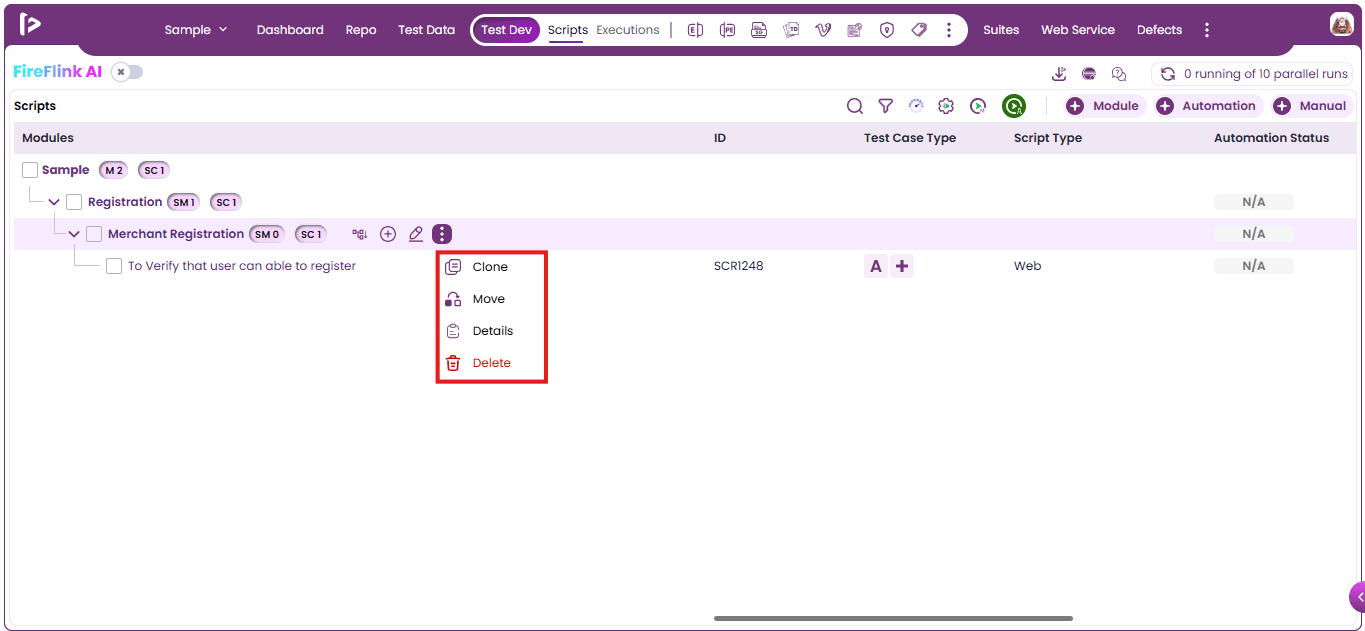
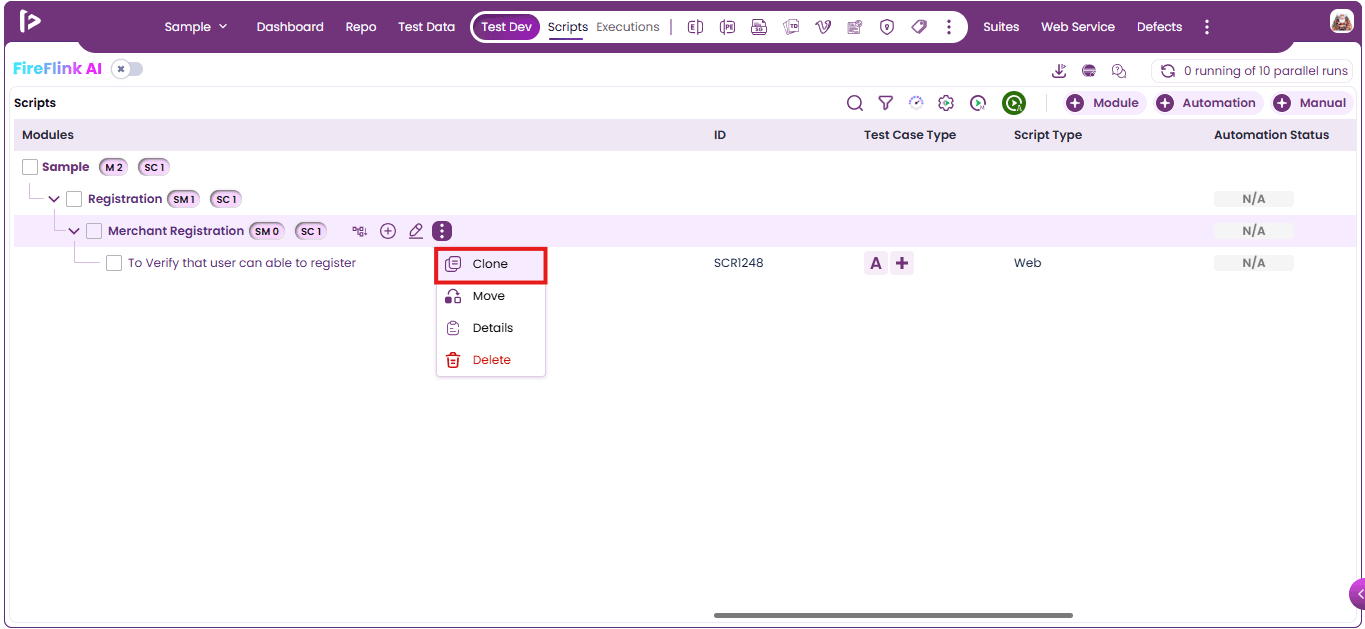
a. Clone: Users can clone modules and sub-modules by following the steps below. i. Click on the Clone option for the module as displayed below
ii. Upon clicking on Clone option user will able to view an information popup as shown below
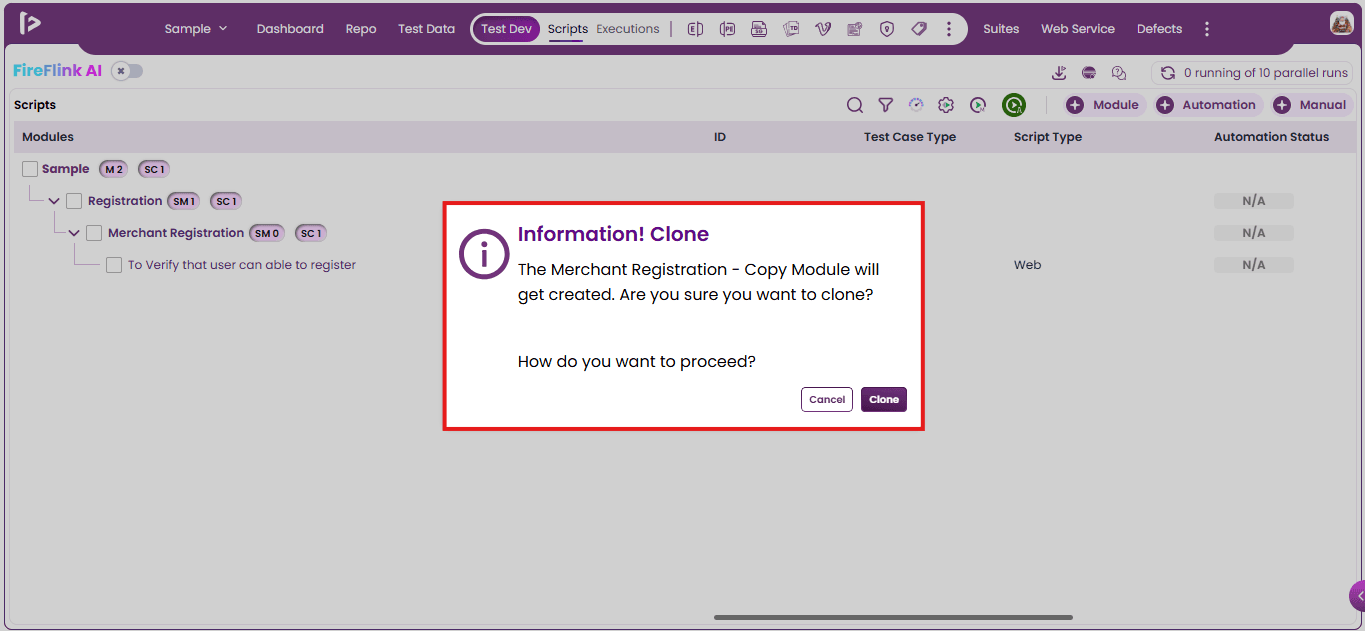
iii. Click on the clone button.
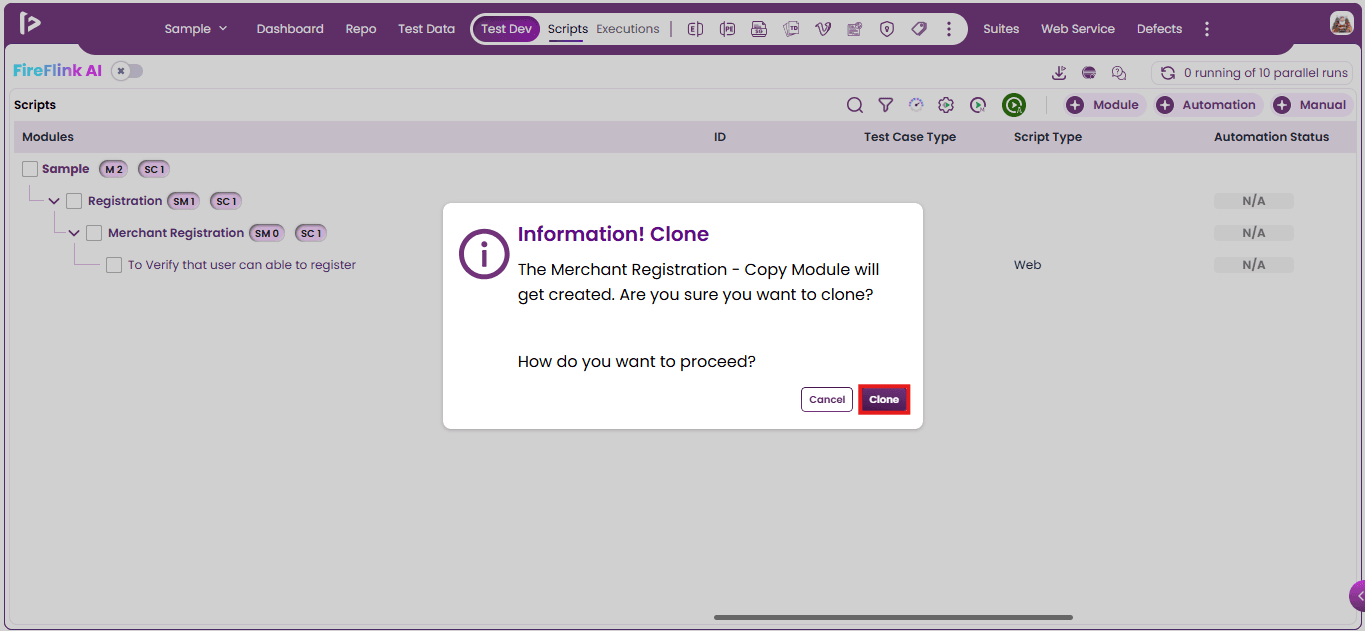
iv. Upon clicking on Clone button, user can able to view a successful message as displayed below
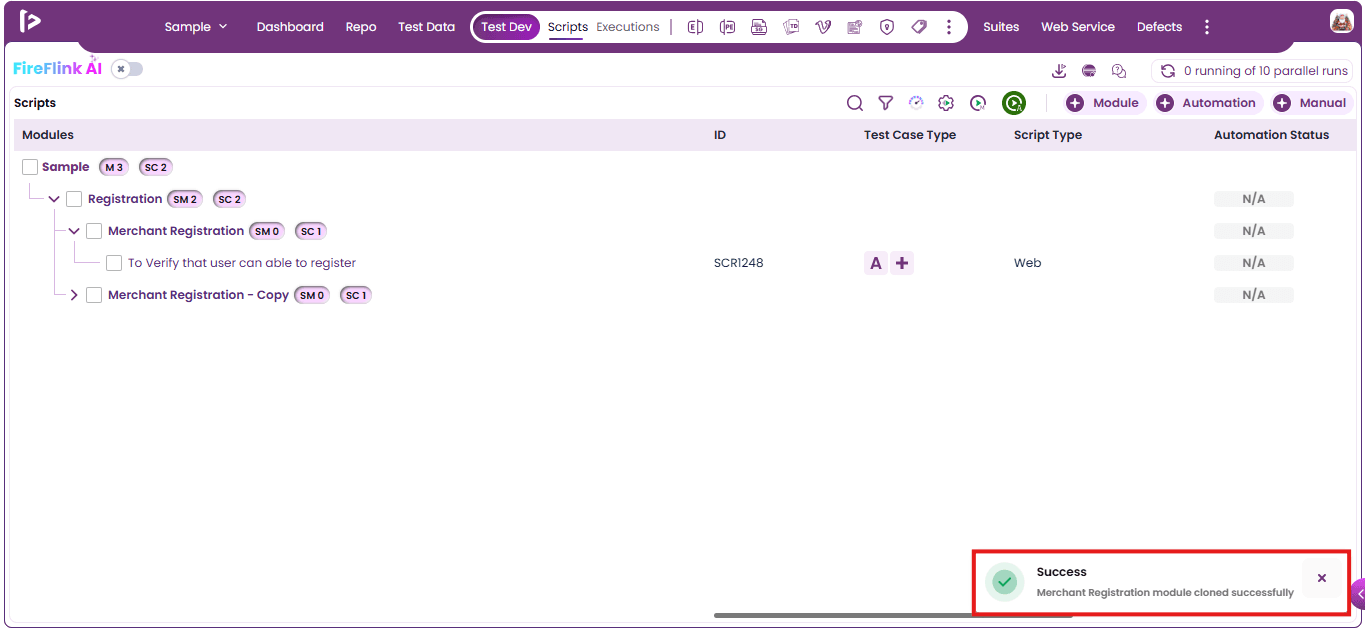
b. Move:
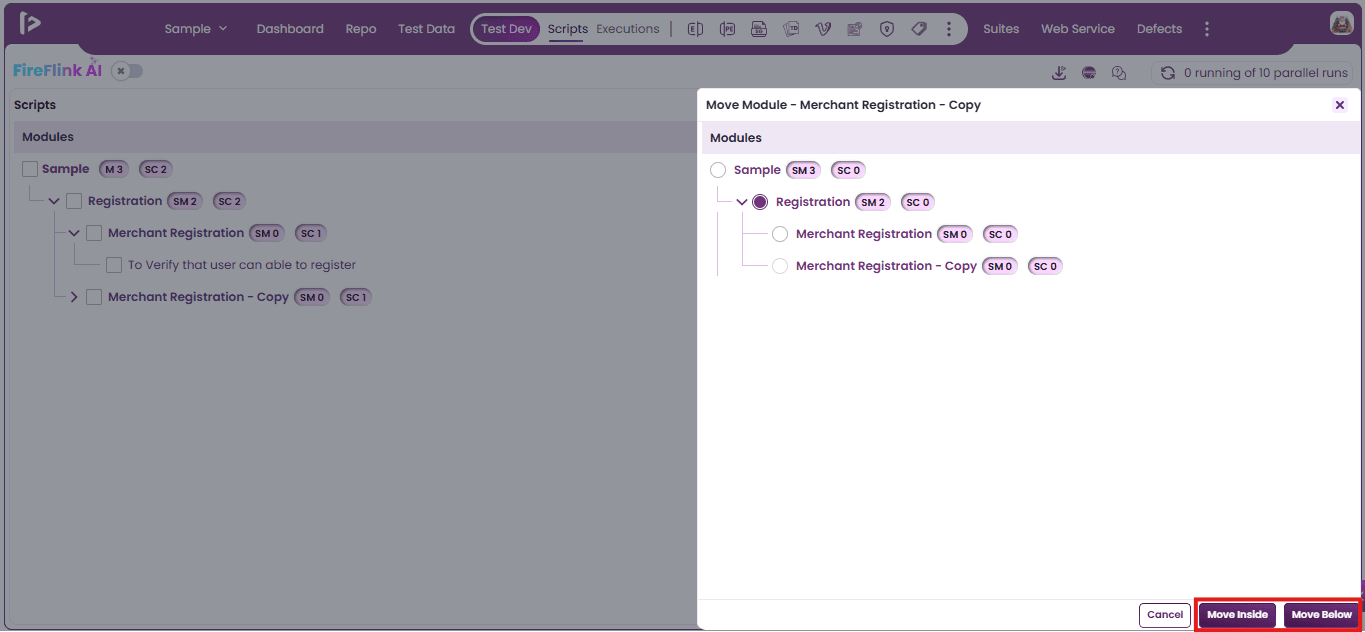
- This feature allows users to move modules and sub-modules using two available options, namely: i. Move Inside ii. Move Below
- User can able to move the modules and sub modules by following the steps given below: i. Click on Move options as shown below
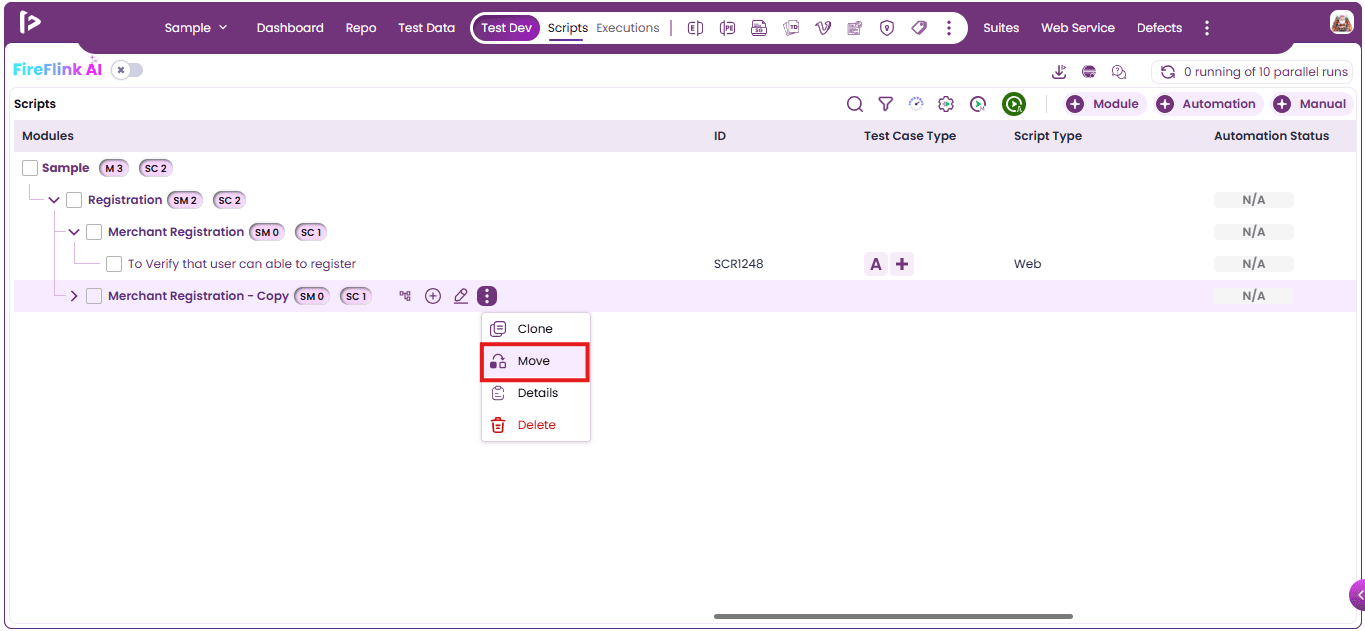
ii. Upon clicking on Move option, user can able to see a Move Module Slider as shown below
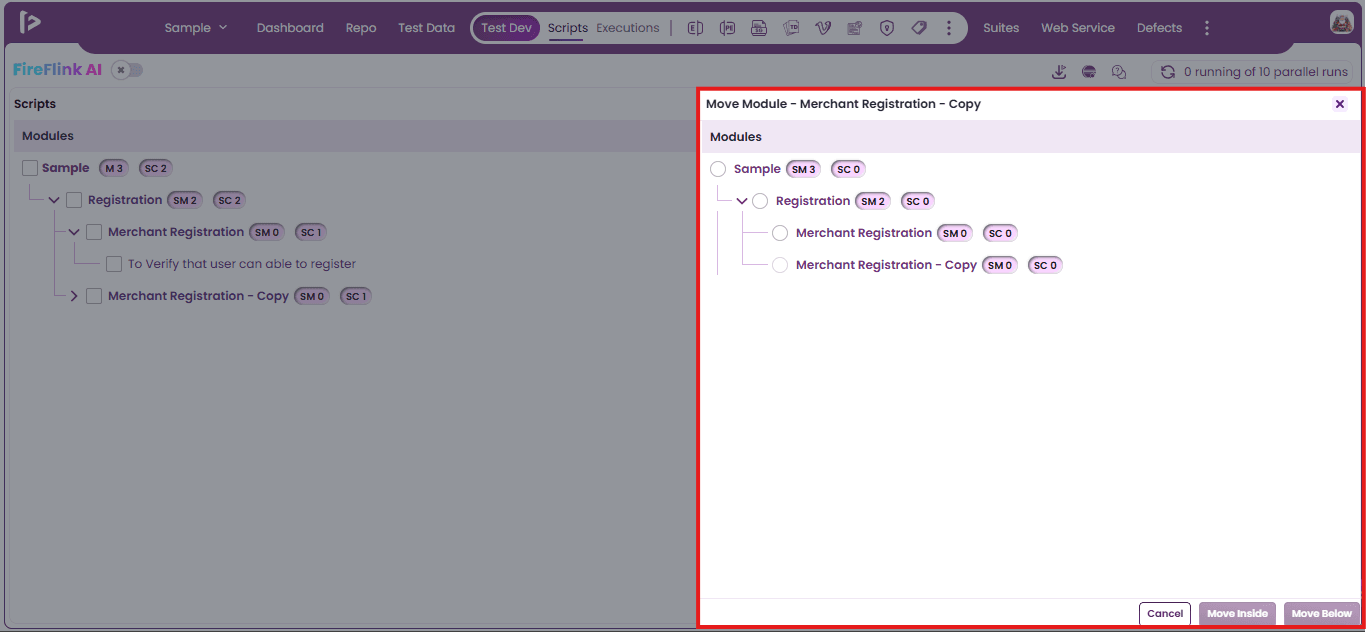
iii. Select the target module under which you want to move the current module. Based on the available options, click the appropriate button below — either Move Inside or Move Below.
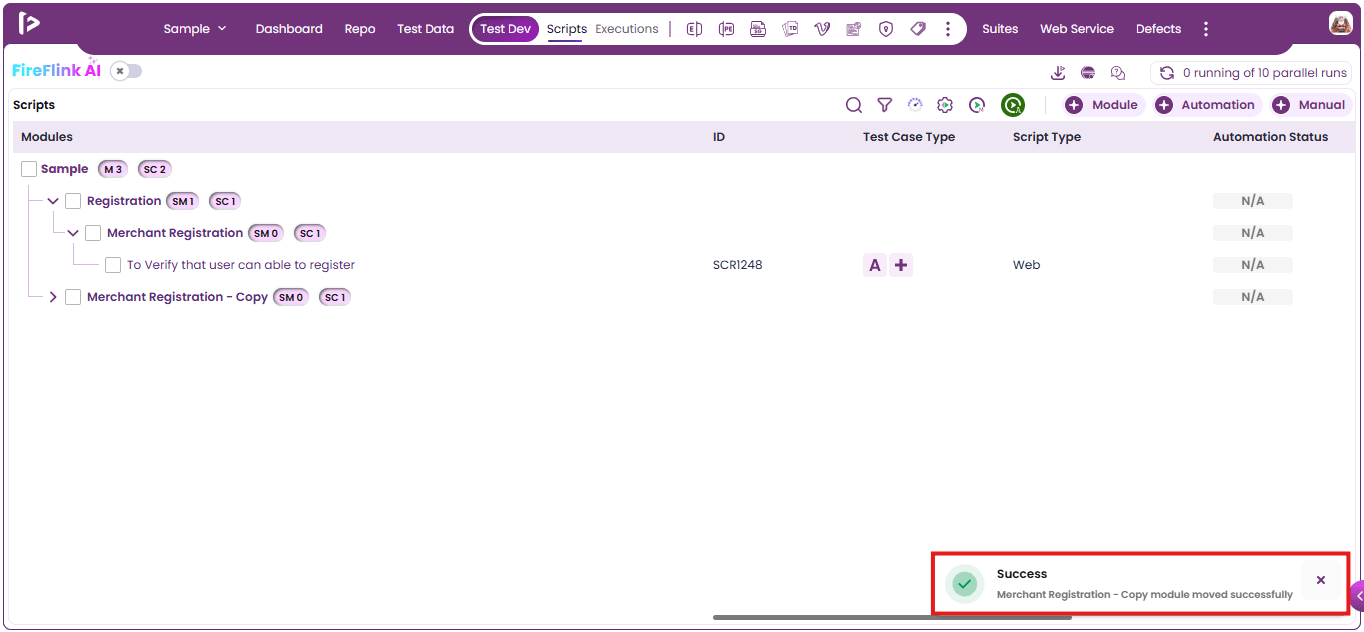
iv. Upon clicking on appropriate button, successful message will be appeared as shown below
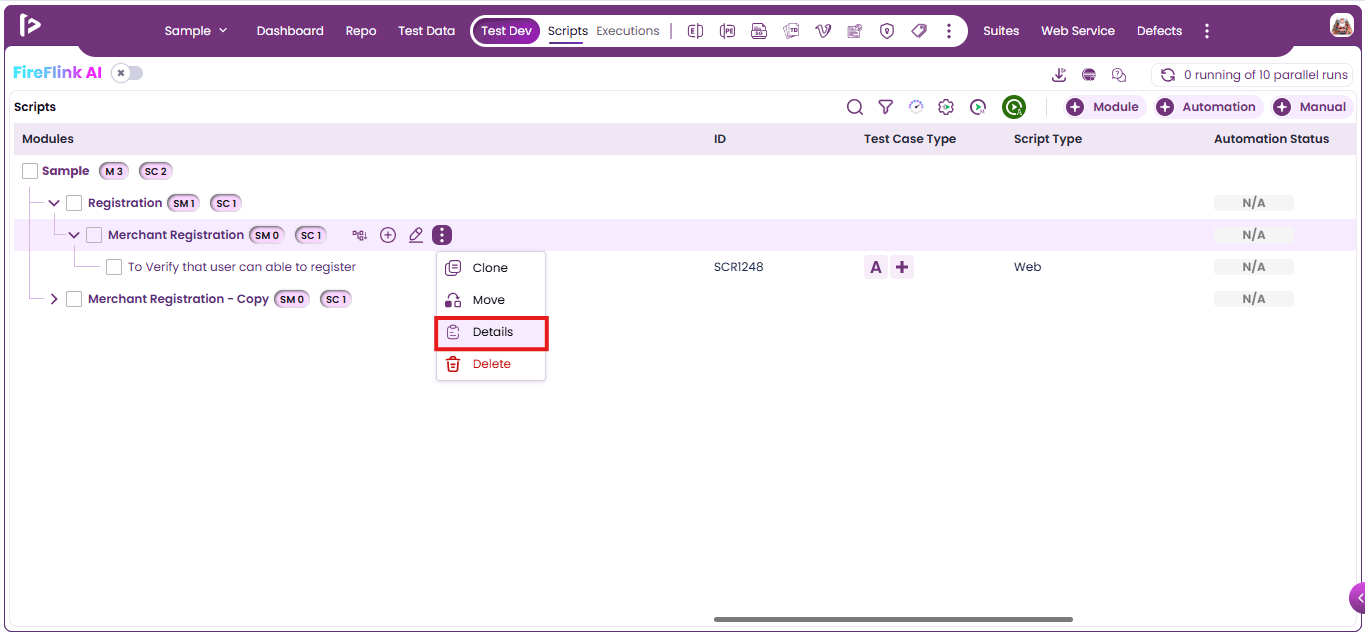
c. Details : To view the details for module or sub modules, users need to follow the steps given below: i. Click on the Details option as shown below
ii. Upon clicking on Details option, user can able to view the details for the module as shown below
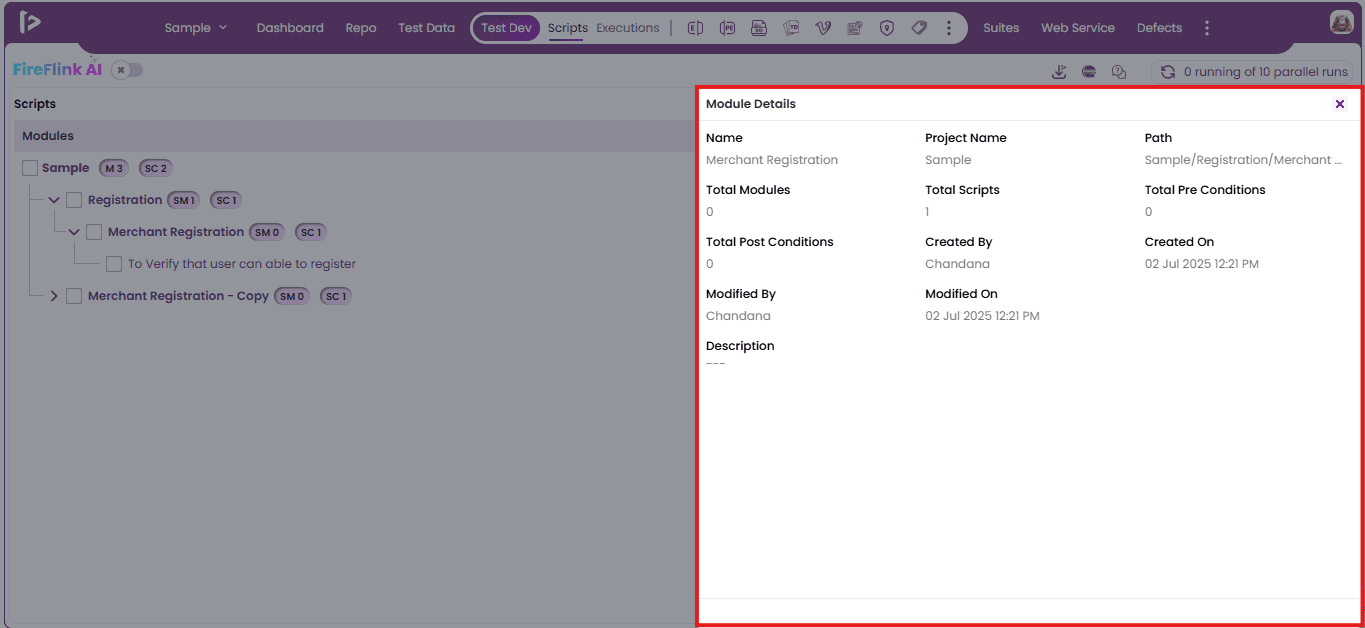
- Name: It displays the name of the current Module or Sub Module
- Project Name: It displays the project name under which module is present
- Path: This displays the hierarchical path from the Project Name to the selected sub-module.
- Total Modules: It displays the number of modules present inside the current module.
- Total Scripts: It displays the number of scripts present inside the current module.
- Total Pre Conditions: It displays the number of Pre Conditions present inside the current module.
- Total Post Conditions:It displays the number of Post Conditions present inside the current module.
- Created By: It displays the name of the user who created this module.
- Created On: It displays the date and time when this module was created.
- Modified By: It displays the name of the most recent user who modified this module.
- Modified On: It displays the date and time of the most recent modification of this module.
- Description:It displays the description provided by the user during the creation or modification of the module.
d. Delete: User can delete a Module or Sub Module by following the steps given below i. Click on the delete button as shown below
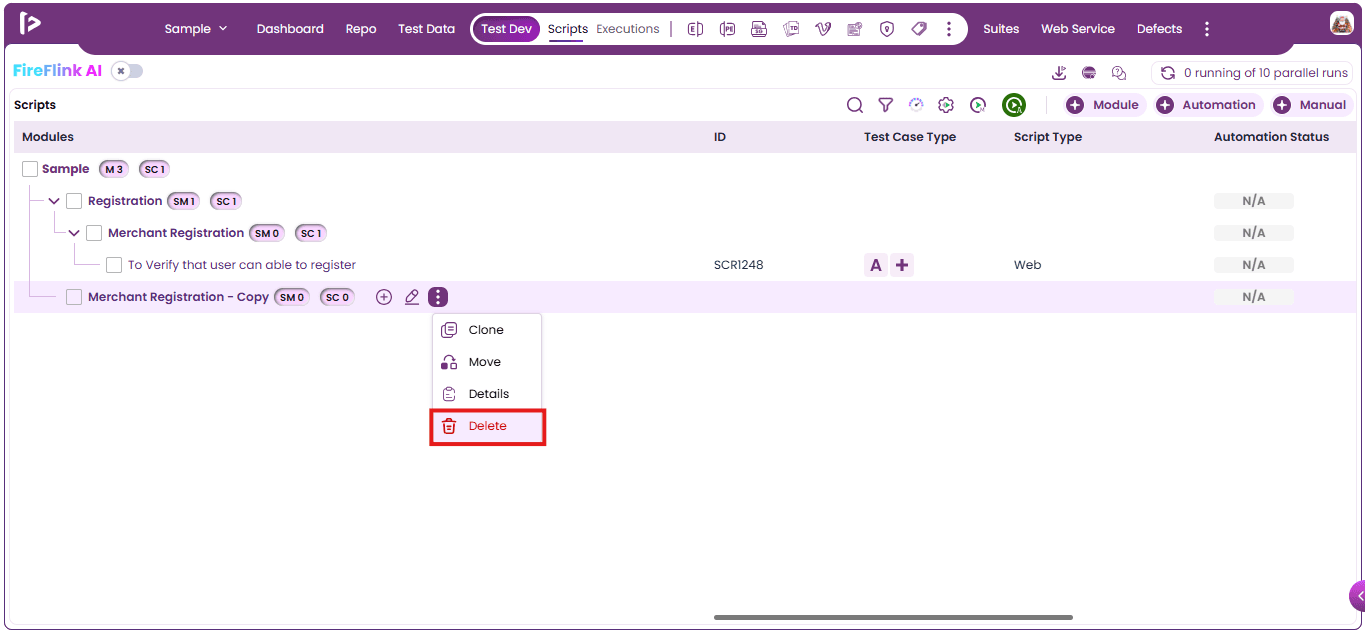
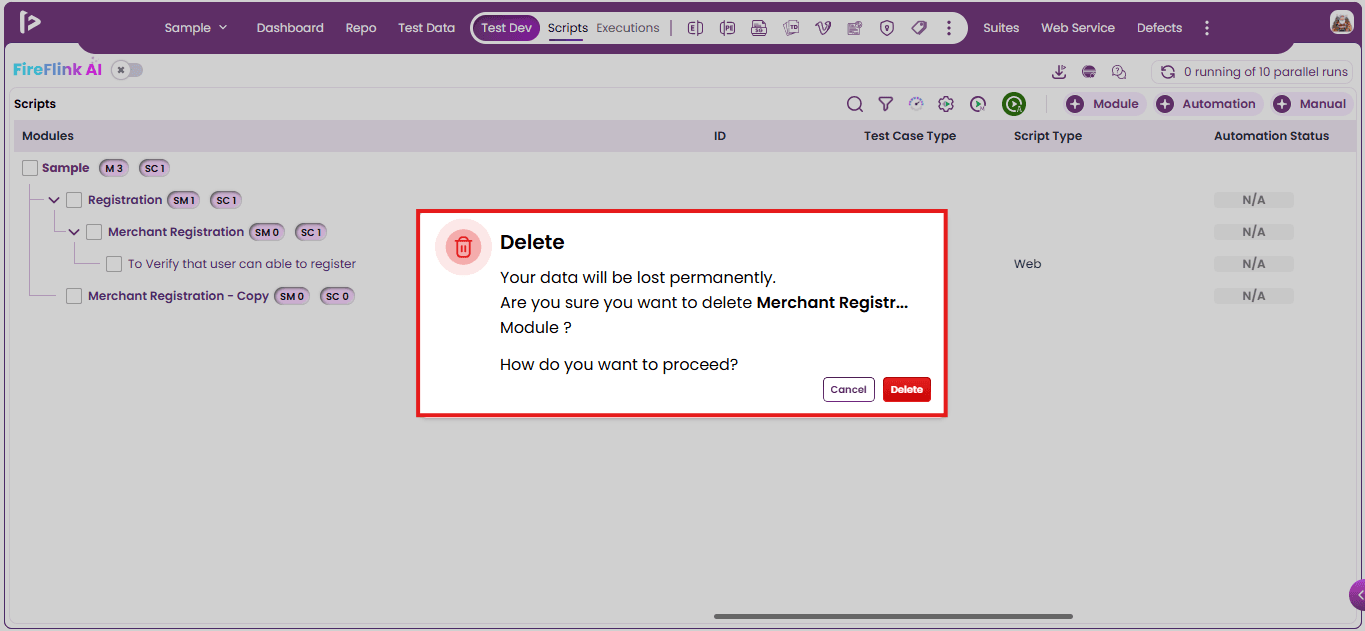
ii. Upon clicking on the delete button, Delete popup will be displayed as shown below.
Note: Modules that contain sub-modules or scripts cannot be deleted directly.
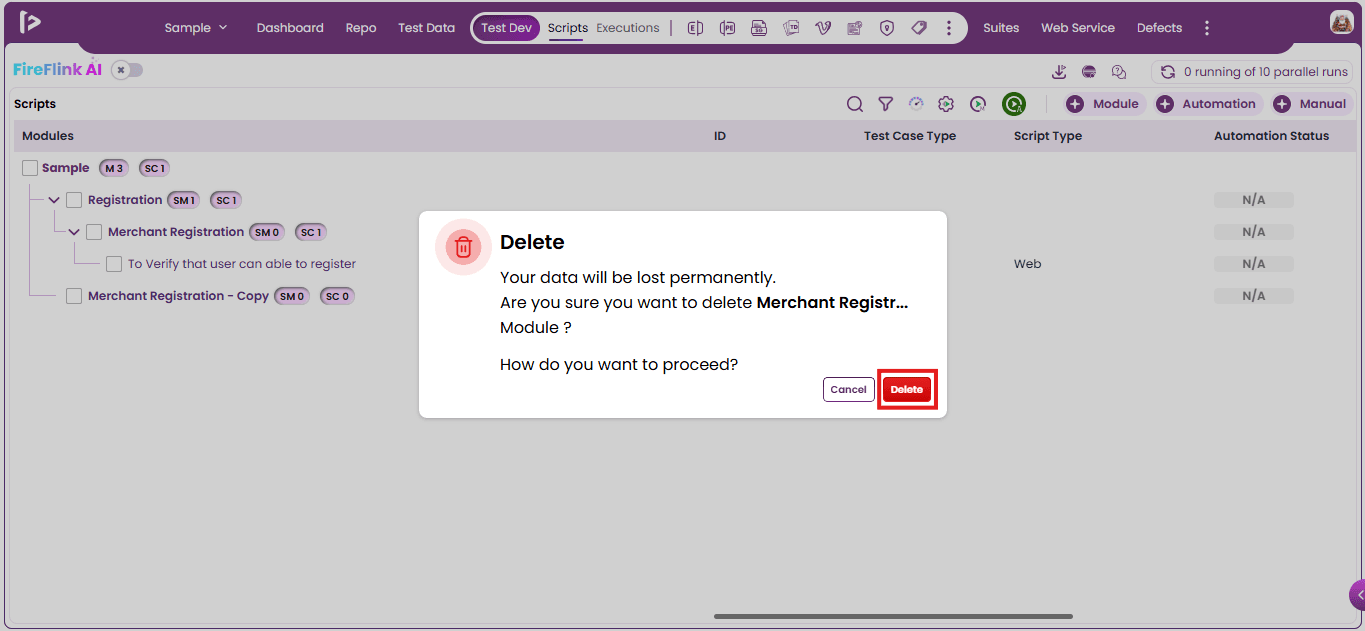
iii. Click on delete button
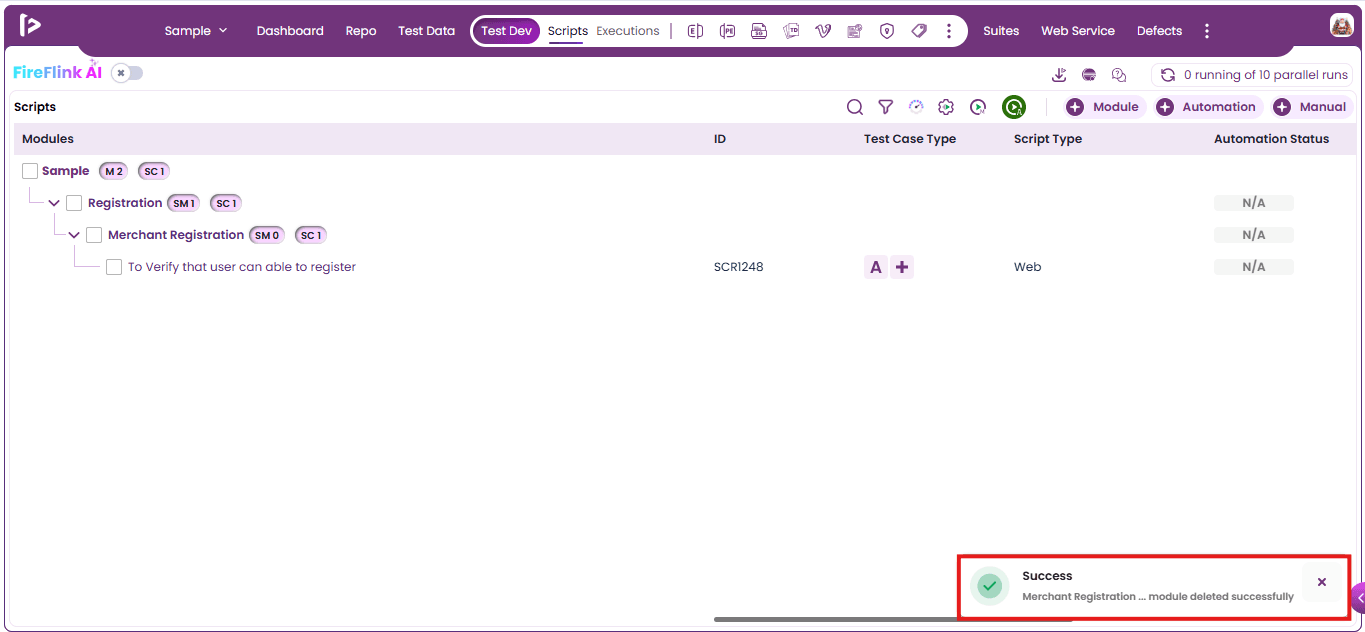
iv. Upon clicking on delete button, a successful message will appear as shown below
Quick Actions in Test Development
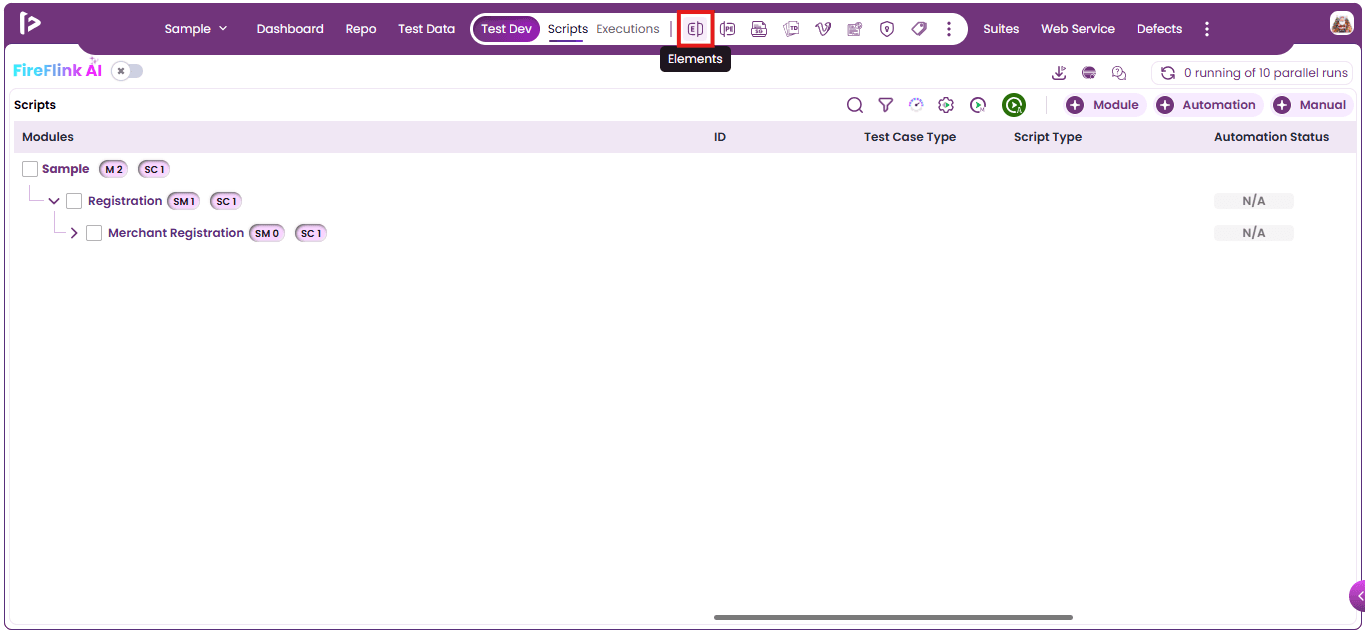
- Elements :
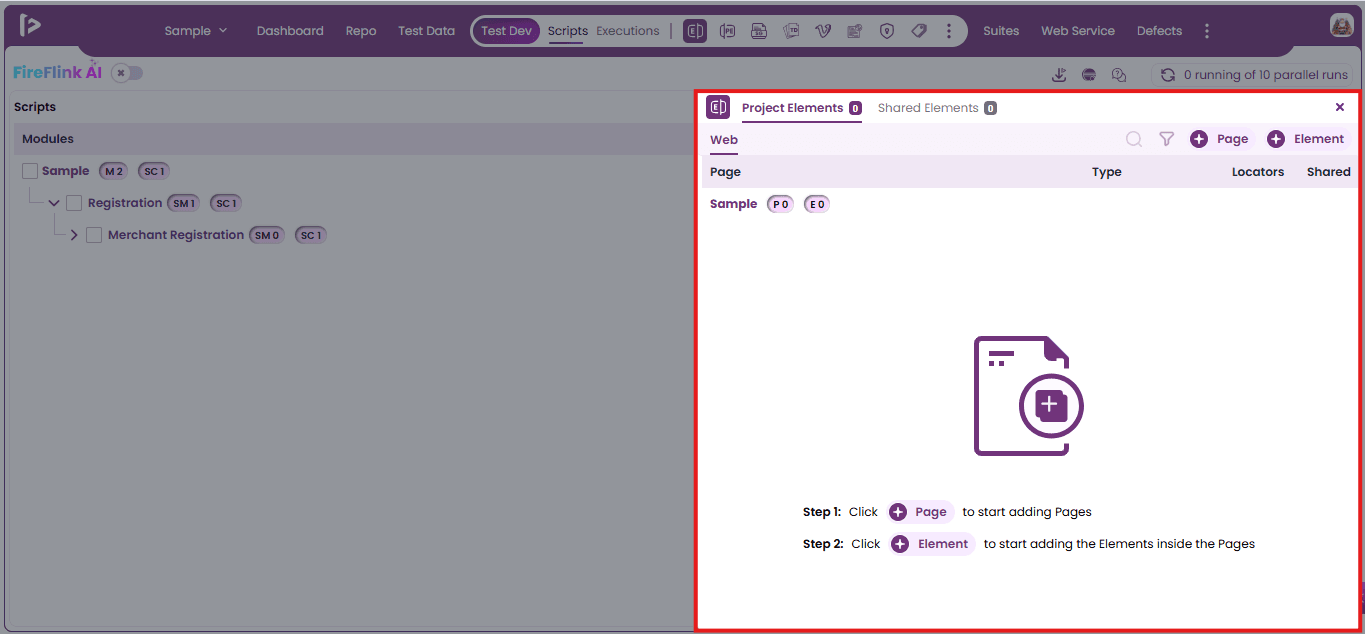
- This feature allows users to add, edit or remove elements from the Test development section without navigating to the repository. User can click on Elements feature as shown below
- Upon clicking user can able to view Project Elements slider as shown below
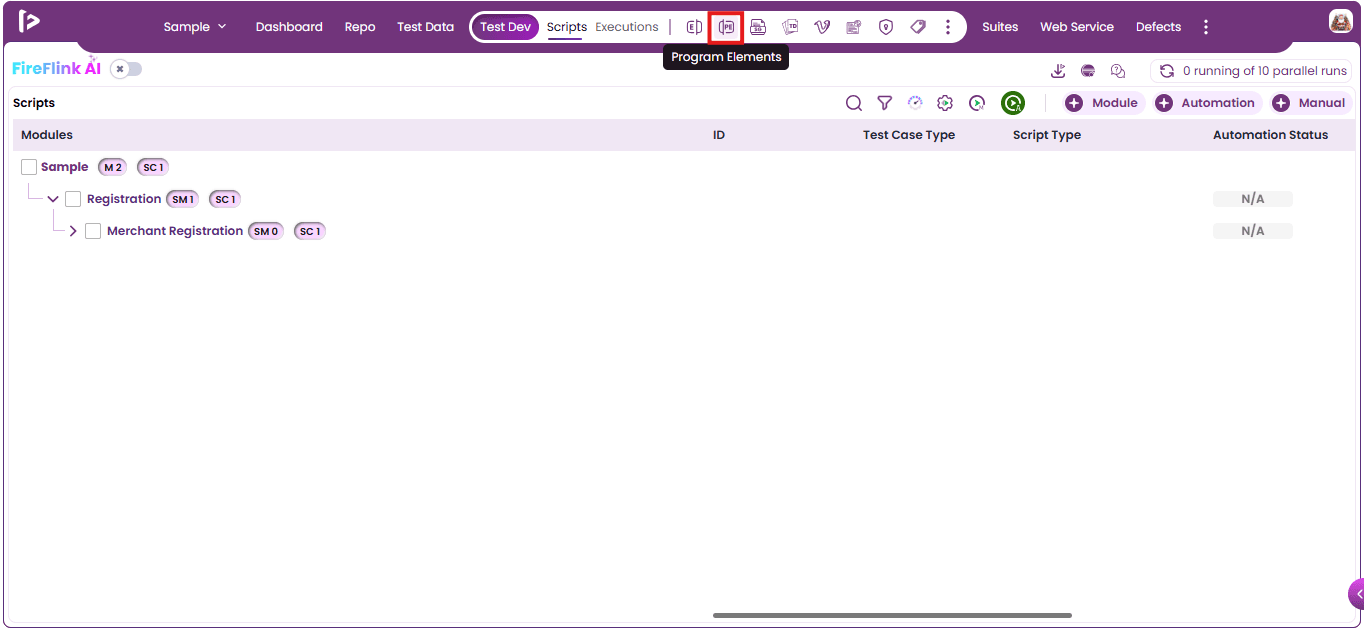
2.Program Elements:
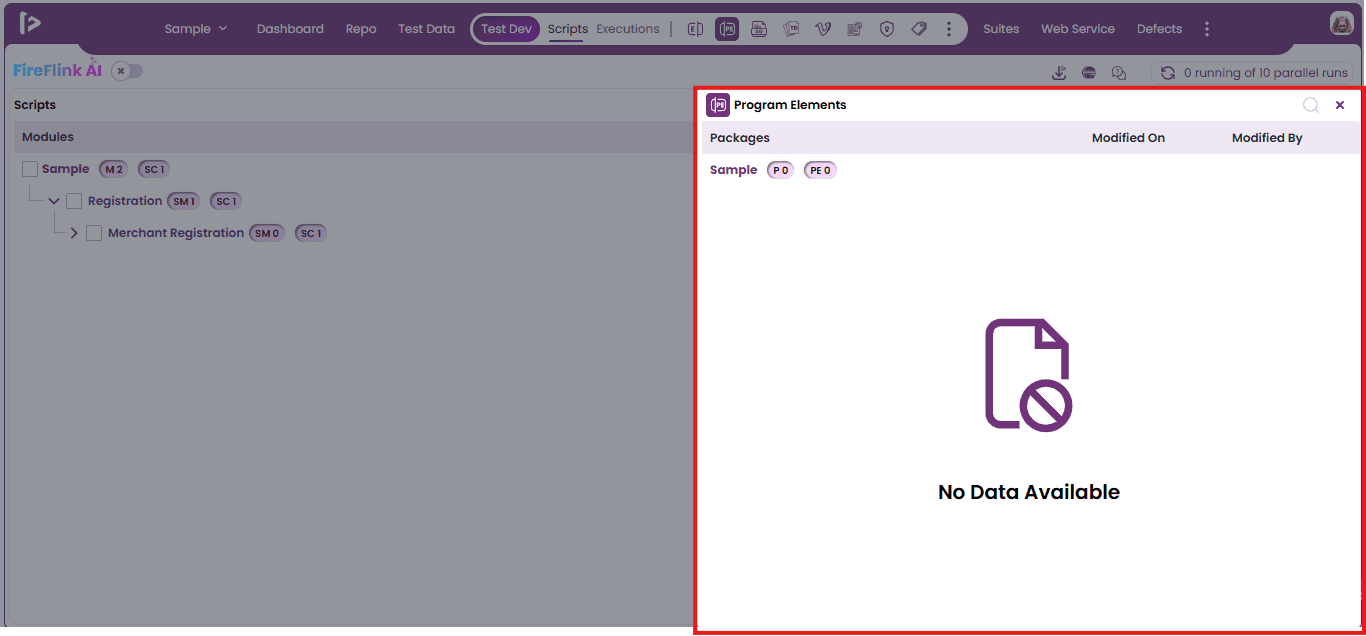
- This feature allows users to view the Program Elements from the Test Development section without navigating to the Repository. User can click on the Program Elements features as shown below
- Upon clicking user can able to view the Program Elements slider as shown below
3.Step Groups :
- This feature allows users to add , edit or remove Step Group from the Test Development section without navigating to the Repository. User can click on the Step groups features as shown below
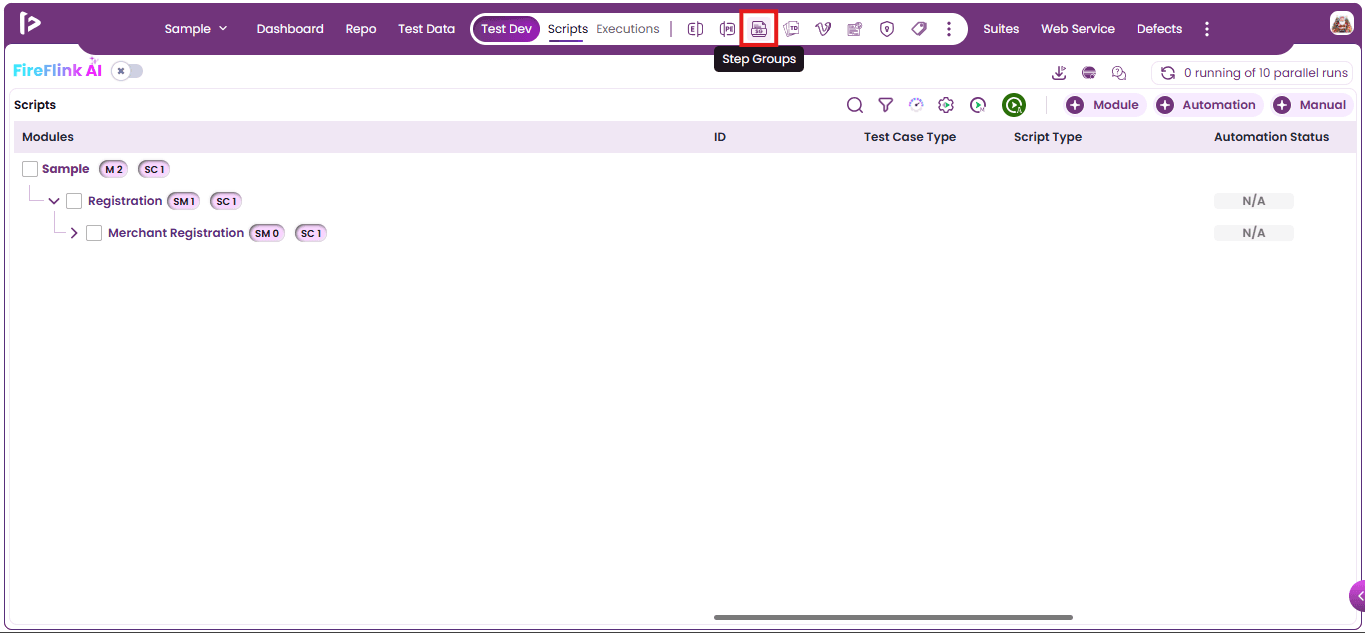
- Upon clicking user can able to view the Step Group Slider as shown below
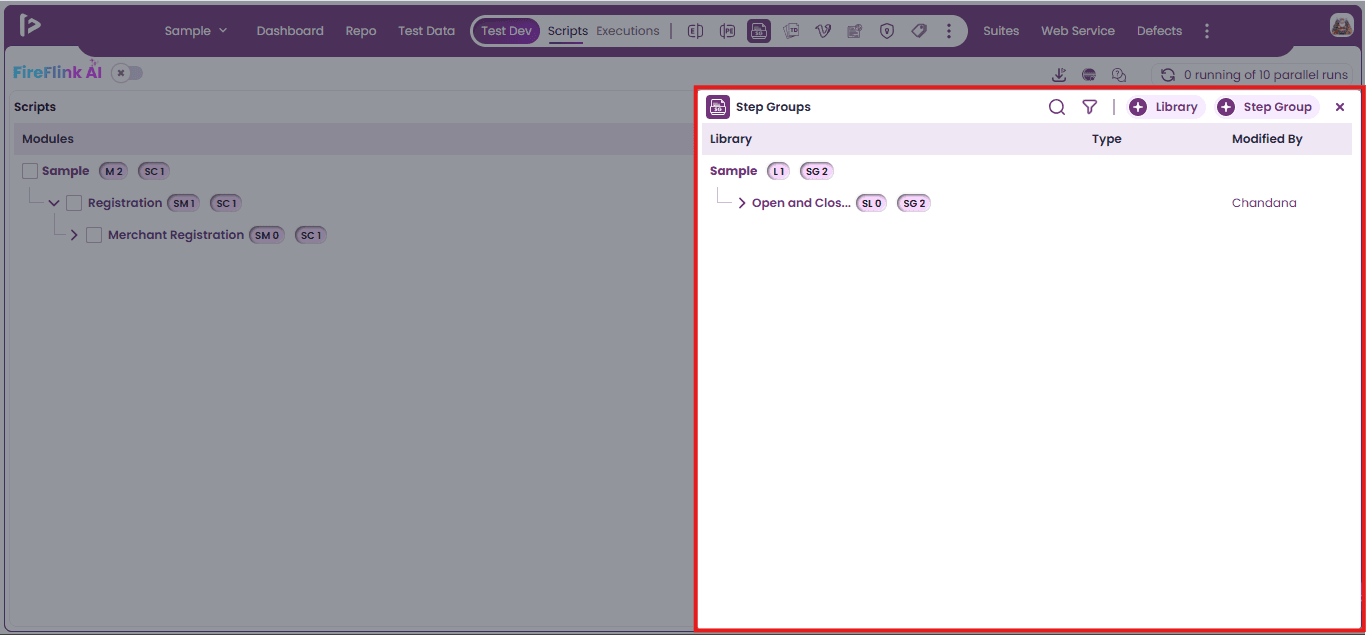
4.Test Data:
- This feature allows users to Upload , replace or remove Files from the Test Development section without navigating to the Test Data section. User can click on the Test Data feature as shown below
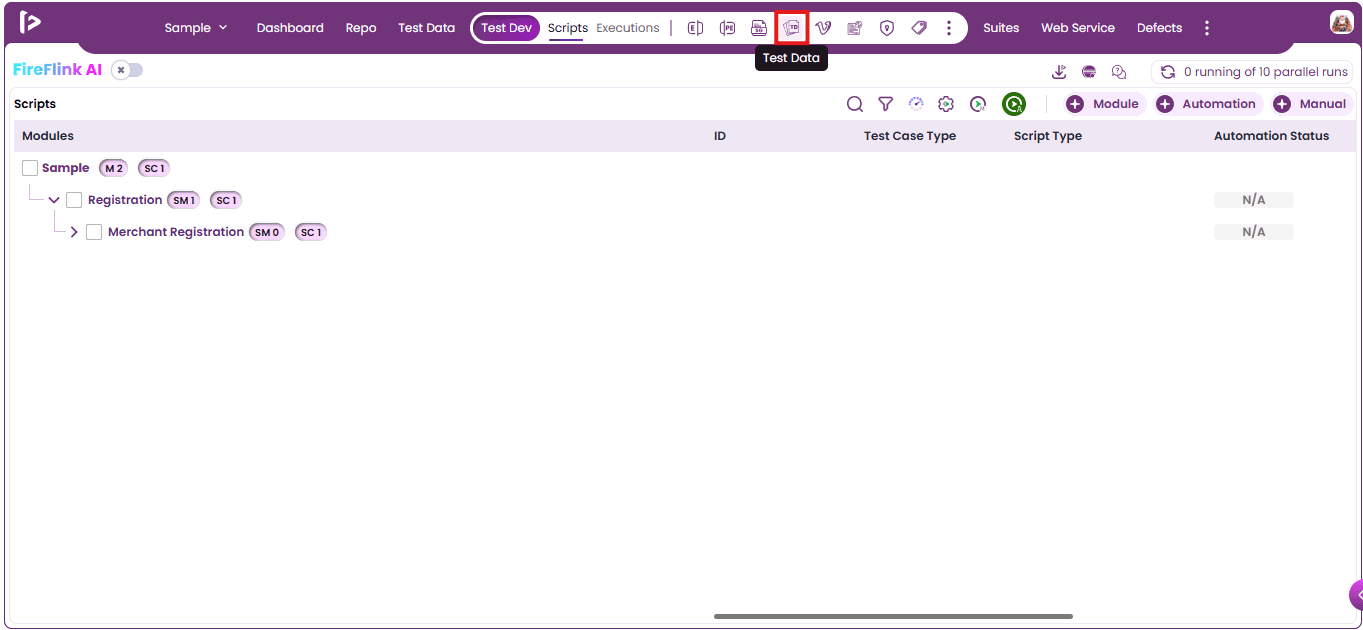
- Upon clicking user can able to view the Test Data Slider as shown below
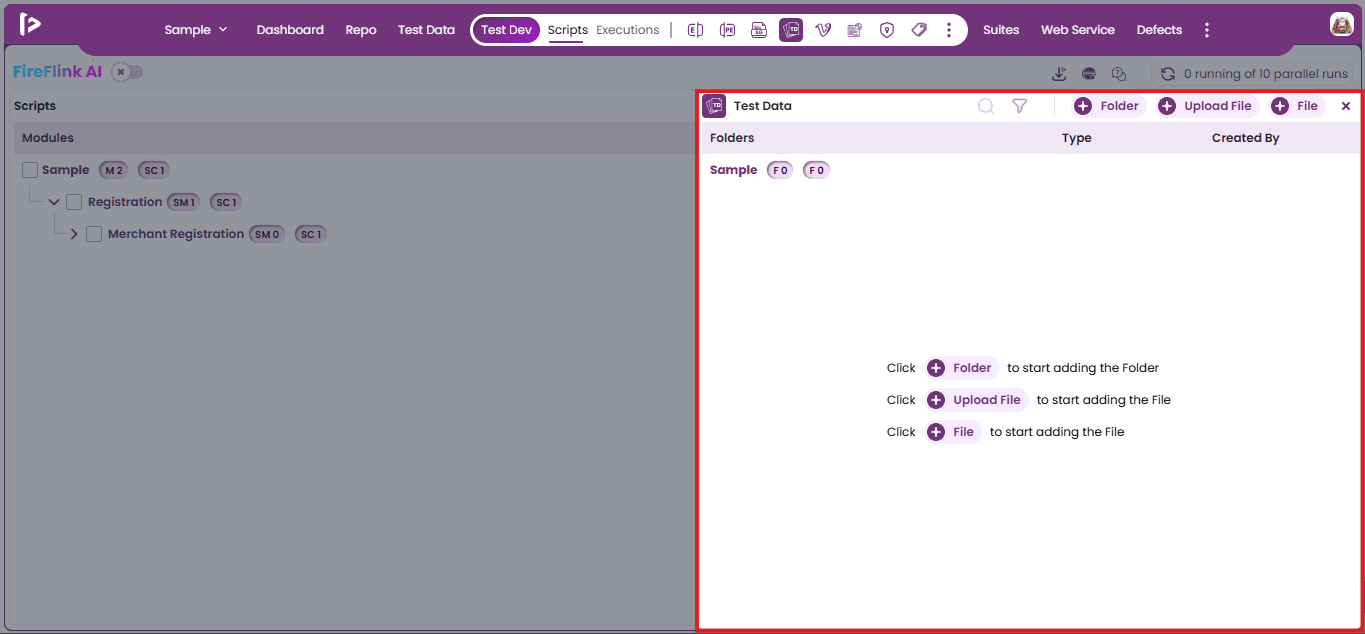
5.Variables
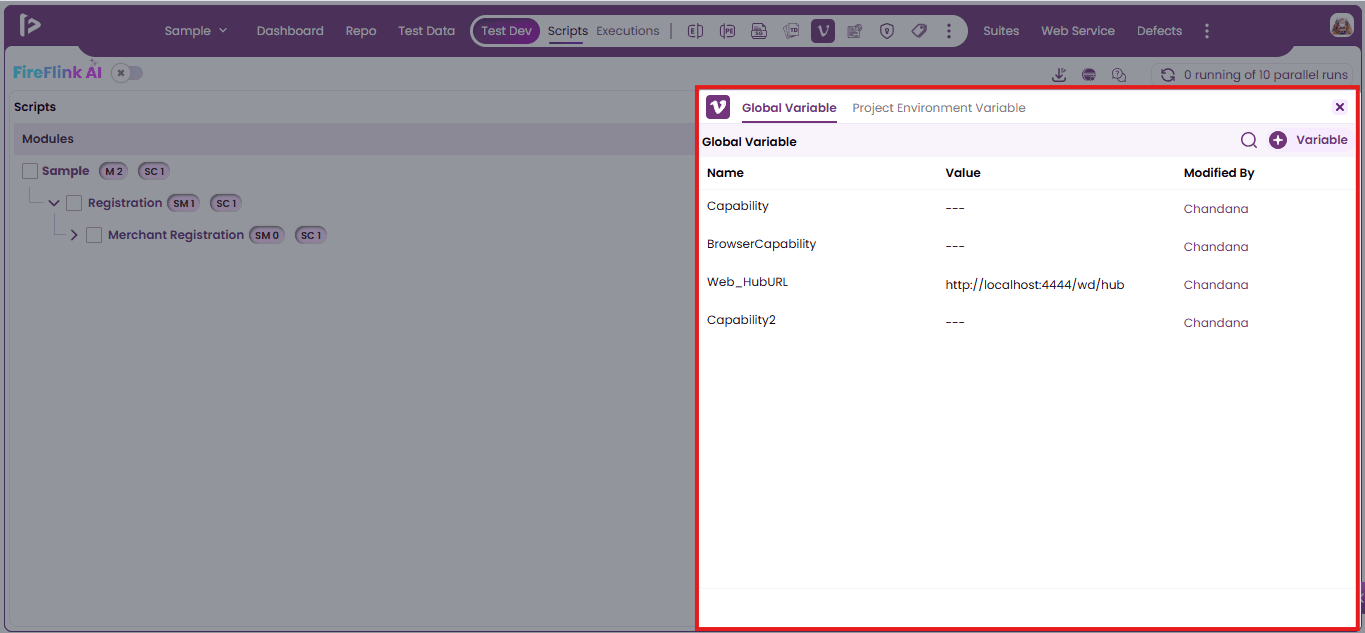
- This feature allows users to add, edit or remove Variables mainly Global variables and Project Environment variables from the Test Development section. User can click on the Variables feature as shown below
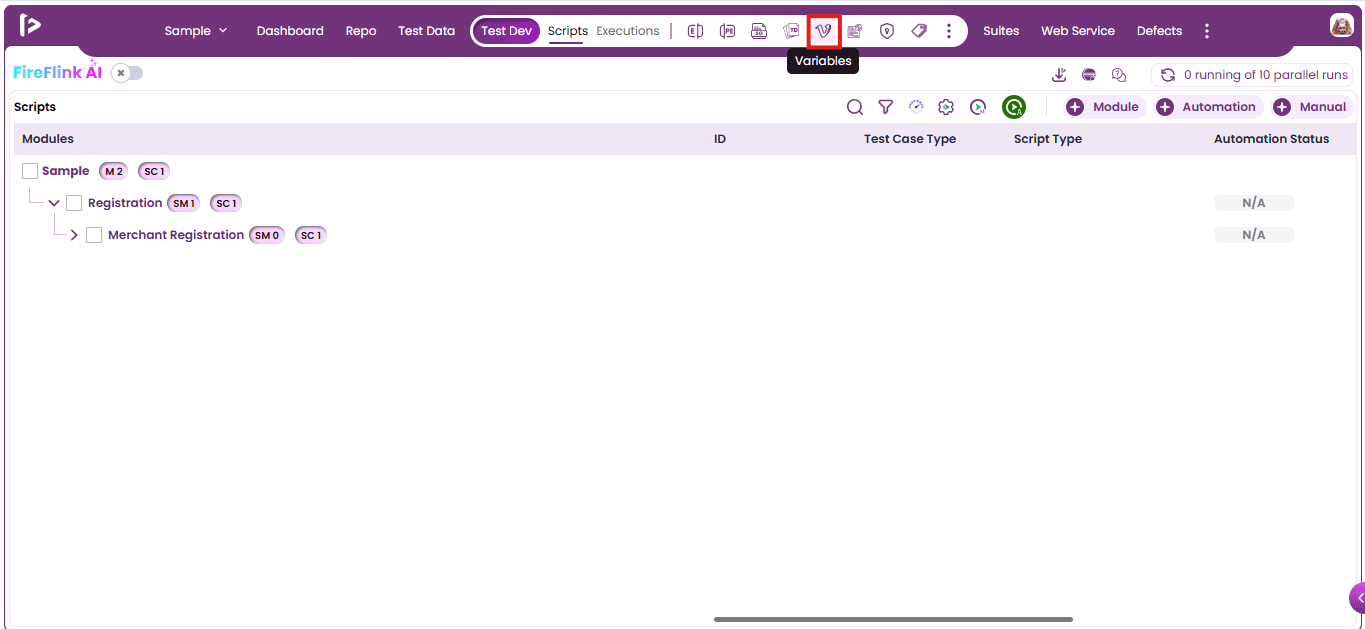
- Upon clicking user can able to view the Slider which consists of Global and Project Environment Variables tabs as shown below
6.Pre-Post Conditions:
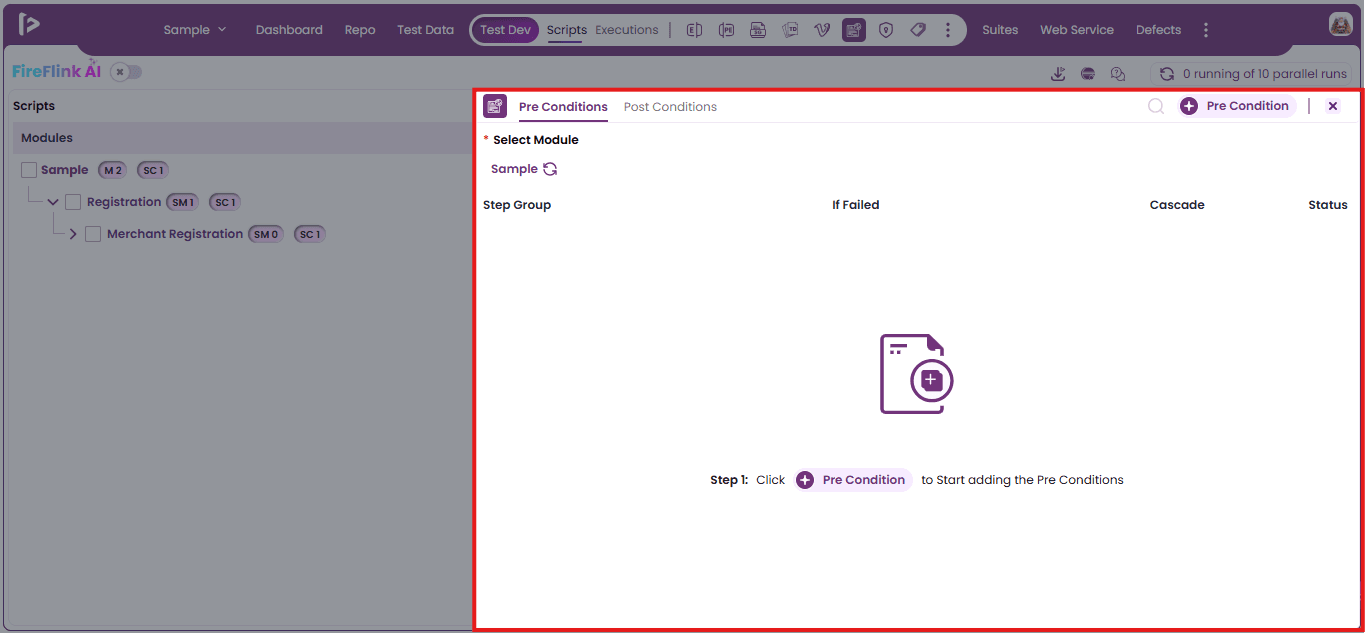
- This feature allows users to add, edit or remove Pre and Post conditions from the Test Development section. User can click on the Pre and Post feature as shown below
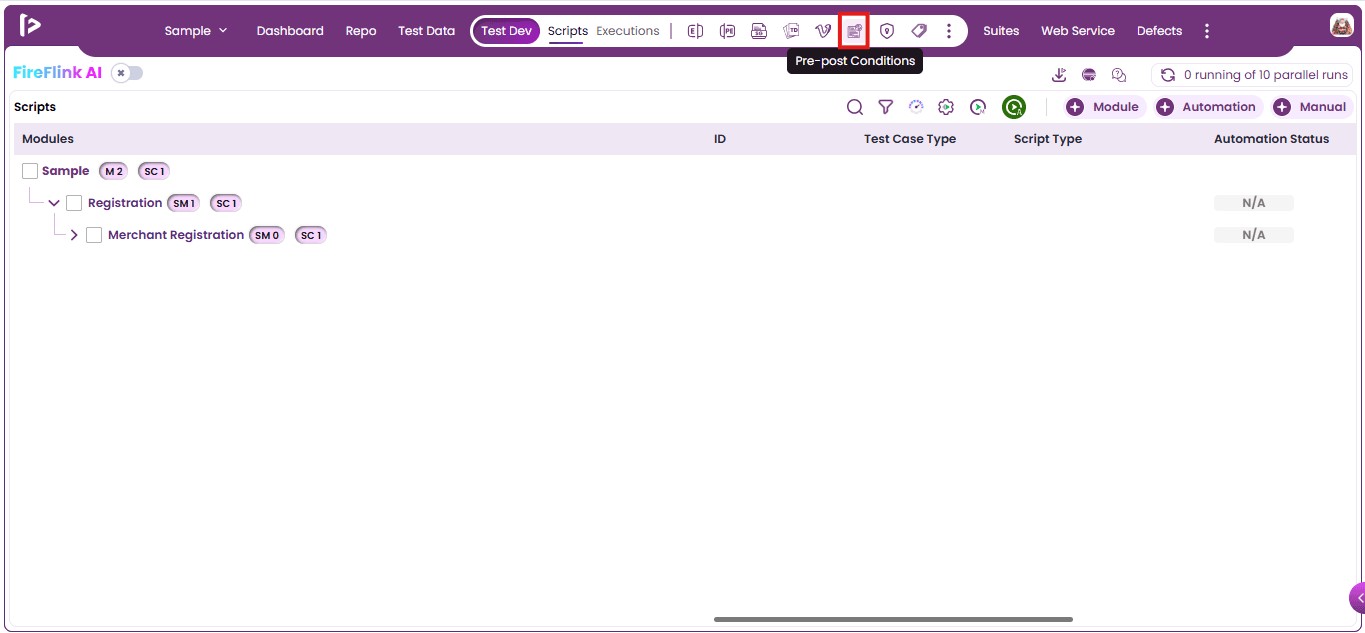
- Upon clicking user can able to view the Slider which consists of Pre conditions and Post Conditions Tabs as shown below
7.Authorization:
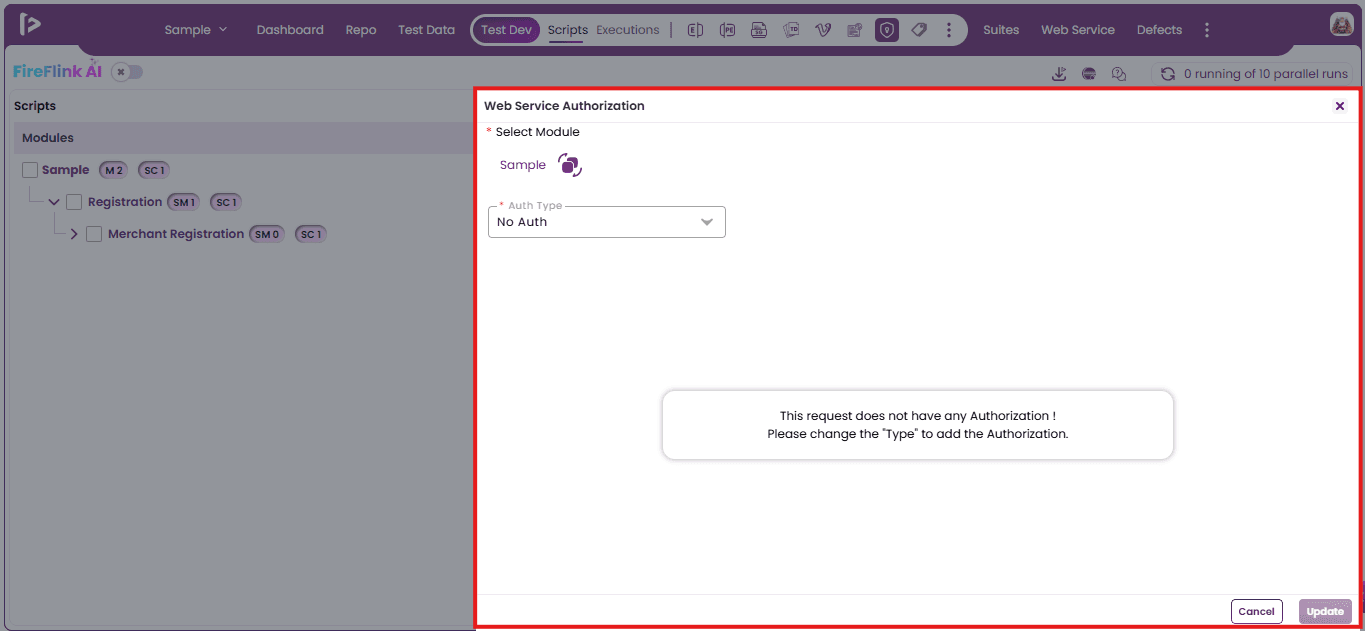
- This feature allows users to provide the Authorization for API steps from the Test Development section. User can click on the Authorization feature as shown below
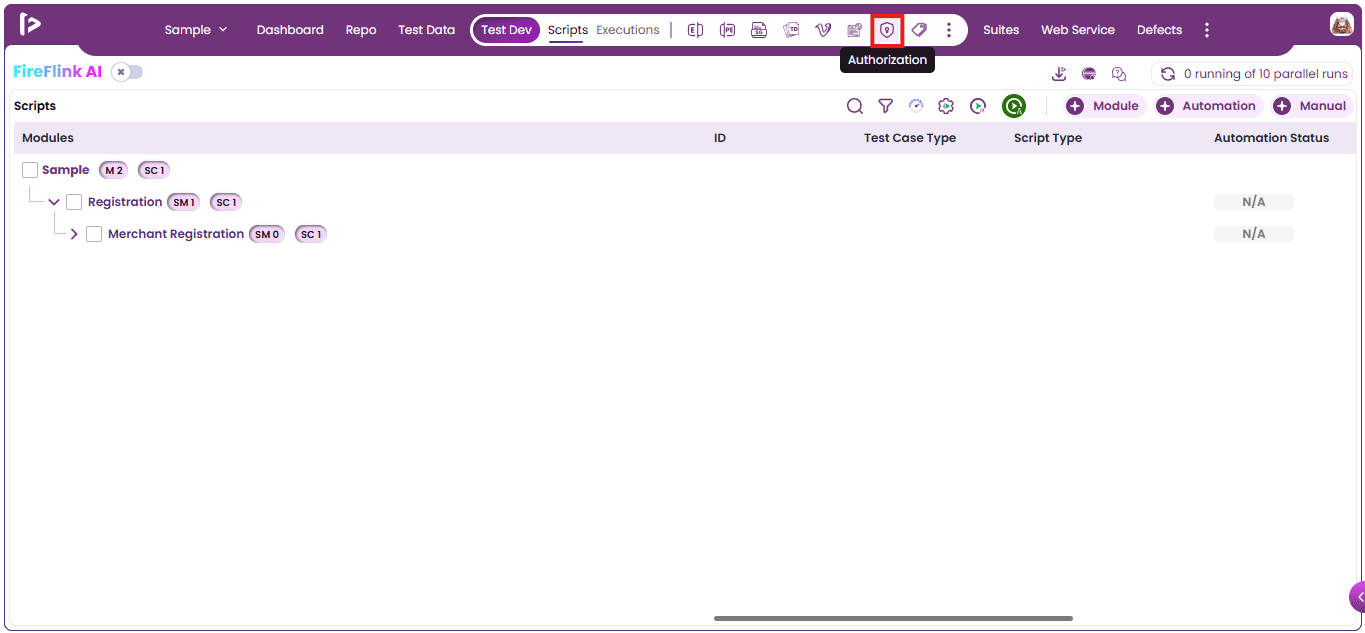
- Upon clicking user can able to view the Web Service Authorization Slider as shown below
8.Labels:
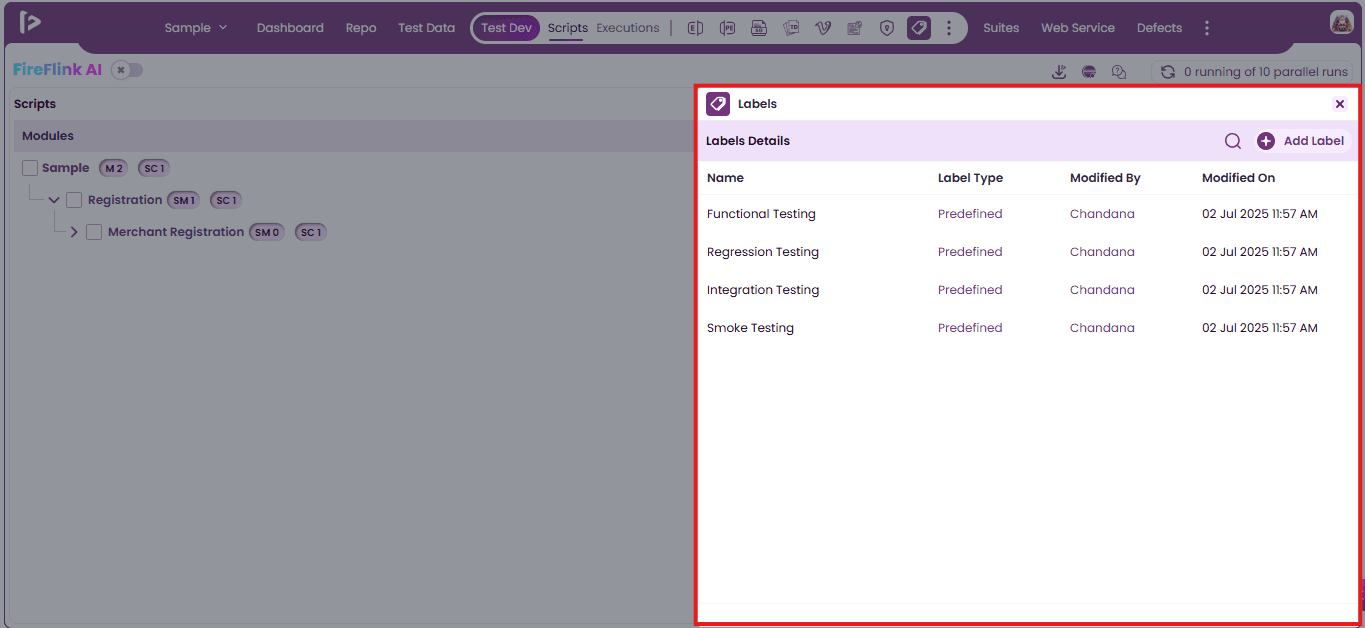
- This feature allows users to add Labels from the Test Development section. Users can click on the Labels feature as shown below
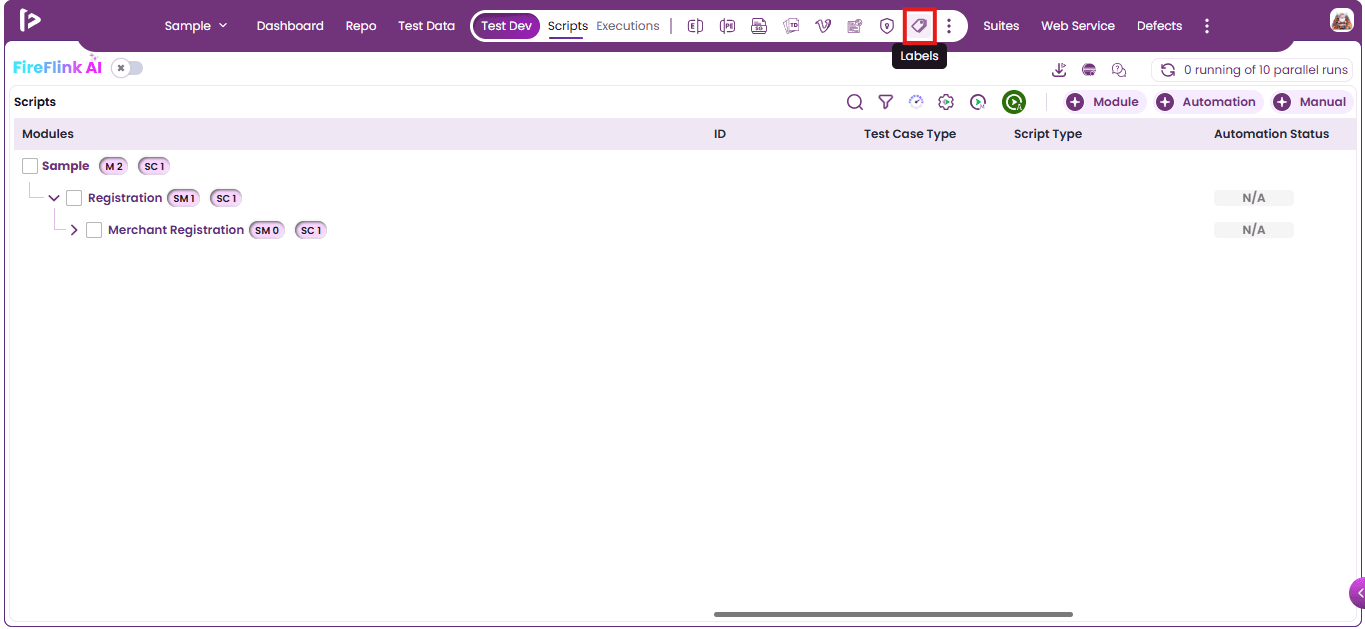
- Upon clicking user can able to view the Labels Slider as shown below
9.More Features
a. Import MTC:
- Manual test cases can be imported into FireFlink from external files using the Import MTC feature, as illustrated below.
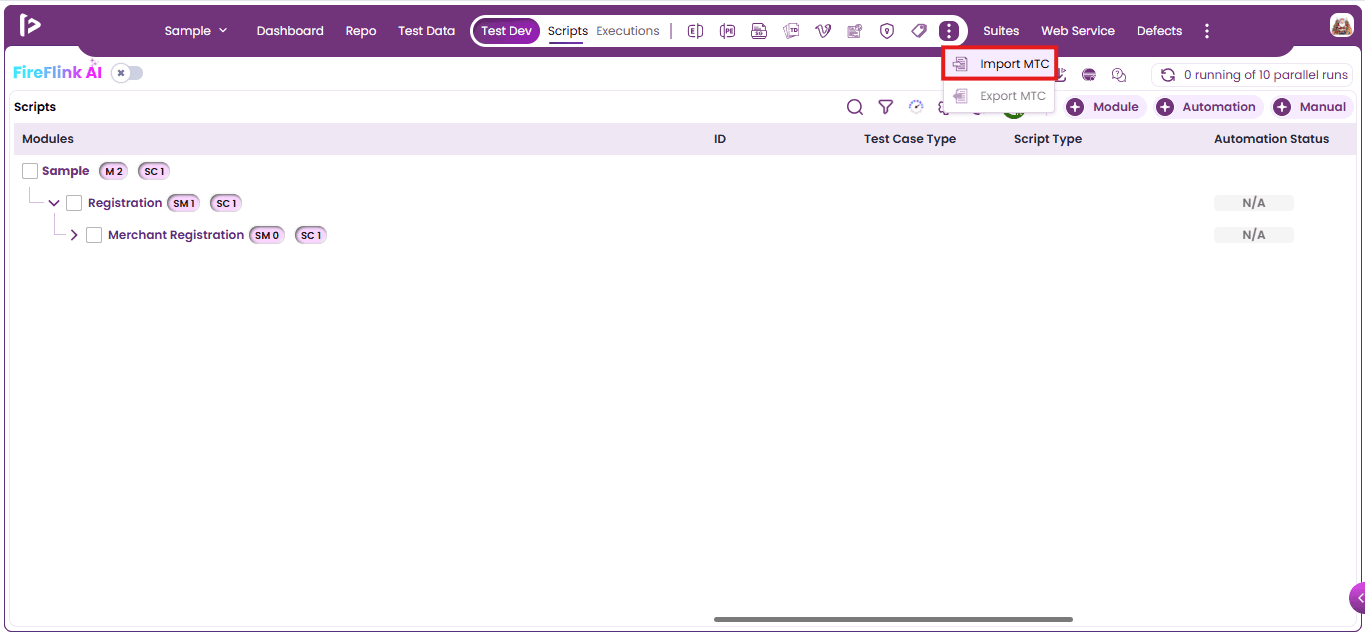
b.Export MTC:
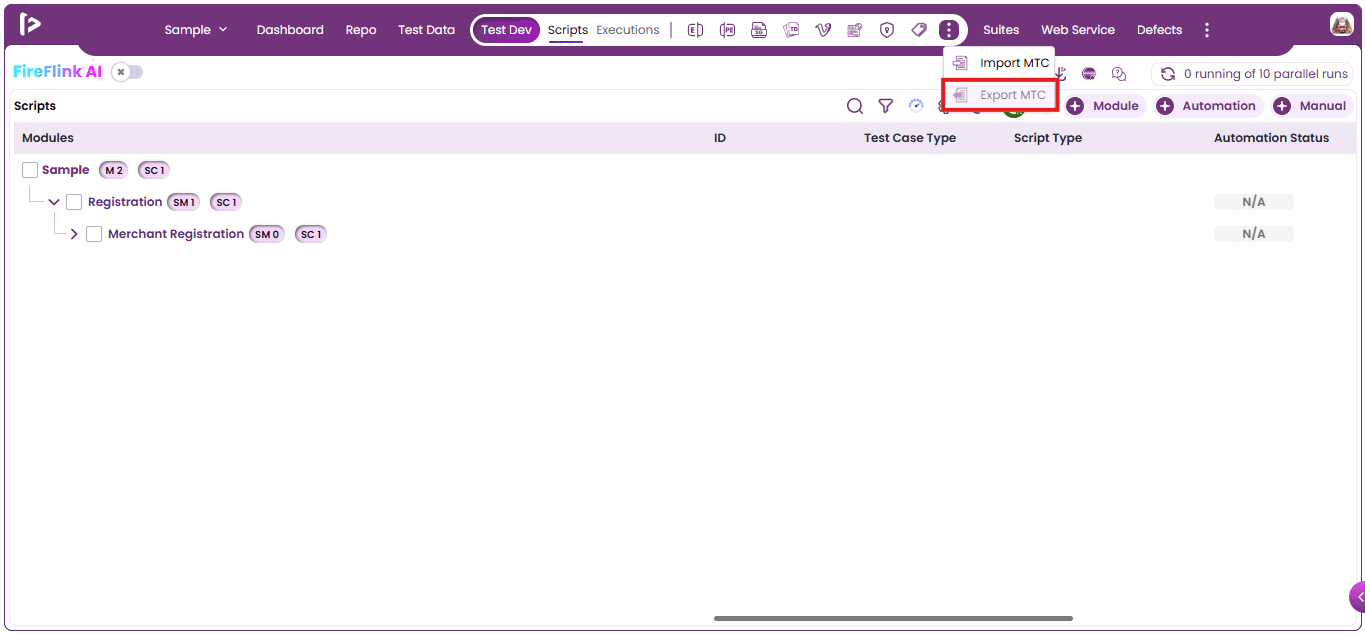
- Manual test cases can be exported from FireFlink using the Export MTC feature, as illustrated below..